
Topic
This article discusses how to configure the NinjaOne Agent for use over a proxy server.
Environment
NinjaOne Endpoint Management
Description
A proxy server forwards network traffic between a device and the internet. Organizations often use a proxy to control, filter, or monitor traffic. When the NinjaOne agent is deployed in a proxy-controlled environment, it requires accurate proxy settings to connect to the NinjaOne platform. Incorrect or missing proxy settings prevent the agent from communicating with NinjaOne services.
You need to configure proxy settings in these cases:
- The NinjaOne agent does not have proxy settings configured.
- The NinjaOne agent already has incorrect proxy settings configured.
Refer to NinjaOne Agent: Supported Functionality Over a Proxy Server for information about functionality supported over a proxy.
Index
Select a topic to continue:
- Proxy Auto-Detection for Microsoft Windows
- NinjaOne agent does not have proxy settings configured
- NinjaOne agent already has proxy settings configured
- Set up a Proxy for NinjaOne Remote
- Bypassing Proxy Settings
Proxy Auto-Detection for Microsoft Windows
Proxy Auto-Detection for Microsoft Windows provides the following capabilities:
- Simplified agent deployment eliminates manual configuration and custom scripting in complex networks. This automation reduces onboarding time for IT fleets and allows Managed Service Providers (MSPs) to manage unique environments at scale.
- When an agent is running on a Windows OS that supports a native proxy configuration, the agent will detect and use the native settings for connectivity, so you no longer need to manually configure the agent.
- When the agent is not able to connect through the automatically detected proxy settings, the agent will directly connect to the NinjaOne server, so agents can remain connected to the dashboard.
To activate this feature, add a new DWORD value to the Windows registry. To deactivate this feature, delete the value or set it to 0:
[HKEY_LOCAL_MACHINESOFTWAREWOW6432NodeNinjaRMM LLCNinjaRMMAgentServer] ProxyAutoDiscovery = 1
If the NinjaOne Agent Does Not Have Proxy Settings Configured
In this scenario, you have created an organization for a new client and need to add proxy settings to the NinjaOne agents so that they point to the proxy server.
Solution for Windows OS Only
Add the following registry keys to each device.
32-bit device:
[HKEY_LOCAL_MACHINESOFTWARENinjaRMM LLCNinjaRMMAgentServer]64-bit device:
[HKEY_LOCAL_MACHINESOFTWAREWow6432NodeNinjaRMM LLCNinjaRMMAgentServer]The following example shows the registry values for a 32-bit or 64-bit device:
- "ProxyHost" = "192.168.32.144" (ProxyHost should be String Value)
- "ProxyPort" = dword:00000c38 (ProxyPort should be a DWORD (32-bit))
The following authentication values are optional:
- "ProxyAuthName" = "SomeUserName"
- "ProxyAuthPassword" = "aPassword"
Solution for All OS
Proxy prompts will ask for the type, host, and port. Username and password are optional.
- Run the following command from the NinjaOne agent folder:
Windows:
.NinjaRMMAgent.exe /setproxy -host [IP] -port [PORT] -user [USER] -password [PASSWORD]Example:
.NinjaRMMAgent.exe /setproxy -host 127.0.0.1 -port 80 -user root -password helloworldLinux:
./ninjarmm-linagent -set-proxyApple macOS:
./ninjarmm-macagent -set-proxy- Restart the NinjaOne service to apply the new proxy settings. Follow Custom Script: Restart NinjaRMMAgent to restart the agent from a custom script.
If the NinjaOne Agent Already Has Proxy Settings Configured
In this scenario, you need to remove or change the proxy settings configured in the NinjaOne agent.
Solution for Windows OS Only
- Follow the Windows OS Only steps under the If the NinjaOne Agent Does Not Have Proxy Settings Configured section of this article to modify the registry keys for each device.
- Restart the NinjaOne service to apply the new proxy settings. Follow the steps in Custom Script: Restart NinjaRMMAgent to restart the agent from a custom script.
NinjaOne automatically hides the proxy password after the first successful login.
Solution for All OS
- Run the following command from the NinjaOne agent folder:
Windows:
.NinjaRMMAgent.exe /removeproxyLinux:
./ninjarmm-linagent -remove-proxymacOS:
./ninjarmm-macagent -remove-proxy- Follow the Solution for All OS steps under the If the NinjaOne Agent Does Not Have Proxy Settings Configured section of this article to set the proxy via the command line.
Set up a Proxy for NinjaOne Remote
Establishing a proxy for a player or streamer requires additional steps.
NinjaOne Remote proxy support includes the following:
- NinjaOne Remote supports the use of HTTP, HTTPS, and SOCKS5 proxies with network support. NinjaOne Remote also supports the HTTP proxy, but we strongly recommend using HTTPS instead.
- NinjaOne Remote uses proxy configuration settings stored in a Windows system environment variable.
NC_PROXY Setup Procedure for Windows 11
- In Windows 11, type Edit environment variables for your account into the Windows search bar.
- The Environment Variables window will open. Click New in the System variables section.
- Enter "NC_PROXY" as the variable name and enter the variable value, as shown in the following table.
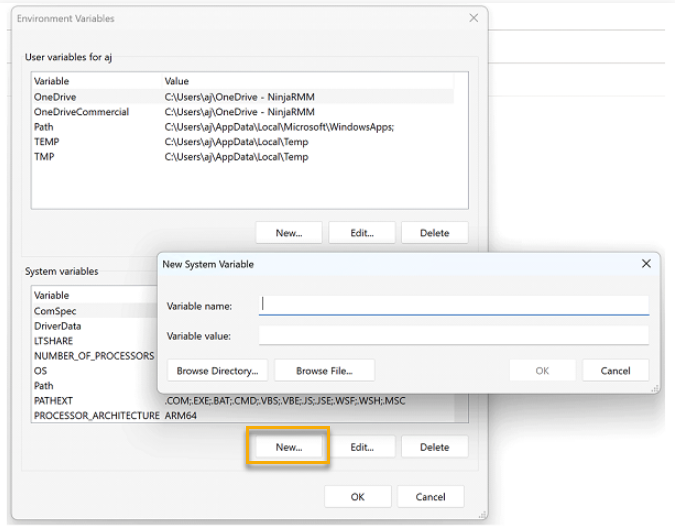
You must define the system environment variable NC_PROXY format as follows:
| Parameter | Description |
|---|---|
NC_PROXY | 192.168.1.1:1080:username:password |
192.168.1.1 | IP address of SOCKS5 proxy |
http(s)://192.168.1.1 | IP address of HTTP or HTTPS proxy.
|
1080 | Proxy port (8080 common default for HTTPS proxy) |
user | Username for the proxy (leave blank if no user) |
password | Password for the username (leave blank if no password) |
Even without a username or password, include the trailing colons. (for example, 192.168.1.1:8080:user: or 192.168.1.1:8080:)
During startup, the player or streamer examines this environment variable, and if it exists and has a correct format, uses that parameter to establish the connection via that proxy.
Bypassing Proxy Settings
When the proxy is configured, but there is no internet access through the proxy, the agent and patcher can detect a direct internet connection and seamlessly switch to the direct connection. This proxy bypass behavior is particularly useful in scenarios where a user transitions from an environment with a configured and functioning proxy, such as an office setting, to a different location where there is no longer a proxy available, or vice versa.
For the proxy configuration to take effect, restart the NinjaOne agent.
Additional Resources
For more information about configuring a proxy for NinjaOne Remote, refer to the Set up a Proxy for NinjaOne Remote section above.