
Wake-on-LAN (WoL) is a network technology that enables IT teams to remotely power on computers by sending a specially crafted data packet—called a Magic Packet—to a device’s network adapter. As long as the endpoint is connected to power and properly configured at both the BIOS/UEFI and operating system level, the network interface remains in a low power listening state and can trigger the system to boot when the Magic Packet is received. This allows devices that are powered off or sleeping to become reachable without requiring physical access.
Automating Wake-on-LAN (often through Wake-on-LAN software) increases operational flexibility and efficiency. Organizations can schedule wake events for overnight patching, maintenance, reporting, or remote access, ensuring IT tasks execute when users are not present, minimizing impact. Automated WoL also supports energy-saving goals by allowing devices to remain powered off when idle yet still be brought online on demand. This reduces manual effort, minimizes disruption, and helps maintain compliance and readiness across distributed fleets.
Within NinjaOne, WoL can be initiated directly from the management console, allowing technicians to bring devices online as needed for troubleshooting or maintenance. This provides a centralized, convenient way to ensure endpoints are available when required without relying on users to power on their devices.
What is a WoL magic packet?
A WoL magic packet is an Ethernet broadcast network packet designed to wake sleeping computers.
It consists of six bytes of FF, followed by the target device´s MAC address sixteen times:
FF FF FF FF FF FF
<MAC> <MAC> <MAC> … (16 times)
Can any computer be powered on via WoL?
No, there are some hardware requirements and specific configurations that must be enabled at both the BIOS and OS levels:
BIOS level:
- The motherboard and NIC must support Wake-on-LAN (WoL)
- WoL must be enabled in BIOS/UEFI settings.
- ACPI power state support (typically S3/S4/S5) must allow wake events.
- “ERP/Low-Power mode” settings may need to be disabled so the NIC can stay powered while the system is off.
Note: Setting names vary widely among OEM but the goal is to ensure the NIC remains powered and allowed to trigger system power-up.
OS level:
- A compatible network driver must be installed with WoL / Magic Packet support enabled.
- NIC power-management settings must allow the device to wake the system (e.g., “Allow this device to wake the computer”).
Can NinjaOne natively power on a computer via WoL?
Yes. NinjaOne can send a Wake-on-LAN magic packet; however, the endpoint will only power on if it is properly configured for WoL. The magic packet is relayed through another NinjaOne-managed device in the same subnet, so at least one powered-on device must be present in that subnet.
These are the requirements for using Wake-on-LAN with NinjaOne:
- Both the sleeping device and the device sending the wake request must be managed by NinjaOne.
- The sleeping device must be connected to the network via a wired Ethernet connection.
- The sleeping device and the device sending the wake request must:
- Belong to the same organization.
- Reside on the same subnet and share the same gateway IP.
- Be Windows devices.
Follow the steps below to send a Wake-on-LAN magic packet to an endpoint.
- Select the sleeping device and open the device dashboard.

- Click the run icon ( ).
- Select Wake on Lan.
How can I wake up a group of devices in bulk?
To send a Wake-on-LAN magic packet to a group of computers, follow the steps below:
- Click Devices on the left navigation pane within the NinjaOne console. Alternatively, you can load a predefined group.
- Select the devices you want to wake by checking the box to the left of each device name. You can use the filters to narrow down the list.
- Click Run.
- Select Wake on Lan.
Can I schedule waking up one or more devices?
Yes. You can do this using a remote scheduled task. NinjaOne does not include a built-in WoL script for automation, so you must provide your own script.
For better understanding, let´s illustrate this with one example. In this example we will create a remote scheduled task named “Wake up computers”, it will run every Tuesday at 11 PM. The automation (PowerShell script) broadcasts WoL magic packets based on a list of MAC address provided as a parameter.
Follow the steps below to create this scheduled.
- From the NinjaOne main console, navigate to Administration > Library > Automation.
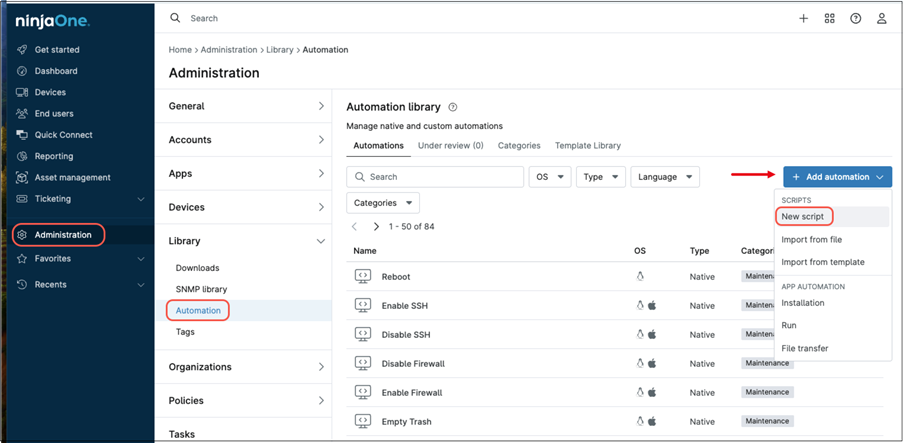
- Click + Add Automation. From the drop-down, select New script. The “Create Script” screen will appear.

- Fill in the Name and Description (for this example, the name will be “Wake up endpoints”).
- In Categories, select “Maintenance”.
- In Language, select “PowerShell”.
- In Operating System, select “Windows”.
- In Architecture, select “64-bit”.
- In Run As, select “System”.
- Leave the following fields blank.
- Copy the following script* to the black script window:
# Wake-on-LAN sender
param(
[string]$macList
)
# Expect: "AA:BB:CC:DD:EE:FF-11:22:33:44:55:66-..."
# Split outer list by hyphen, drop blanks
$macs = ($macList -split '-') | Where-Object { $_ -and $_.Trim() -ne '' }
# Strict colon-separated MAC: 6 hex octets (e.g., B1:B2:B3:B4:B5:B6)
$macRegex = '^(?:[0-9A-Fa-f]{2}:){5}[0-9A-Fa-f]{2}$'
$valid = @()
$invalid = @()
foreach ($m in $macs) {
$t = $m.Trim()
if ($t -match $macRegex) { $valid += $t.ToUpper() } else { $invalid += $t }
}
if ($invalid.Count -gt 0) {
Write-Host "Invalid MAC address format (expected XX:XX:XX:XX:XX:XX):"
$invalid | ForEach-Object { Write-Host " - $_" }
}
if ($valid.Count -eq 0) {
Write-Host "No valid MAC addresses provided. Aborting."
exit 1
}
Write-Host "Sending WoL magic packet to:"
$valid | ForEach-Object { Write-Host " - $_" }
# Prepare UDP broadcast to port 9
$udp = New-Object System.Net.Sockets.UdpClient
$udp.EnableBroadcast = $true
$endpoint = New-Object System.Net.IPEndPoint([System.Net.IPAddress]::Broadcast, 9)
foreach ($mac in $valid) {
# Convert "AA:BB:CC:DD:EE:FF" to bytes
$macBytes = ($mac -split ':') | ForEach-Object { [Convert]::ToByte($_,16) }
# Build magic packet: 6 x 0xFF + MAC repeated 16 times
$packet = New-Object System.Collections.Generic.List[byte]
1..6 | ForEach-Object { [void]$packet.Add(0xFF) }
1..16 | ForEach-Object { [void]$packet.AddRange($macBytes) }
# Send packet
[void]$udp.Send($packet.ToArray(), $packet.Count, $endpoint)
}
$udp.Close()
* This PowerShell script broadcasts a Wake-on-LAN (WoL) magic packet for each MAC addres provided. The script reads the MAC address list from the command line, which is passed as a preset parameter by NinjaOne.
You may specify one or multiple MAC addresses. When providing more than one, they must be separated by a hyphen (-), and the entire MAC address list must be enclosed in quotes. Each MAC address must follow this format:
B1:B2:B3:B4:B5:B6
You can include as many MAC addresses as needed.
- Click Save (you may need to enter your MFA response).
- Navigate to Administration > Tasks.
- Click + Create task. The task editor appears.
- Fill out the task name and description. Uncheck the Allow Groups option.
- Enter a schedule (for this example, Tuesdays 11 PM local time was selected).

- Click Add on the right. The automation library appears.
- Find and click on the desired automation, “Wake up endpoints” for this example. You can use the filters or the search option to make your search easier.
- Select the account that will run this script and preset parameters; for this example, enter your MAC address in the preset parameter.

- Click Apply. The Automation library closes, and the selected automation appears on the new scheduled task.
- Click Targets on the left side menu.
- Click Add, to add a target device. This is the device that will run the script.

- Click the first row, where it says “Organization” and select Device (Windows, Mac, Linux). A list of all devices appears.
- Select a Windows device (other than the computer you want to wake up) that will remain powered on when the task runs, and it´s located on the same subnet as the computer you want to wake up. This is the device from which the script will be executed. You can use the search option to make the search easier.
- Click Apply.
- Click Save (You may need to enter your MFA response.)
- Click Close.
- The new scheduled task named Wake up computers appears listed in the task screen.
Disclaimer:
The sample script provided is intentionally minimal and contains a very basic input validation. It has no error handling, or security safeguards. It is intended for educational and demonstration purposes only. This script should not be used in production environments. Use it at your own risk, and ensure appropriate testing, security controls, and validation before deploying any automation in a live system.