Topic
NinjaOne Ticketing allows NinjaOne users and technicians to create, track, and resolve tickets without the need of third-party software.
Environment
NinjaOne Ticketing
Description
Access to tickets is based on organization access, meaning a technician with access to an organization will have access to all tickets for that organization, regardless of the permissions set under Ticketing. The only exception is the Pending Emails Board; if this is set to "No Access, " the technician cannot see them until a ticket ID is assigned.
Select a category to learn more:
- Granting Technicians Access to Ticketing
- Setting up Technician Email Signatures
- Granting End Users Access to Ticketing
- Viewing and Managing Contacts
Granting Technicians Access to Ticketing
All system administrators have access to NinjaOne Ticketing by default. To enable NinjaOne Ticketing for technicians with custom

- Once you have set the access levels you would like, click Save.
Setting up Technician Email Signatures
Technicians can set up email signatures that will be automatically applied to the end of their public responses on a ticket.
A signature can be created from the technician account page under General → Basic Details → Signature. Technicians can use text and inline images in the WYSIWYG field.

Granting End Users Access to Ticketing
Ticketing access can be enabled or disabled for individual end users on their account configuration page. Once overall access has been enabled, you can grant the end user access to all tickets across their organization (rather than just their own tickets).
- When creating a new end user, the option to enable or disable Ticketing access is available under the Permissions: Ticketing settings.
- Select an option from the Ticketing access drop-down menu to allow users to view, update, and create tickets belonging to the organization to which they were assigned access (regardless of who submitted the ticket); if no access is given, the user can only see the tickets they submitted.
- If the user is assigned to all organizations in the General tab, the organization-wide ticketing access permission in Ticketing will be locked, and the Ticketing access permission will be set to apply to all organizations.

Add or Edit Ticketing Permissions in Bulk
Alternatively, you can manage access to organization-specific NinjaOne tickets from the organization configuration page:
- Navigate to the organization configuration page (Administration → Organizations) and select the End Users tab.
- Activate the checkboxes for the end users whose ticketing permissions you want to edit, and then click Edit Ticketing Permissions at the top of the list.

- Move your cursor over the tooltips to view a description of each permission and use the toggle switches to turn the access on or off. You must enable ticketing access (the first option) before you can enable organization-wide ticketing access.
- Click Save in the permissions modal and then click Save again at the top of the configuration page.
Viewing and Managing Contacts
Contacts can be added to NinjaOne to receive updates. They can also submit tickets to your NinjaOne instance through the email domain you set up in Administration → Apps → NinjaOne Ticketing → Email Domain.
New contacts can be created in multiple ways:
- From the Accounts section in Administration
- From the organization configuration page
- From within a new or existing ticket
Create a Contact Account Section
- Navigate to Administration → Accounts → Contacts.
- To edit or delete an existing contact, hover your cursor over the contact and click Edit or Delete.
- Click Create Contact in the top right corner.
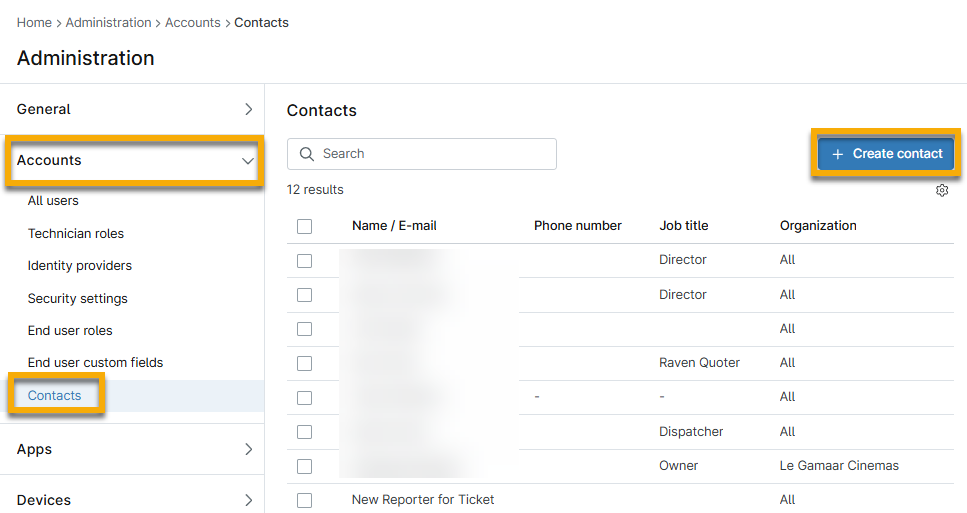
- Provide the contact's first name, last name, email address, phone number, job title, and organization (optional), and then click Save.
Import Organization Contacts
- Navigate to the organization editor for an organization. Then, select Contacts on the left navigation pane.
- Click Import Contacts in the top right.
- You can import contacts in bulk for the organization by copying and pasting from a CSV spreadsheet. Per the instructions, the data must be in three columns in the following order: First Name, Last Name, and Email. All columns must be filled out, and emails must be unique.
Create New Contacts in a Ticket
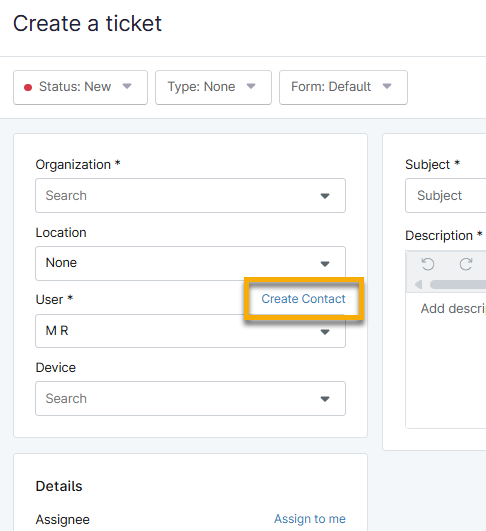
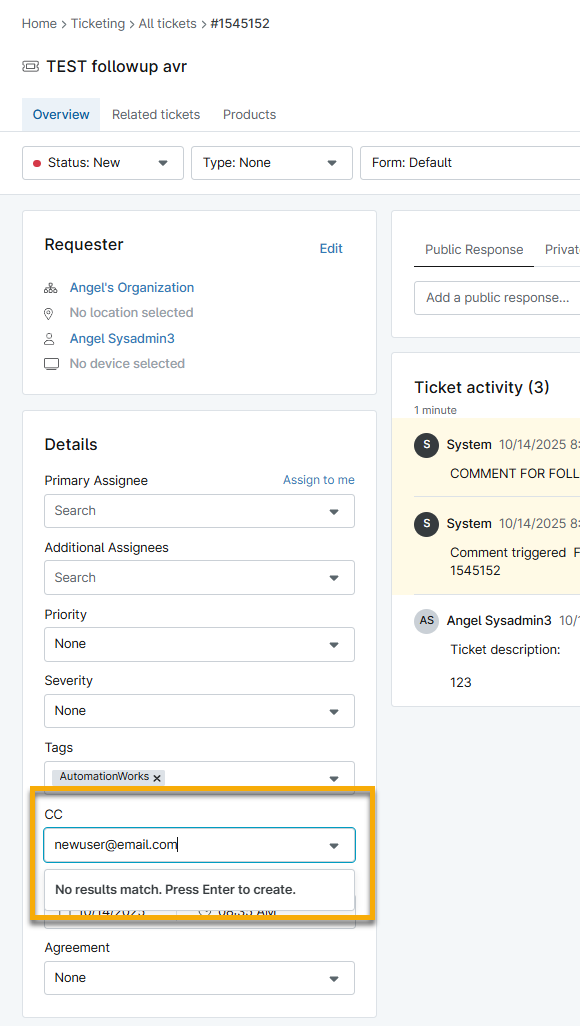
If the new contact needs to be listed as the reporter for the ticket, you can only create this contact in a new ticket. If the contact needs to be added as a CC ("carbon copy," or someone who can view the correspondence on a ticket), you can add them to an existing ticket.
- New requestor contact: From within a new ticket, click Create Contact under the Requestor section of the modifiable fields.
- New CC contact: Enter the email address into the CC field and click Enter on your keyboard.
Additional Resources
Refer to the Ticketing Resource Catalogue to learn more about NinjaOne Ticketing.