Topic
This article explains how to map your ServiceNow configuration items in NinjaOne.
If you have not already activated the ServiceNow integration, refer to NinjaOne Integrations: Getting Started With ServiceNow to learn how to do so.
Environment
- NinjaOne Integrations
- ServiceNow
Description
Use the Configuration Item Mapping tab on the ServiceNow application management page to map ServiceNow's Configuration Management Database (CMDB) with device roles in NinjaOne. Each organization can contain multiple mappings.

Figure 1: NinjaOne → ServiceNow integration → Configuration Item Mapping
These Configuration Items (CIs) may represent physical devices (such as computers), logical devices (like databases), or conceptual services. You can learn more about the CMDB on the ServiceNow documentation site (external link).
- To add a new CI mapping, click Add. The New Configuration Item Mapping editor dialog displays.
- Enter a name for the mapping in the top text field (Name) and then click Add.

Figure 2: NinjaOne → ServiceNow application → New configuration item mapping
- Select a device role from the top drop-down menu.
To learn about creating or managing device roles in NinjaOne, refer to NinjaOne Endpoint Management: Device Roles. - Select the ServiceNow class from the second drop-down menu.
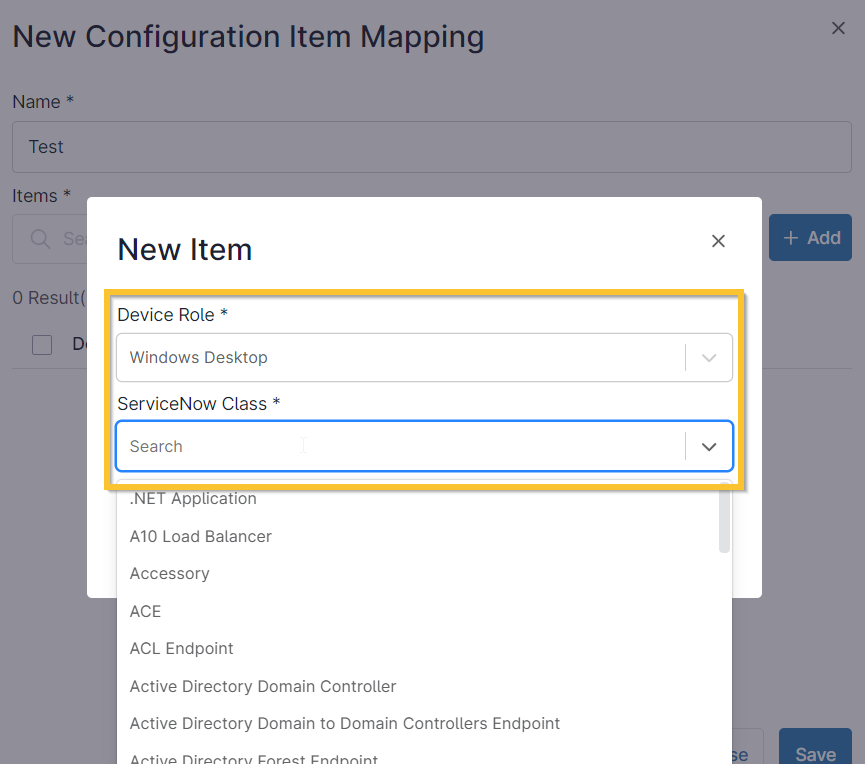
Figure 3: NinjaOne → ServiceNow application → New configuration item mapping → New item
- Click Save.
- On the New Configuration Item Mapping dialog, click Add again for as many new item mappings as needed.
- To edit or delete an item mapping, select the checkbox and click Edit or Delete at the top of the table, or use the ellipsis button.

Figure 4: NinjaOne → ServiceNow application → Manage configuration item mapping
- When finished, click Save.
Custom Field Mapping
- Log in to ServiceNow and navigate to the NinjaOne Configurations setting page.
- Open the NinjaOne Custom Field Mappings tab and then click New.

Figure 5: ServiceNow → NinjaOne configuration settings → NinjaOne Custom Field Mappings
- Complete the fields using the following table as a guide on the new record page.
| Field | Data |
|---|---|
| Custom Field Name | Enter the name of the custom field as it is logged in NinjaOne. It should reflect the Field Name instead of Label (you can find this data in NinjaOne at Administration → Devices → Global Custom Fields). |
| Target Table | Click the magnifying glass icon to select the target table or create a new one. The selection dialog includes all tables that connect to configuration items. |
| Target Field | Click the magnifying glass icon and filter the fields that belong to the selected table. |
- Click Submit.
- Synchronize the changes (this step is optional if you have scheduled imports and do not want to sync immediately).
- Open the Scheduled Import tab and select an option or create a new import.
- Click Execute Now.
Additional Resources
The following page will help you get the most out of NinjaOne's integration with ServiceNow: ServiceNow integration documentation in NinjaOne.
Refer to the following articles to learn more about configuring ServiceNow integration settings in NinjaOne: