Topic
This article explains how to use the Vulnerability Importer application in NinjaOne.
Environment
- NinjaOne Integrations
- Generic Vulnerability Importer
Description
Vulnerability Management for networks and systems is an ongoing, iterative process that requires continuous attention and adaptation to emerging threats and vulnerabilities. It's a critical component of an organization's overall cybersecurity strategy, helping to protect assets and data from potential breaches and attacks.
The importer ingests a comma-separated values (CSV) file containing a list of vulnerabilities identified by a third-party tool. The vulnerabilities are mapped to NinjaOne-managed devices and reported in a dashboard and through device health. NinjaOne remediates vulnerabilities when you upload new scans that no longer contain previously identified vulnerabilities.
View additional tutorials in our video library.
Index
Select a category to learn more:
- About the Vulnerability Integration in NinjaOne
- Import a Vulnerability File to be Scanned
- Re-import or Override a Vulnerability File
- Delete a Scan Group
- Find Vulnerability Data in NinjaOne
- Automating the Vulnerability Import Process
- Glossary
- Additional Resources
About the Vulnerability Integrations in NinjaOne
Consider the following important notes:
- NinjaOne currently has six vulnerability integrations at Administration → Apps:
- Generic Vulnerability Importer; inventory scanning tool (discussed in this article)
- Qualys
- Tenable
- Rapid7
- Microsoft Defender
- ConnectSecure
- Use the Inventory Scanning tool to identify vulnerabilities by reviewing the versions of the operating system and installed applications against the National Vulnerability Database (NVD). The Inventory Scanning tool will identify both traditional managed and unmanaged devices, where endpoints are regularly or continuously assessed for individual vulnerabilities.
- Integrate the results of your vulnerability scans with NinjaOne to streamline remediation by applying operating system and third-party application updates from a single platform. Integration also includes surfacing vulnerabilities identified in NinjaOne Patching.
- NinjaOne device dashboards will provide health status reporting.
- The vulnerability scan will map the columns from an uploaded Excel spreadsheet or .csv file. At a minimum, the uploaded file should include a column for the device identifier and a column for the CVE identifier.
Import a Vulnerability File to be Scanned
To import a file, perform the following steps:
- In NinjaOne, navigate to Administration → Apps → Installed or click the cluster box icon in the top right corner of the console and select View all apps.

Figure 1: View apps in NinjaOne (click to enlarge)
- Select Vulnerability Importer. If you cannot find this app, click Add Apps and select it from the list to include it on the Apps page.
- Click Enable in the top-right corner of the app.
- Enabling the application adds the General and Scan groups tabs to the page.
- In the General tab, click Edit for Settings.

- Select Enabled from the Status drop-down menu to capture the behavior of CVEs imported from the scan.
- Select an option from the Impact device health drop-down menu depending on whether you want impacted device health data to appear in the dashboard. If you select Yes, the Device health issues section on the dashboards will update to reflect new data.

- Click Update.
Create Scan Groups
To create a new group for a third-party vendor that does not have an application page in NinjaOne, perform the following steps.
- Open the Scan groups tab and click Create scan group. A scan group is a specific selection of items; for example, servers or workstations.

Figure 4: Vulnerability Importer app → Create scan group button
- The Create scan group dialog displays. Enter a unique identifier as a name for Scan group.
- From the Select a scanning vendor drop-down menu, select a scanning vendor. Doing so will help you identify the source of the scanning. If you select Other, a new data field will display where you must enter a scanning source name for reference.
- Click Upload CSV file. Navigate to and select a .csv file (limited to 200 MB in size) containing vulnerability data. You can also automate vulnerability uploads from the Automation Library.
- Click Continue to confirm the mapping attributes from the file.
- The next page of the dialog allows you to map the attributes. From the Map the column that has the Device ID identifier from file drop-down menu, select the column title that has the device identifier listed in the file.
- A new drop-down will display for Confirm Device ID type. Select the applicable option.
- From the Map the column that has CVE ID identifier with corresponding vulnerabilities from file drop-down menu, select the column with the CVE ID.
- Click Finish.

Figure 5: Vulnerability scan group creation → Create scan group dialog → Map attributes
The imported file will display the associated column data in the importer grid.
If your status is not active, refresh your console to update the status and view the number of vulnerabilities processed from within the file.

Figure 6: Vulnerability Importer → Status column and Vulnerabilities process column (click to enlarge)
Re-import or Override a Vulnerability File
Because vulnerability management is ongoing, you may need to update CVE lists to import into the NinjaOne console. To do so, perform the following steps:
- In the NinjaOne console, navigate to Administration → Apps → Vulnerability Importer.
The Vulnerability Importer will open, displaying a list of imported scan groups. - Move your cursor over a scan group row to expose the ellipsis button. Open the actions menu and select Import File.
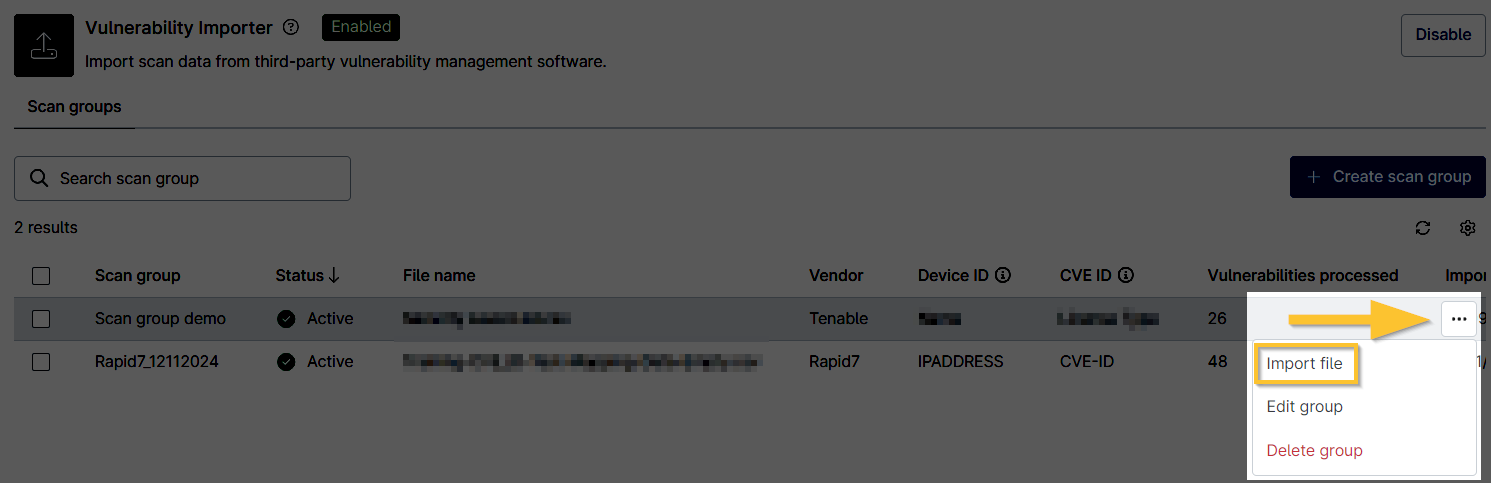
Figure 7: Vulnerability Importer → Import file (click to enlarge)
- The Import file dialog displays. Click Upload CSV file, and then re-import your vulnerability file.
- If needed, refresh your console to view the updates. The data from the most recent import file is always listed.
Delete a Scan Group
To delete a scan group, perform the following steps:
- In the NinjaOne console, navigate to Administration → Apps → Vulnerability Importer.
The Vulnerability Importer will open, displaying a list of imported .csv files. - Move your cursor over a scan group row to expose the ellipsis button. Open the actions menu and select Delete group.

Figure 8: Vulnerability Importer → Delete group (click to enlarge)
Automating the Vulnerability Import Process
In an effort to support you in this ongoing, iterative process, we created a series of APIs to automate the vulnerability import process. Read Automating the Vulnerability Import Process for more information.
Glossary
Several acronyms are commonly used in vulnerability management to communicate various concepts, tools, and processes. Below is a list of some of the most frequently used acronyms in vulnerability management. For additional terminology used throughout NinjaOne and our Dojo, refer to our NinjaOne Terminology article.
| Term | Definition |
|---|---|
| CVE | "Common Vulnerabilities and Exposures" This is a widely used nomenclature for publicly known cybersecurity vulnerabilities. |
| CVE ID | This is a unique identifier for a specific CVE. |
| CVSS | "Common Vulnerability Scoring System" This is a standardized framework for rating the severity of security vulnerabilities. |
| CWE | "Common Weakness Enumeration" This is a category system for software weaknesses and vulnerabilities. |
| DAST | "Dynamic Application Security Testing" This is a process of testing an application or software product in an operational state. |
| GDPR | "General Data Protection Regulation" This is a regulation in EU law on data protection and privacy in the European Union and the European Economic Area. |
| HIPAA | "Health Insurance Portability and Accountability Act" This is the US law designed to provide privacy standards to protect patients' medical records and other health information. |
| IAM | "Identity and Access Management" This is a framework of policies and technologies ensuring that the right individuals access the appropriate resources. |
| IDS | "Intrusion Detection System" This is a device or software application that monitors a network or systems for malicious activity or policy violations. |
| IPS | "Intrusion Prevention System" This is a network security/threat prevention technology that examines network traffic flows to detect and prevent vulnerability exploits. |
| NVD | "National Vulnerability Database" (external link) This is the U.S. government repository of standards-based vulnerability management data. |
| OWASP | "Open Web Application Security Project" This is an online community producing articles, methodologies, documentation, tools, and technologies in the field of web application security. |
| PCI-DSS | "Payment Card Industry Data Security Standard" This is a set of security standards designed to ensure that all companies that accept, process, store, or transmit credit card information maintain a secure environment. |
| SAST | "Static Application Security Testing" This is a process of testing the application from the inside out by examining its source code, byte code, or binary code. |
| SIEM | "Security Information and Event Management" These are solutions that provide real-time analysis of security alerts generated by applications and network hardware. |
| SOC | "Security Operations Center" This is a centralized unit that deals with security issues on an organizational and technical level. |
Additional Resources
Refer to the following resources to learn more about vulnerability management in NinjaOne:
- Getting Started with NinjaOne Vulnerability Management
- Health Statuses and Icon Definitions (adjust the vulnerability CVSS severity level for your devices to indicate the impact on device health).
- Vulnerability Importer Sample Script