Topic
This article explains how to use the ConnectSecure integration in NinjaOne.
Environment
- NinjaOne Integrations
- ConnectSecure
Description
Configure ConnectSecure scan integration or import vulnerability comma-separated values (CSV) data into NinjaOne. The importer ingests a CSV file containing a list of vulnerabilities identified by a third-party tool. NinjaOne maps the vulnerabilities to managed devices and reports data in the device dashboard. NinjaOne updates the status of vulnerabilities when you upload new scans that no longer contain previously identified vulnerabilities.
Vulnerability management for networks and systems is an ongoing, iterative process that requires continuous attention and adaptation to emerging threats and vulnerabilities. Vulnerability management is a critical component of an organization’s overall cybersecurity strategy, helping to protect assets and data from potential breaches and attacks.
If you need to scan for vulnerabilities using generic importers (products other than Qualys, Rapid7, Tenable, Microsoft Defender, or CrowdStrike), refer to NinjaOne Platform: Getting Started with the Vulnerability Importer to learn how to set up and configure the Vulnerability Importer application.
Submit feature requests for improvements through our website at Released - NinjaDojo Roadmap | Product Roadmap. You can use the Submit idea button in the top right corner of the page.
Index
Select a category to learn more:
Add the ConnectSecure Integration
To activate the integration in NinjaOne, perform the following steps:
- Navigate to Administration → Apps → Installed and click Add Apps.
- Select ConnectSecure and click Continue.
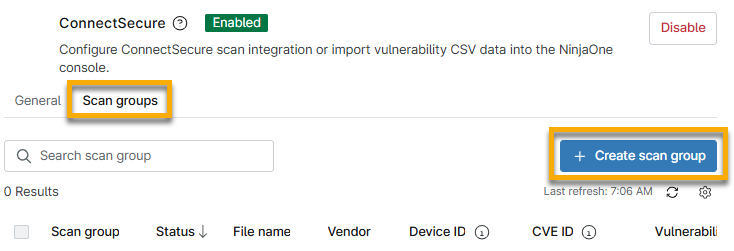
- On the ConnectSecure application page, click Enable.
Activating the application adds the General and Scan groups tabs to the page.
- From the General tab, click Edit in the Settings section.

- Select Enabled from the Status drop-down menu to capture the behavior of Common Vulnerabilities and Exposures (CVEs) imported from the ConnectSecure integration.
- Select an option from the Impact device health drop-down menu depending on whether you want impacted device health data to appear in the dashboard. If you select Yes, the Device health issues section on the dashboards will update to reflect new data.

- Click Update. NinjaOne will save your preferences.
Scan Devices for Vulnerabilities
You must create and manage scan groups in the ConnectSecure integration to import CVE data for your devices.
Create Scan Groups
A scan group is a specific selection of items; for example, it can include servers or workstations. Use the Scan groups tab to identify vulnerabilities by reviewing the versions of the operating system and installed applications against the National Vulnerability Database (NVD). The Scan groups tool will identify both managed and unmanaged devices, in which endpoints are regularly or continuously assessed for individual vulnerabilities.
- From the ConnectSecure application in NinjaOne, select the Scan groups tab and click Create scan group.
- The Create scan group dialog will appear. Enter a unique identifier as a name for Scan group.
- From the Select scanning vendor drop-down menu, select a scanning vendor. Doing so will help you identify the source of the scanning. If you select Other, a new field will appear in which you must enter a scanning source name for reference.
- Click Upload CSV file. Navigate to and select a CSV file (limited to 200 MB) containing vulnerability data. You can also automate vulnerability uploads from the Automation Library.
- Click Continue to confirm the mapping attributes from the file.
The next page of the dialog will help you map the attributes. NinjaOne will retrieve the column data, so the drop-down menus will contain the column header names specific to the file you uploaded.
- From the Map the column that has the Device ID identifier from file* drop-down menu, select the column title that has the device identifier listed in the file.
- A new drop-down menu will appear for Confirm Device ID type*. Select the applicable option.
- From the Map the column that has CVE ID identifier with corresponding vulnerabilities from file* drop-down menu, select the applicable option to identify the column with the CVE ID identifier.
The imported file will show the associated column data in the importer grid.
If the scan group status is not Active, refresh NinjaOne to update the status and view the number of vulnerabilities processed from within the file.
Refer to NinjaOne Vulnerability Management: Find CVE Data in NinjaOne to learn how to retrieve the data that was scanned in NinjaOne.
Reimport Scan Groups
Because vulnerability management is ongoing, you may need to update CVE lists to import into NinjaOne. To do so, perform the following steps:
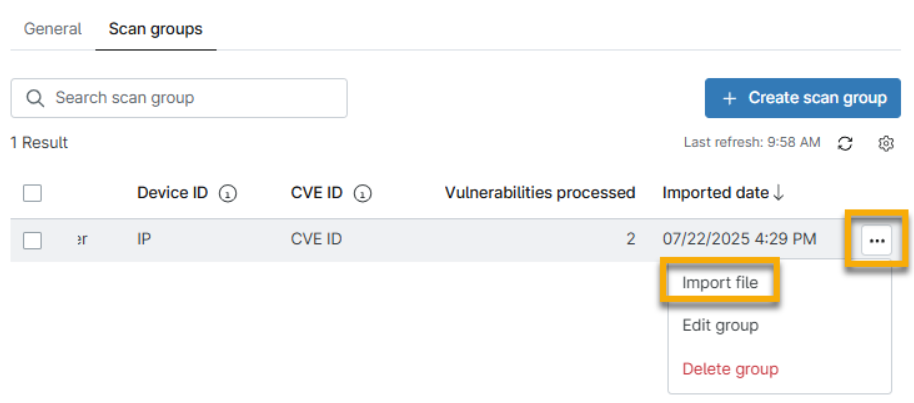
- From the ConnectSecure application in NinjaOne, select the Scan groups tab.
- Move your mouse cursor over a scan group row and click the actions menu. Select Import file.
- The Import file dialog will appear. Click Upload CSV file, and then reimport the vulnerability file.
- If needed, refresh NinjaOne to view the updates. The data from the most recent import file is always listed.
Delete Scan Groups
To delete a scan group, perform the following steps:
- From the ConnectSecure application in NinjaOne, select the Scan groups tab.
- Move your mouse cursor over a scan group row and click the actions menu. Select Delete group.
Additional Resources
Refer to the Vulnerability Management: Resource Catalog to learn more about vulnerability tools in NinjaOne.