Topic
This article discusses how to connect NinjaOne SaaS Backup to Autotask.
Environment
NinjaOne SaaS Backup
Description
Follow the steps below to connect Autotask to your NinjaOne SaaS Protection instance.
Index
- Complete Partner Setup in Autotask
- Connect to Autotask on NinjaOne's Partner Portal
- Create a New Plan with Autotask Integration
- Create a New Organization Connected Through Autotask Integration
- Set Up a New Security Role in Autotask
- Revoke Autotask Integration
Complete Partner Setup in Autotask
The first action is to complete the Autotask partner setup.
- Launch Autotask and log in using valid credentials.
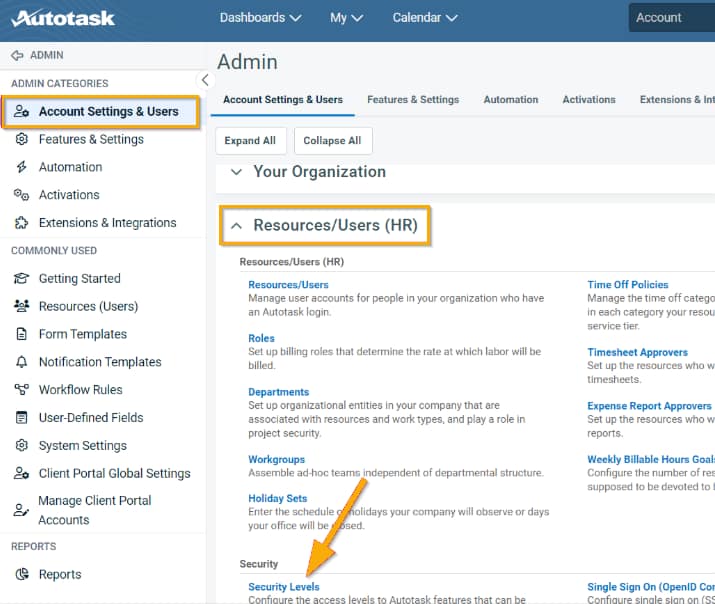
- Navigate to Admin, then Company Settings & Users.
- Expand Resources/Users (HR) and click Resources/Users.
- Click New API User.
- In the General section, fill in all mandatory information and select an appropriate security level. For guidance on creating a new role, refer to the Setting Up a New Security Role in Autotask section below.
- Click Generate Key and Generate Secret. Save both the key and secret for later use during this procedure.
- Select NinjaOne - Cloud Backup as the Integration Vendor.
- Click Save and Close.
Connect to Autotask on NinjaOne's Partner Portal
Next, you'll connect Autotask to NinjaOne so you can manage it through the NinjaOne Portal.
- Log in to the Partner Portal. On the navigation bar, click the Integrations menu (marked with the plug icon).
- On the Autotask card, click Connect.
- Input the previously generated Key and Secret into the respective fields, and then click Next Step.
Upon successful connection, you are officially connected, and Autotask will redirect you to the ticket mapping form. - Complete the form by selecting the suitable options, then click Next Step. All fields are required.
Complete Integration configuration (optional)
Fill out all required fields in the integration configuration form, then click Next Step.
- Specify if you want to sync the seat quantity to PSA.
- Select Ticket Type for service ticket creation.
- Select Ticket SLA for service ticket creation.
- Select Ticket Priority for service ticket creation.
Autotask will show a banner with a completed integration configuration setup. You can continue to the steps below for organization mapping. Clicking the Revoke all ticket mapping button will only clear the integration configuration form. Your HaloPSA connection will not be affected.
Create a New Plan with Autotask Integration
Next, map the plan.
- To map the plan, click Manage. Autotask will redirect you to the Integration page for mapping.
- From the available options, select Service, then click Connect (blue icon).
After successfully mapping the plan, you will notice a green check mark indicating success, and the Unlink button will appear. - Upon returning to the plan page, click Menu and select View Integration. The Synced badge will now indicate that the plan is synchronized with the integration.
Edit Existing Plans Mapped with Autotask Integration
- Click the Menu button, then select View Integration.
A dialog box window will appear. - Click Manage to proceed with mapping the plan in Autotask. Autotask will redirect you to the Integration page. Select Service and proceed until the sync completes..
Create a New Organization Connected Through Autotask Integration
Use this procedure to create a new organization that's connected to Autotask.
- Select the plan that you synced with the Autotask integration.
- Upon successful organization creation, a new window will appear for mapping requirements. Click the Manage button to redirect you to the Integration page.
- Select Company, Contract, and Contract Service, then click Connect (blue icon).
- Upon successful organization mapping, a green check mark will appear, and Autotask will display the Unlink button.
Edit an Existing Organization and Map with Autotask
- Navigate to the Integration page and click Option, then select Manage Connection.
- Click Organization Mapping, find the organization you want to edit, then select Company, Contract, and Contract Service and click Connect (blue icon).
Once successful, Autotask will display a green check and the Unlink button.
Set Up a New Security Role in Autotask
Here you'll set up the security role and its permissions.
- Launch Autotask, then log in with valid credentials.
- Navigate to Admin → Account Settings & Users.
- Expand Resources/Users (HR) and select Security Levels.
- Click the unordered list icon and choose Copy.

- Enter a name for the new security level and select the Active checkbox.

- Set permissions for the API user as follows:
- Contracts: Click Object Permissions and set the following parameters:
- View: All
- Add: Yes
- Contract Visibility (for contracts you have access to): Full
- CRM: Click the No Permission link and set the following permissions individually:
- Company & Contact Access: All
- Customer & Cancellation:All
- Vendor & Partners: All
- Prospects, Leads, & Dead: None
- Companies:
- Add: Yes
- Edit: All
- Delete: All
- All other fields: None
- Inventory: Click the No Permission link.
- Projects: Click the No Permission link.
- Service Desk:
- Click the No Permission link and then set the following permissions individually:
- Object Permissions (Tickets):
- View: All
- Add: Yes
- Edit: Yes
- Delete: All
- Object Permissions (Tickets):
- Click the No Permission link and then set the following permissions individually:
- Documents & Knowledge base: Click the No Permission link.
- Timesheets: Click the No Permission link.
- Reports: Click the No Permission link.
- Admin: Click the No Permission link, then set the following permissions only by activating the checkbox for: Resources/Users and Products, Services, & Inventory.
- Contracts: Click Object Permissions and set the following parameters:
- After configuring all permissions, click Save & Close.
Revoke the Autotask Integration
Follow these steps to remove the connection between NinjaOne and Autotask.
- Log in to the NinjaOne Partner Portal and navigate to the Integration page.
- Select Option, then Revoke Autotask on the Autotask card.
NinjaOne will display the same page with the Connect button active after revoking succeeds.