Topic
This article explains how to configure and manage scheduled tasks in NinjaOne.
Environment
NinjaOne Endpoint Management
Description
Scheduled tasks allow you to run automations on targeted organizations, devices, or groups on a specified schedule. For more information about groups, refer to our Search and Grouping article.
Miscellaneous Scheduled Tasks (NinjaOne Inc. 01:58)
Index
Select a category to learn more:
- Important Considerations
- Enable Technician Permissions for Scheduled Tasks
- Create a New Scheduled Task
- Edit, Copy, or Delete Scheduled Tasks
- Additional Resources
Important Considerations
- Your NinjaOne user must be either a system administrator or have the appropriate permissions set to create, view, and manage scheduled tasks.
- Configuring fast boot or quick startup on your Microsoft Windows device may prevent scheduled tasks from running on System Startup, because the device does not completely power off. Since fast boot causes the device to "wake up" rather than start, it does not trigger the startup value.
- Only system administrators can target groups in a scheduled task or view the created tasks within a targeted group.
Enable Technician Permissions for Scheduled Tasks
To set up permissions for technicians to interact with scheduled tasks, perform the following steps:
- In NinjaOne, click Administration, then select Technician Roles from the expanded options. You can also set the permissions for an individual technician account.
- Open the Automation Library section, click the Enabled toggle, and select the desired access level from the Scheduled Tasks Administrator drop-down menu. Click Save Changes when finished.
Create a New Scheduled Task
To create a scheduled task, perform the following steps:
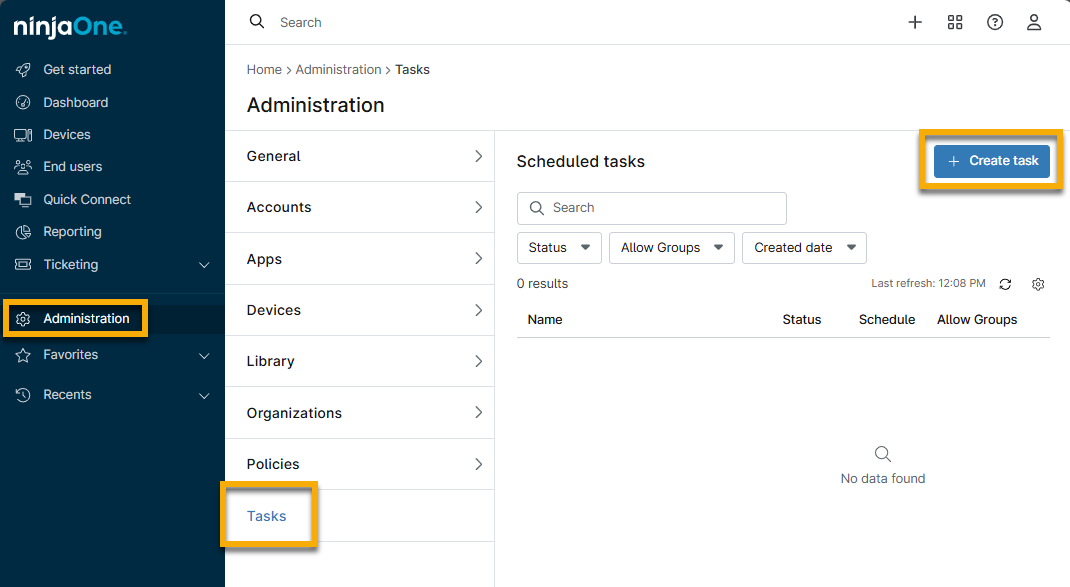
- In NinjaOne, navigate to Administration → Tasks and click Create Task.
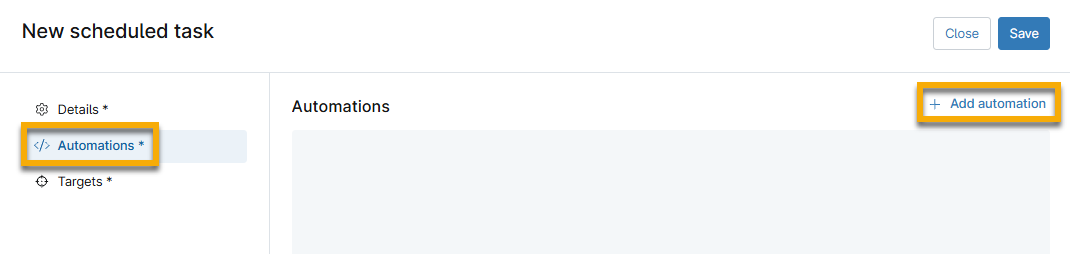
- The task configuration page will open, with the Details section active by default. Ensure the Enabled setting is active, then configure the following settings:
Configure Task Details
Use the following table to configure the data in the Details tab:
| Field Name | Description or Purpose |
|---|---|
| Status | By default, this toggle switch should be enabled. |
| Name | Create a unique identifier for the task. |
| Description | Give the task an optional description. |
| Allow Groups | Select this checkbox to determine if groups should be allowed as a target for this task. If you select this option, only devices that belong to the group will receive the task. If you remove this option, you will notice new scheduling options become available. To learn more about device groups, refer to Search and Grouping. |
| Schedule | You can set the schedule to run tasks daily, weekly, monthly, or on a custom schedule. Use the Repeats drop-down menu to choose this interval. For an explanation of each schedule option, refer to the following section within this article: Schedule Setting Options. |

Schedule Setting Options
You can set the schedule to run tasks daily, weekly, monthly, or on a custom schedule. Use the Repeats drop-down menu to choose this interval.
When you select a time to start, NinjaOne will defer to the time zone settings you configured in NinjaOne. Refer to Time Zone Settings for more information.
If you select After for the Ends drop-down menu, a new Occurrences field will appear. Use this field to enter the number of times the task should run before ending. If you select On for the Ends drop-down menu, a new End date field will appear. Use this field to select a calendar date.
Refer to the following table for an outline of each Repeats option.
| Repeats Option | Schedule Options |
|---|---|
| Daily |
|
| Weekly |
|
| Monthly |
|
| Run Once | This option only displays if you do not select All Groups. Select what time you want to run the task. |
| Run Once Immediately | This option only displays if you do not select All Groups. The task will run when you save and close the configuration. |
| Every |
|
| On System Startup | This option only displays if you do not select All Groups. The task will run when you turn on the device. |
| On User Login | This option only displays if you do not select All Groups. The task will run when the user logs in to the device. |
Add the Automations
You can add automations to scheduled tasks. Use the following steps:
- Open the Automations tab and click Add automation.
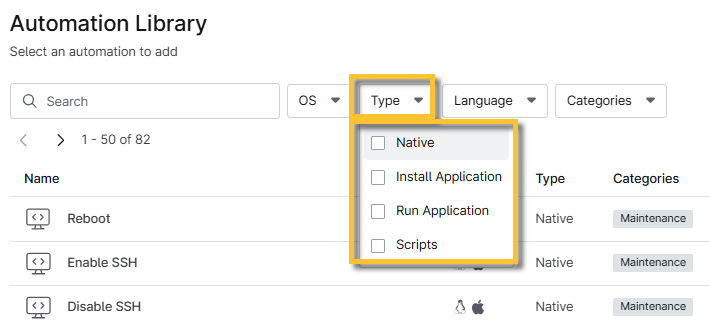
- The Automation Library dialog will display. Select any of NinjaOne's native or custom automations. You can filter by using the drop-down lists. Enter a keyword into the search field to quickly locate relevant automations.
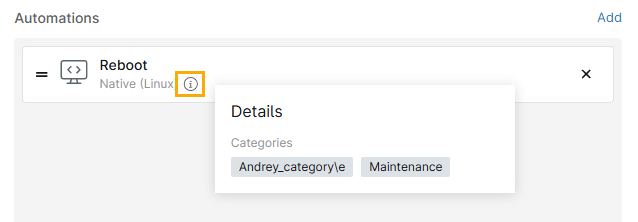
The added automations appear on the New scheduled task page, along with a description of the type and the operating system it supports. Place your mouse cursor over the information tooltip to view the automation's category.
Add Targets
After selecting tasks, you must specify the targets, which are the devices on which the tasks will run.
- Open the Targets section and click Add targets.
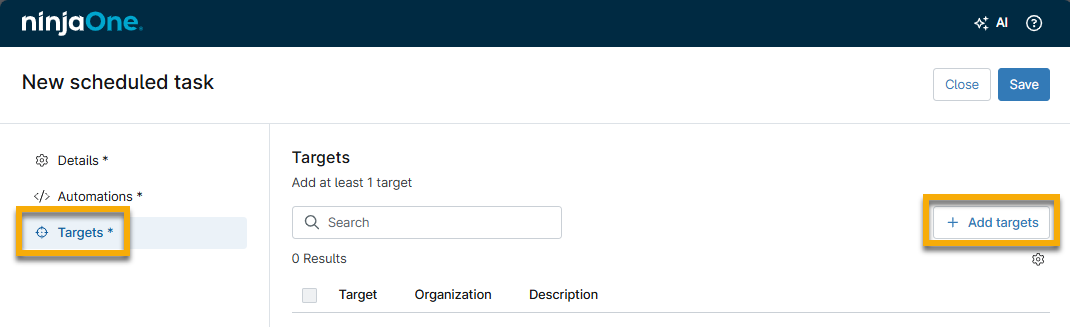
In the Add targets dialog, use the drop-down menu to filter for specific organizations, devices, and groups on which to run the task. Select all applicable options, then click Apply.
If the Allow Groups option is active in the Details tab, you can set a group as a target. Otherwise, NinjaOne will only show Organization or Devices as target options.- Click Save to save your new task.
Edit, Copy, or Delete Scheduled Tasks
Navigate to Administration → Tasks, then move your mouse cursor over the scheduled task you want to modify and select the desired option.

View Scheduled Tasks on the Device Dashboard
After you schedule the task to run automations on the device, you can track each event on the device's dashboard in the Activities → All tab.
Select Device: Automations from the Activity type drop-down menu to filter the results. The Description should state Action completed: [scheduled task name].

Additional Resources
Use the following resources to learn more about tasks and automations in NinjaOne: