Topic
This article provides instructions for running or installing automations on a device and configuring default parameters.
Environment
NinjaOne automation and scripting
Description
View additional tutorials in our video library.
- Where to Install or Run App Automations in NinjaOne
- Add Automated Applications: Installation
- Add Automation Applications: Run
- Additional Resources
Where to Install or Run App Automations in NinjaOne
You can run or install app automations through NinjaOne's Automation Library. For more information, refer to Getting Started with NinjaOne's Automation Library (Scripting).
Add Automated Applications: Installation
To install an application automation:
- Navigate to Administration > Library > Automation. Then, click Add > Installation in the top right corner.
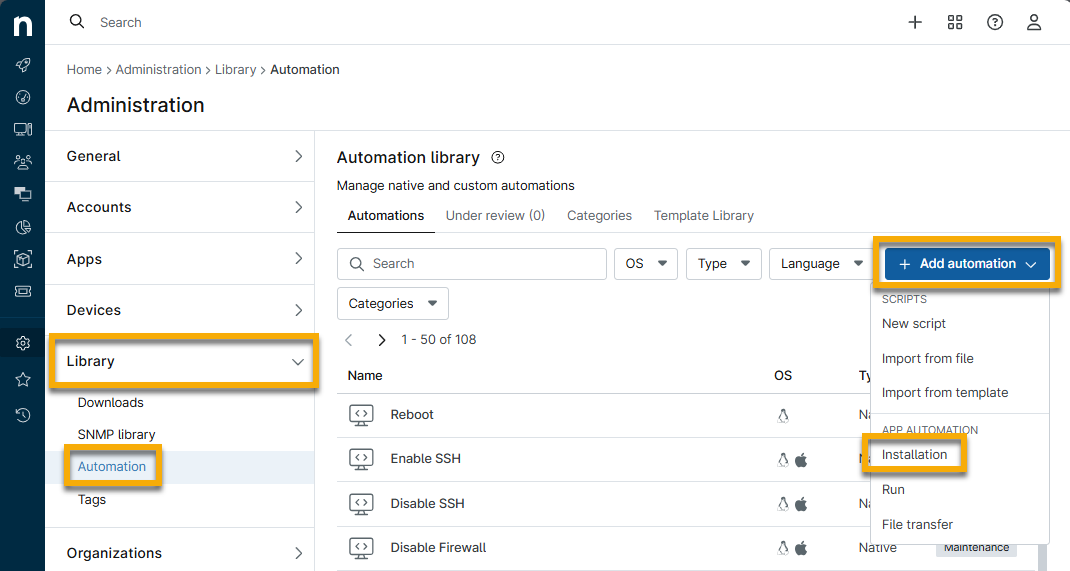
Figure 1: Install an app automation in NinjaOne
- Use the table below to help fill in the fields. Use the Additional Settings tab at the top of the page to see more configuration options.
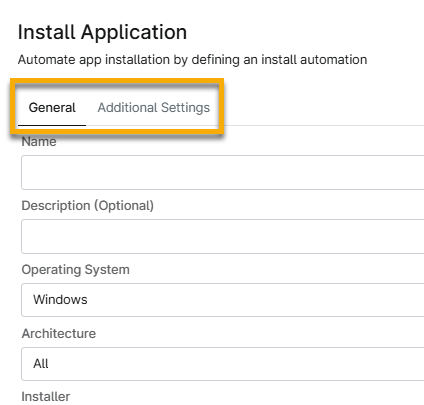
Figure 2: Install an app automation in NinjaOne → Configuration tabs
| Field | Description/Action |
|---|---|
| General | |
| Name | Give the application a unique identifier. |
| Operating System | Select whether the application is to run on Mac or Windows devices. |
| Architecture | Select whether the application will run as 32-bit, 64-bit, or both. Note: Mac can only run on 64-bit. |
| Installer | Use the drop-down menu to select whether to upload the installer or provide the path to the MSI or EXE using an HTTPS URL. Mac installers use PKG and DMG. Important Note: The file upload size limit is 1GB. If the installer takes more than 30 minutes to upload, it will time out, and you must try again. |
| Categories (Mandatory) | Select one or more categories that best describe what the application will be used for. |
| Run As | Both Mac and Windows allow the application to run as the system. Depending on the OS selected, you may have additional options to run as the current user or utilize the preferred Windows local or domain admin credentials from your credential store. Important Note: Some software may require you to deploy the installation with specific credentials. |
| Parameters | When adding preset parameters, click Add at the top right of the Parameters field. If the installer requires a specific silent parameter, add it here. For more information about preset parameters, refer to Automation Library: Parameters.
|
| Additional Settings | |
| Helper Files | You can include helper files with the installer—an example of a helper file might be a license file you need to deliver with a software installation. You can add up to five files at 100MB each. |
| Installer Icon | You can display a custom icon for the application within the NinjaOne console (this icon appears only in the Automation Library, not on the devices). |
| Pre-script | Choose an installed custom automation from the library to run before the installed application. Native scripts are not available for this purpose. |
| Post-script | Choose an installed custom automation from the library to run after the installed application. Native scripts are not available for this purpose. |
- Click Submit.
If there are any errors or failures when attempting to add the application, the affected fields turn red and display an exclamation point icon. Move your cursor over the icon to see the reason for failure.
The application moves to the Under Review tab, where the system validates it to ensure the primary and helper files are free of malware or viruses. It only displays under Automations after the scan is successful.
Add Automation Applications: Run
You can install or execute an application without transferring files using the App Automation run. You can use a file that already exists on the endpoint.
- Navigate to Administration > Library > Automation. Then, click Add > Run in the top right corner.
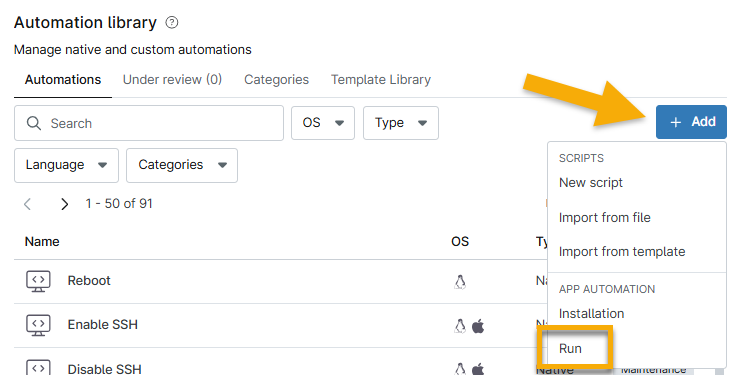
Figure 3: Run an app automation in NinjaOne
Use the table below to help fill in the fields.
Field Description/Action General Name Give the application a unique identifier. Categories Select one or more categories that best describe what the application is used for. Architecture Select whether the application will run as 32-bit, 64-bit, or both. Path Local path only.
Important Note: Run application only works for Windows devices.Run As Windows allows the application to run as the system. You may have additional options to run as the current user or utilize the preferred Windows local or domain admin credentials from your credential store.
Important Note: Some software may require you to deploy installation with specific credentials. For example, some antivirus software, such as system users, may prefer running as an admin.Parameters When adding preset parameters, click Add at the top right of the Parameters field. If the installer requires a specific silent parameter, add it here. For more information about preset parameters, refer to Automation Library: Parameters.
- Examples of common EXE silent parameters: /silent /Silent /S /s -silent --silent
- Click Save.
The application moves to the Under Review tab, where the system validates it to ensure the primary and helper files are free of malware or viruses. It only displays under Automations after the scan is successful.
Example: Install and Run Automated Applications
For this example, we'll demonstrate how to deploy Microsoft 365 using the app installation automation and customize helper files within NinjaOne. We'll start by going to a Microsoft website for the Office Customization Tool. This will help you generate an XML file you can customize to deploy certain settings as part of the Office installation.
- On the Office Customization Tool page, click Export in the upper right corner, select Office Open XML formats, and then accept the license agreement.
Enter a file name.
Important Note: This file name is the one that you will use to reference the helper files: <file name.xml>.- Click Export.
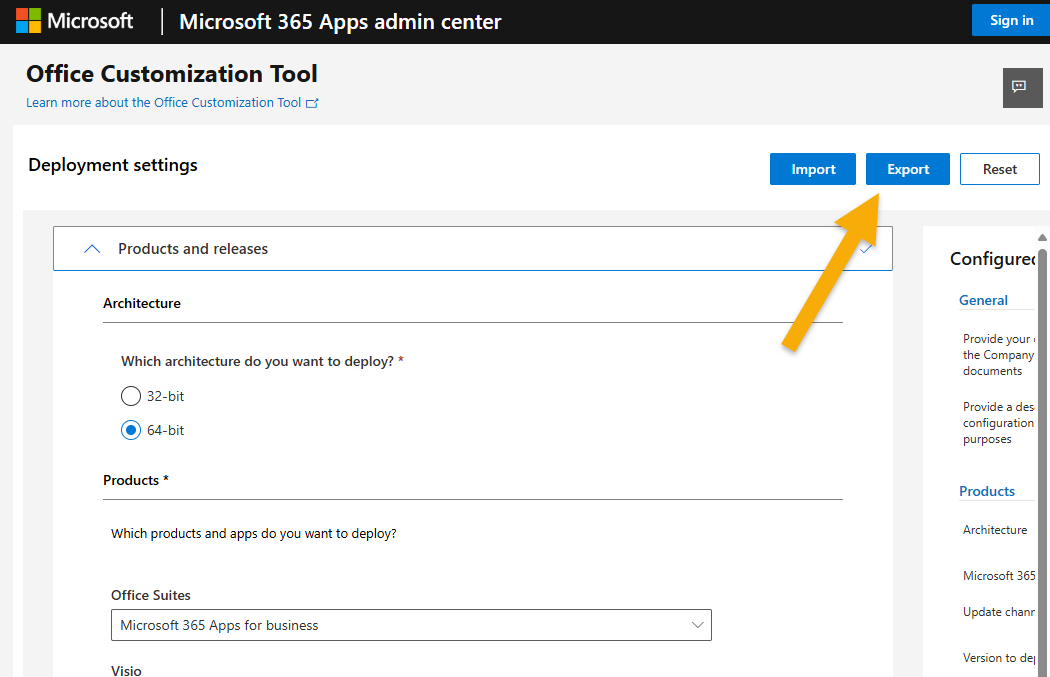
Figure 4: Microsoft Office customization tool → Export
The second half of this procedure is the configuration for the Office Deployment Tool. This is the actual file that gets delivered and is used to install Microsoft Office.
Once you've downloaded this file, you will receive a self-extracting executable with a file called "setup.exe." This is the one that you need to deploy through NinjaOne.
- Go back to NinjaOne and navigate to Administration > Library > Automation.
- In the upper-right section of the page, click Add and select App Automation > Installation.
The install application configuration modal displays. - For this example, we will name the app installation "Microsoft 365 Custom" and describe it as "Custom."
From the Installer drop-down list, select the "setup.exe" installation.
Important Notes: One of the key steps is adding the correct parameter now for Microsoft 365; this is forward slash (/configure) configure and will be the name of the custom XML file you just generated. In this case, it will be "/configure Configuration.xml."- In the Parameters field, enter "/configure Configuration.xml" and click Add to the right of the text field.
- In the Install Application modal, open the Additional Settings tab
- On the right of the helper files row, click Upload File, then select configuration XML file if it's not already displayed.
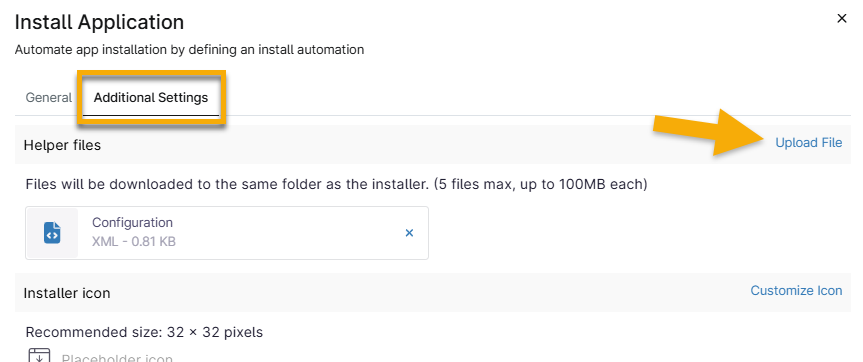
Figure 5: Upload the helper file
- At the bottom of the Install Application modal, click Submit. You can see it's attached.
From there, click Submit. If prompted, enter your one-time verification code and then click Continue. The files you uploaded will be visible there.
While this scans in the background, ensure there's no malware in what was uploaded.
- Go to the automation list and ensure it appears.
Go to one of your test machines and run this automation.
- On the device toolbar, go to the Action button > Run Automation > Install Application.
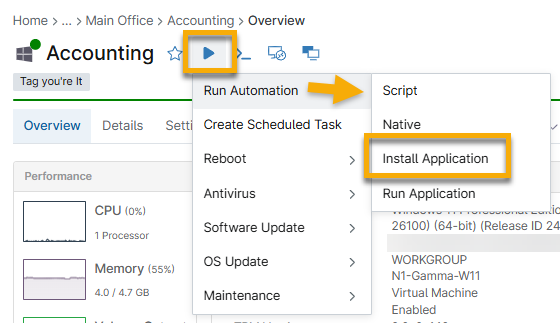
Figure 6: Run the install application automation from a device dashboard
- Choose Microsoft 365 Custom, select the preset parameter you added earlier, and then click Run, Yes, and Run Automation.
You will notice that it launches, but it will take a few moments to complete the installation. - Try launching Excel or looking at other installed apps. You can see the office applications are installed.
- Choose Excel for testing to confirm customization deployment.