Topic
This article explains how to add and manage Hyper-V and other virtual monitoring (VM) machines in NinjaOne.
Environment
NinjaOne Endpoint Management
Description
Hyper-V Monitoring lets users easily manage virtual machines with just a few configuration steps.
Select a topic to learn more:
- How Hyper-V Gathers Information from the Hypervisor
- Creating the Monitor Delegate
- Creating Policies for Hyper-V Monitoring
- Navigating the VM Dashboards in NinjaOne
- Additional Resources
How Hyper-V Gathers Information from the Hypervisor
NinjaOne uses the server as the monitor delegate host within the VM organization to gather information from the hypervisor. Therefore, the NinjaOne agent must be installed on the server first.
With EXSi, NinjaOne uses credentials. Once Hyper-V monitoring is set up, the NinjaOne agent will download and communicate with the VM agent on the device, and then populate the data in the NinjaOne console.
Windows Server 2016 Machines: When virtualization is set up using the monitor delegate, the monitoring agent constantly accesses the host using Exchange credentials. This results in a recurring security message indicating "Node credentials access granted." The message is expected due to the agent's continuous monitoring nature, combined with security measures preventing the storage of obtained credentials.
Creating the Monitor Delegate
Before you can add the virtual machine host to NinjaOne, you must add the monitor delegate. We provide several guides in our Dojo to help you with this process:
- NinjaOne Agent Installation: Add Device (Windows)
- NinjaOne Agent Installation: Add Device (macOS)
- NinjaOne Agent Installation: Add Device (Linux)
Setting up Hyper-V and VMWare ESXi Monitoring in NinjaOne
You must set up a host for VM monitoring in NinjaOne and test the configuration before adding it. You can only add one host per monitoring delegate. In order to be available for selection as a delegated monitor, a device must:
- Have the NinjaOne agent installed
- Be online and connected to the NinjaOne interface
- Belong to the organization to which you are adding a host
- Have Hyper-V installed
- Click the plus sign icon at the top of the NinjaOne interface and select Device from the drop-down menu.

- Select Virtual Infrastructure from the Add device options.

The Add a virtual machine host configuration modal displays.
- Select the type of host you want to add. Depending on your selections, the information requested by the configuration modal will change.

- Complete the configuration fields. If you need instructions for adding the Credential, refer to NinjaOne Organizations: Credential Exchange.
- Click Test host. Then, click Add host.
If the test does not succeed, a reason for the failure in red will appear in the same area.
Alternatively, you can add the host through the organization configuration page. Click the Virtualization link, then click Add Host and select an option from the drop-down menu.

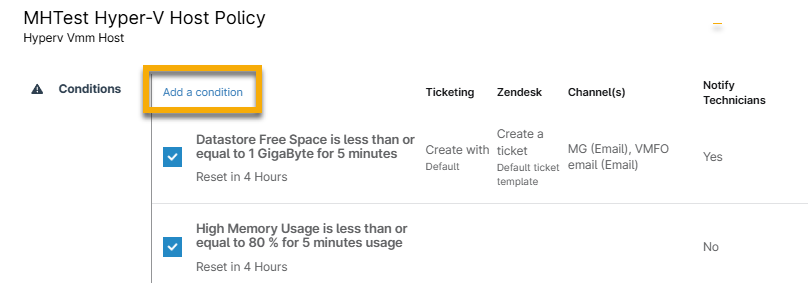
Creating Policies for Hyper-V Monitoring
NinjaOne uses policies to configure notifications and ticketing rules for triggered conditions on affected VM machines.
There are two policy types for Hyper-V monitoring: Hyper-V Host policies and Hyper-V Guest VM policies. The following steps provide information about setting up either type.
- Click Administration in the left navigation pane. Select Policies and then click VM Policies.
- Click Create New Policy. Refer to Policies: Create a New Policy for instructions.
- Assign the role as either a VMware Virtual Machine or a VMware Host.
- A new VMware policy will include a number of pre-configured conditions by default.
- Click a condition to edit the settings. You can change condition thresholds, severity and priority, define reset parameters, set up notifications for channels or technician accounts, and create tickets from triggered conditions.
- Click Add a condition to add more conditions to the policy. For more information, refer to NinjaOne Policies: Condition Configuration.
Navigating the VM Dashboards in NinjaOne
A successfully added host will be listed as a device in NinjaOne. However, the regular Windows workstation or server instance of the device in NinjaOne is listed as a separate entity and will have its own dashboard. For more information about dashboards, refer to NinjaOne Dashboards: Resource Catalog.
When looking at a host, there are six main tabs for the device:
Overview
The Overview tab for a Hyper-V host is similar to the corresponding page for a Windows workstation or server. There are three main sections: Performance, General, and Activities. Depending on whether the device has any triggered conditions, there may also be a Health section towards the bottom of the page.

| Section | Description |
|---|---|
| Performance | Provides graphs that indicate the recent performance of the device's CPU, memory, datastore and network adapter(s). |
| General | Provides the following information about the device: FQDN, OS, license key, service tag, manufacturer, private IP, uptime, total memory, datastore, total VMs, organization, policy, and delegate. The organization, policy, and delegate values provide a hyperlink to each respective item in NinjaOne. |
| Activities | Provides the activity feed for the device—or when Notes is selected, you'll see the current device note (if any). |
| Health | This section appears if there are currently any conditions triggered on the device. This section will not be visible if the device is healthy. |
Details
The Details tab has four main sections: Processor, Memory, Datastore, and Network.
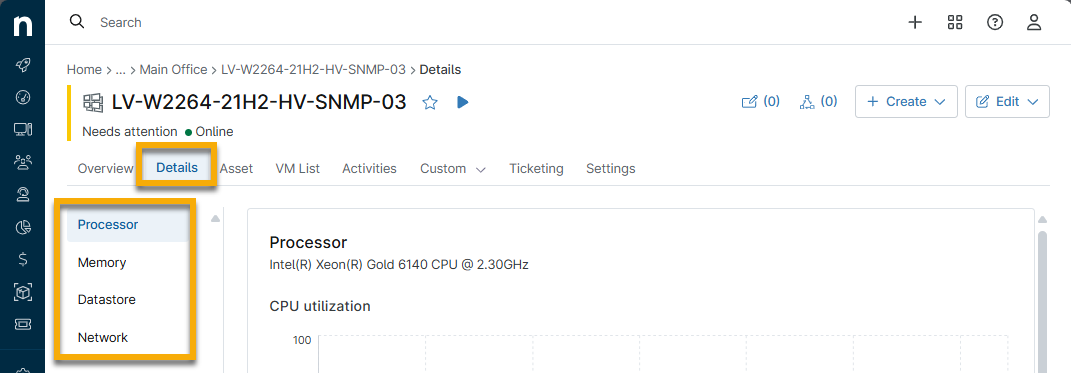
| Section | Description |
|---|---|
| Processor | Provides information about the processor and CPU utilization on the device such as the number of cores, threads, and CPU speed. |
| Memory | Provides information about the memory usage on the device such as the amount of memory in use, the total amount, and the amount available. |
| Datastore | Provides information about the datastore on the device such as the read and write speeds. |
| Network | Provides graphs of the throughput for each network adapter. |
Asset
View and update asset field information from this tab. Click the pencil icon to edit the data. This information will be tracked on the Devices search page.

Settings
From the Settings tab, you can:
- View the FQDN (fully qualified device name)
- View or edit the display name; refer to How to Change a Device Name for more information.
- View or edit the organization that the device belongs to, and view or edit the location
- View or edit the policy to which the device belongs; refer to Policies: Change a Device's Policy Setting for more information.
- Edit or clear any device-level policy overrides

VM List
In this tab, you will see a list of all virtual machines that the host is monitoring.
- Filter the list by using the search field and drop-down menus at the top of the list.
- Click the virtual machine's name to go to its device dashboard in NinjaOne.
To perform actions on a virtual machine, select the checkbox next to the name and then click any of the options that appear above the list.

The actions available depend on the machine's current status.
| Actions Available | Required State |
|---|---|
| Start | Off |
| Shut Down | On |
| Turn Off | On |
| Reset | On |
| Save | On |
| Delete | Off |
| Pause | On |
- You can run actions across multiple machines in bulk, but the machines selected must currently be in the same status (for example, all machines must currently be off).
- "Turn Off" is the equivalent of pulling the plug on a machine, whereas "Shut Down" sends a shutdown message to the guest.
- The Save function writes the contents of the VM’s RAM to the hard disk. The released RAM can then be used by other VMs.
- The Pause function will only pause the CPU and prevent it from executing any instructions.
- If you choose to delete, NinjaOne will delete the VM from the Hyper-V server in addition to the NinjaOne UI. You will be prompted to confirm that you would like to perform this action. The same goes for when you delete a VM from the Hyper-V guest itself in NinjaOne.
Activities
This tab displays all activities performed for the device in question. Refer to NinjaOne Platform: Device and System Activity Notification Feed for more information.
Additional Resources
Refer to the following resource to learn more about virtual monitoring in NinjaOne: NinjaOne NMS: Hyper-V Monitoring FAQ.