Topic
Environment
- NinjaOne Integrations
- Zendesk
Description
NinjaOne introduces our integration with the Zendesk ticketing system! The Zendesk ticketing integration provides alerts that can be resolved from the NinjaOne device dashboard and allows users to access a device in NinjaOne from a ticket in Zendesk.
Refer to the About section below for more details on the capabilities offered by this integration.
Index
Select a category to learn more:
- About
- Enable the Zendesk Integration
- Configure the Zendesk Integration
- Set Technician Permissions for Zendesk
- Additional Resources
About
The Zendesk integration with NinjaOne provides the following capabilities:
- NinjaOne system administrators can find NinjaOne in the Zendesk marketplace when the app is enabled through NinjaOne.
- NinjaOne will automatically create a webhook to trigger your Zendesk account.
- Specific technicians can have permissions configured to allow them to modify Zendesk integration settings. Instructions.
- Technicians can use their Zendesk credentials for user authentication.
- Map NinjaOne organizations to Zendesk organizations for tracking alerts. Instructions.
- When the organizations are mapped, the associated policies can create tickets in Zendesk based on configured conditions and alerts.
- Create ticket templates with core Zendesk values. Instructions.
- When an alert is resolved in NinjaOne, the Zendesk ticket follows the configured workflow.
- Ticket statuses support custom fields.
- Access device information and launch remote sessions from within the Zendesk Ticketing tool on the NinjaOne platform.
Enable the Zendesk Integration
To enable the integration, perform the following steps:
- Log in to NinjaOne.
- From Administration, open the Apps tab and click Add Apps. Select Zendesk.
You will be redirected to the App settings page. - Click Enable.
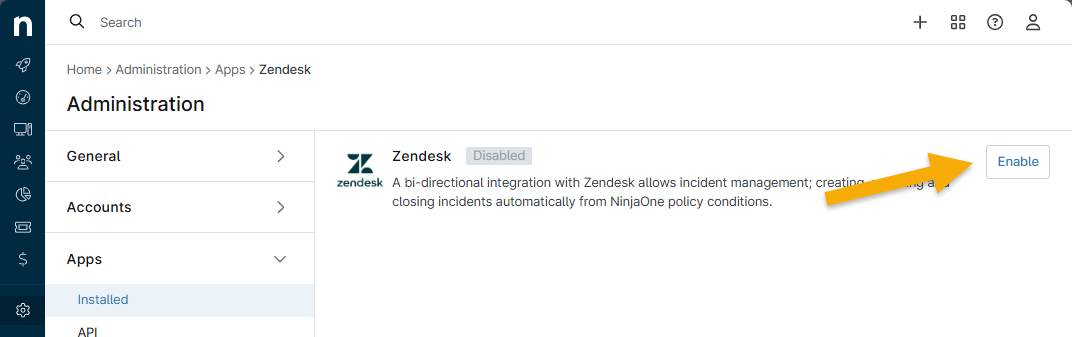
Figure 1: Enable the Zendesk integration app in NinjaOne
The Zendesk Auth modal displays.
- Enter the data from your Zendesk account; this can be found in the URL bar between "https://" and "zendesk.com/".
- Click Login with Zendesk to connect the account.
Zendesk Marketplace App
When you enable or edit the Zendesk app configuration in NinjaOne, you have the option to activate the Zendesk Marketplace app.
Check this box to allow the system to fetch custom field device IDs and sync accounts.
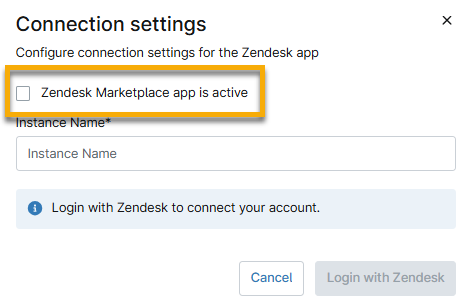
Figure 2: Enable the Zendesk Marketplace app for the integration
Configure the Zendesk Integration
Select a topic to continue:
Create Ticket Templates
NinjaOne supports Zendesk custom ticket statuses. To learn more about Zendesk custom statuses, refer to Activating custom ticket statuses – Zendesk help (external link).
- From the Zendesk app setting page in NinjaOne, click the Ticket Template tab. Then, click Add.
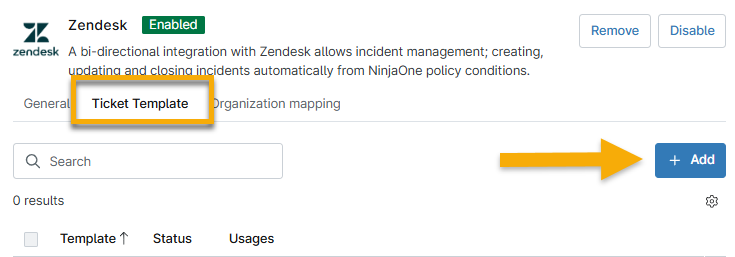
Figure 3: Create a ticket template for the Zendesk integration in NinjaOne
- Use the Zendesk Ticket Structure table to fill out the fields. Then, click Save.
- Once added, you can further edit, set as default, or delete a ticket template by clicking the ellipsis button that appears when you place your cursor over the row.

Figure 4: Manage ticket templates for the Zendesk integration in NinjaOne
Map Organizations in Zendesk
To learn about creating organizations within Zendesk, refer to Creating organizations – Zendesk help.
- From the Zendesk app setting page in NinjaOne, click the Organization mapping tab. You will find a list of all existing organizations within NinjaOne.
- Place your cursor over the organization you want to map and click the ellipsis button that appears. Alternatively, activate the radio box next to the organization name. Select Edit. (Selecting Clear will remove existing mappings and turn off ticket creation.)

Figure 5: Manage organization mappings for the Zendesk integration in NinjaOne
- Select the Zendesk organization from the available drop-down menu. Optionally, you can select a user who belongs to that organization to act as the default contact. The contact ideally should be someone who is knowledgeable or responsible for the organization.
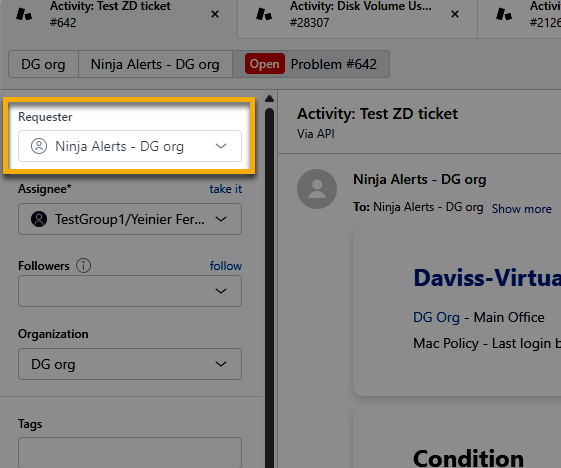
Figure 6: Example of the requestor field on a Zendesk ticket
- To enable ticket creation for the organizations, select the checkbox below the drop-down menus.
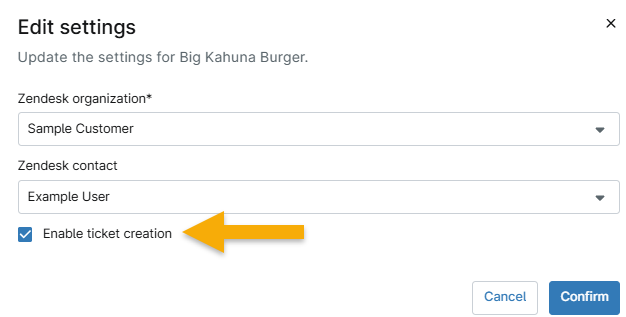
Figure 7: Enable ticket creation for the Zendesk organization and contact
- Click Confirm.
If the mapping is successful, the Status column will show "Active." The Ticket creation column shows whether you selected the Enable checkbox.
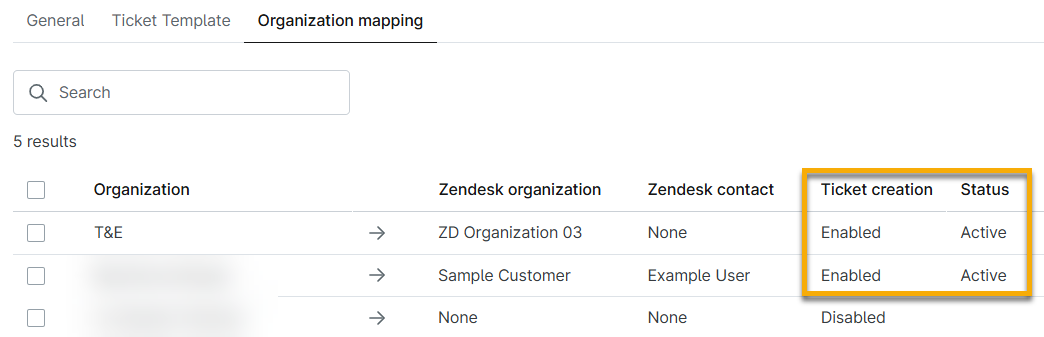
Figure 8: Example of the Zendesk ticket creation and status data
Set Technician Permissions for Zendesk
Technicians need to have their permissions updated to allow them to create ticket templates for Zendesk.
- From Administration → Accounts, either open a Technician account editor or Technician Role editor.
- Open the Permissions → System tab.
- Find the ITSM / PSA Integrations Configuration and set the drop-down menu to "Allowed."
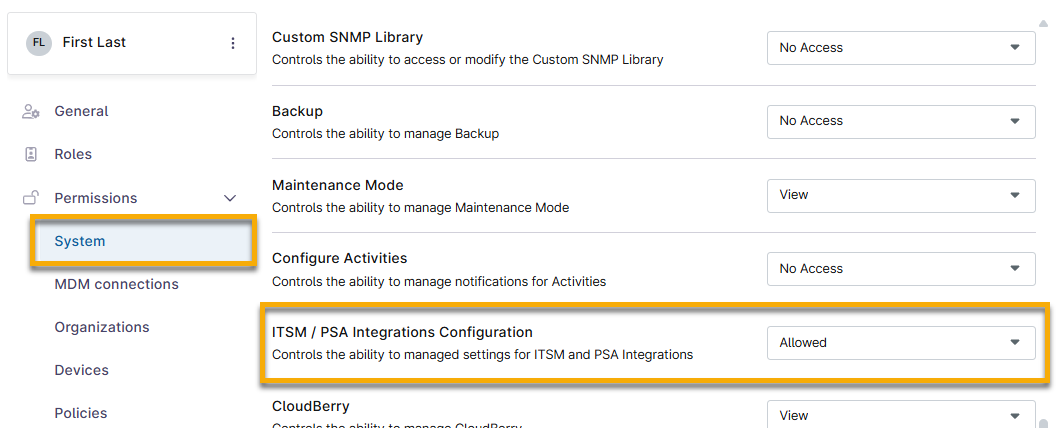
Figure 9: Give a NinjaOne technician access to the Zendesk integration
- Click Save Changes.
Additional Resources
Refer to the following resources to learn more about using Zendesk with NinjaOne:
- Zendesk Ticket Structure in NinjaOne
- Zendesk Integration Troubleshooting
- External help guides