Topic
This documentation explains how to set up Webroot in NinjaOne using a new or existing account with Webroot (also known as OpenText).
Environment
- NinjaOne Integrations
- Webroot or OpenText
Description
Integrating Webroot with NinjaOne allows you to deploy, scan, and remediate threats directly in NinjaOne using Webroot’s easy-to-manage cybersecurity suite.
Index
Select a category to learn more:
Important Notes
Before you begin, consider the following information:
- Only system administrators can view the application tile and perform Webroot actions such as configuring the integration and deploying the antivirus at the policy level. This also includes actions such as Synchronize and Poll now.
- You may use any email address to register for your Webroot trial (the email address does not necessarily need to belong to an existing user within NinjaOne).
- To use the integration, you must start your Webroot trial within the NinjaOne application, or your Webroot account must be managed by NinjaOne Billing.
- If you receive a prompt during the initial setup of your Webroot account asking you to specify whether you are a "Business" or "MSP" account, select MSP.
- If you selected Business and need to convert your Webroot account to MSP, you can do so in the Advanced Settings section of the Settings tab in the Webroot console.
- Ensure that your NinjaOne organizations and Webroot sites match in name; otherwise, you may experience mapping inconsistencies.
Integrate Your Webroot Account
To integrate a Webroot account with NinjaOne, perform the following steps:
- Navigate to Administration → Apps and click Add Apps. Select Webroot from the list of apps. If you have already added this app, click the Webroot tile on the screen under Third-party apps.
- A window pops up with a prompt asking whether you already have a Webroot account.
- Select "No" if you do not have a Webroot account, and then read the instructions in the following subsection titled New Account.
- Select "Yes" if you have an existing Webroot account, and then read the instructions in the following subsection titled Existing Account.
New Account
To create a new Webroot account with NinjaOne, perform the following steps:
- Starting from the previous section, enter your information to create your Webroot trial, and then click Create.
You will receive an email directly from Webroot to initialize your new account. The welcome email may take up to 10 minutes to arrive. The sender will be "[email protected]."

Figure 1: Example of the Webroot setup email (opened in Outlook)
- Follow the link in the email to register your account and then return to the NinjaOne platform.
- Once you initialize your trial account, click Agree to permit NinjaOne to create an API user for use with the integration.
- In the Username field, use your email address and the password you set up when registering with Webroot.
Webroot displays as enabled in NinjaOne on the Installed Apps page.
Existing Account
To integrate your existing Webroot account with NinjaOne, perform the following steps:
- Enter your GSM key and email address, then click Agree on the prompt. Find our GSM key in the Webroot GSM console at Settings → Account Information → Parent Keycode.
- Alternatively, you can enter your Webroot credentials by selecting the checkbox in the setup modal.
- You will receive an email from "[email protected]." Click the link in the email to activate the API user.
- Once you follow the emailed instructions to activate the API user, return to your NinjaOne console and click Continue where prompted on the screen. If you selected the option to enter your existing credentials, you can skip this step.
- You are prompted to map your NinjaOne organizations to your Webroot sites. For the organizations to be correctly mapped to sites, ensure they are named exactly the same.
- To change the name of an organization in NinjaOne, navigate to Administration → Organizations and select the organization. Update the Name field in the General section. Then, return to the Webroot app configuration setup and click Refresh list.
- To change the name of a Webroot site, navigate to Sites → Manage on the Webroot console and edit the name in Details. Then, return to the Webroot app configuration setup and click Refresh list.
- Once your NinjaOne organizations and Webroot sites are correctly matched, click Submit.
You will receive a message informing you that your Webroot integration has been appropriately configured.
Give Users Access to Sites in the Webroot GSM Console
Follow the steps for each user to provide access to your sites, including your own account:
- Navigate to the Webroot GSM console, located at https://my.webrootanywhere.com.
- Click the Admins tab.
- Click the name of any user who needs access to all sites.

Figure 3: Select an admin in Webroot
- Click Site Permissions.
- Grant administrator access for all sites.
- Click Save.

Figure 4: Set admin permissions in Webroot
Deploy Webroot to Devices
Once the Webroot integration has been enabled on the console, you must enable it at the policy level to deploy to your devices.
- Navigate to Administration → Policies and select a policy for which you would like to enable Webroot.
- Select the Antivirus tab, and then select Webroot from the drop-down menu.
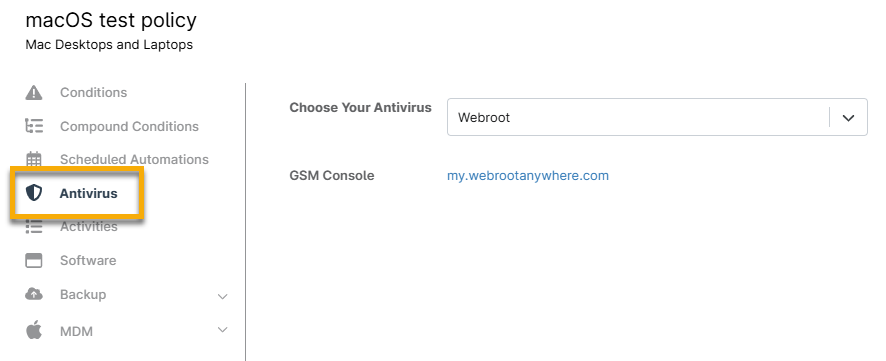
Figure 2: Deploy the antivirus at the policy level
- You will receive a prompt asking if you wish to deploy Webroot to the devices in your policy. Click Yes.
- Save the policy.
It can take time for a new endpoint registration (and endpoint ID) to pass through the various servers of the Webroot backend. This could take up to 24-48 hours. Due to this, it may take some time for Webroot to be deployed and properly synced.
If you're experiencing issues with syncing, refer to Webroot: Error NJ-INT-WR001 for assistance.
Using device-level policy overrides, you can enable or turn off Webroot for specific devices. For more information about policy overrides, refer to Change or Override a Device Policy.
Additional Resources
Refer to the following resources to learn more about the Webroot integration in NinjaOne:
- Webroot: FAQ
- Webroot: Troubleshooting
- For more information about navigating the Webroot GSM console, refer to the Webroot GSM Admin Guide (external link).
- Integrations and Third-Party Apps: Resource Catalog