Topic
This article will help you enable and use the Bitdefender Software Development Kit (SDK) integration, which is currently available for Windows devices only.
Environment
- NinjaOne Integrations
- Bitdefender SDK
Description
- Technician Permissions for Bitdefender
- Bitdefender SDK Branding
- Deploying Bitdefender SDK to Devices
- Bitdefender SDK Settings
- Running an Ad-hoc Bitdefender Scan
- Viewing the results of a Bitdefender scan
- Taking Action on Blocked or Quarantined Threats
- Bitdefender Search Filters
- Additional Resources
Technician Permissions for Bitdefender
System administrators have default access to the Bitdefender GravityZone Integration. Technicians with custom user permissions must be granted access through permissions or roles.
Select a topic to continue:
Grant Access to a Technician
- Navigate to Administration → Accounts → Technicians and then select a technician to whom you would like to grant GravityZone management access.
- Under Permissions, select System. If system access is not enabled, use the toggle switch to enable it.
- Scroll down to the GravityZone options. There are two roles available:
- GravityZone Admin: This role grants the user complete rights to administer the integration, including enabling or disabling it, as well as starting or canceling scans.
- GravityZone Scan Options: Users in this role are only allowed to start and cancel scans.
Select No Access or Allowed for each role. Then, click Save Changes.
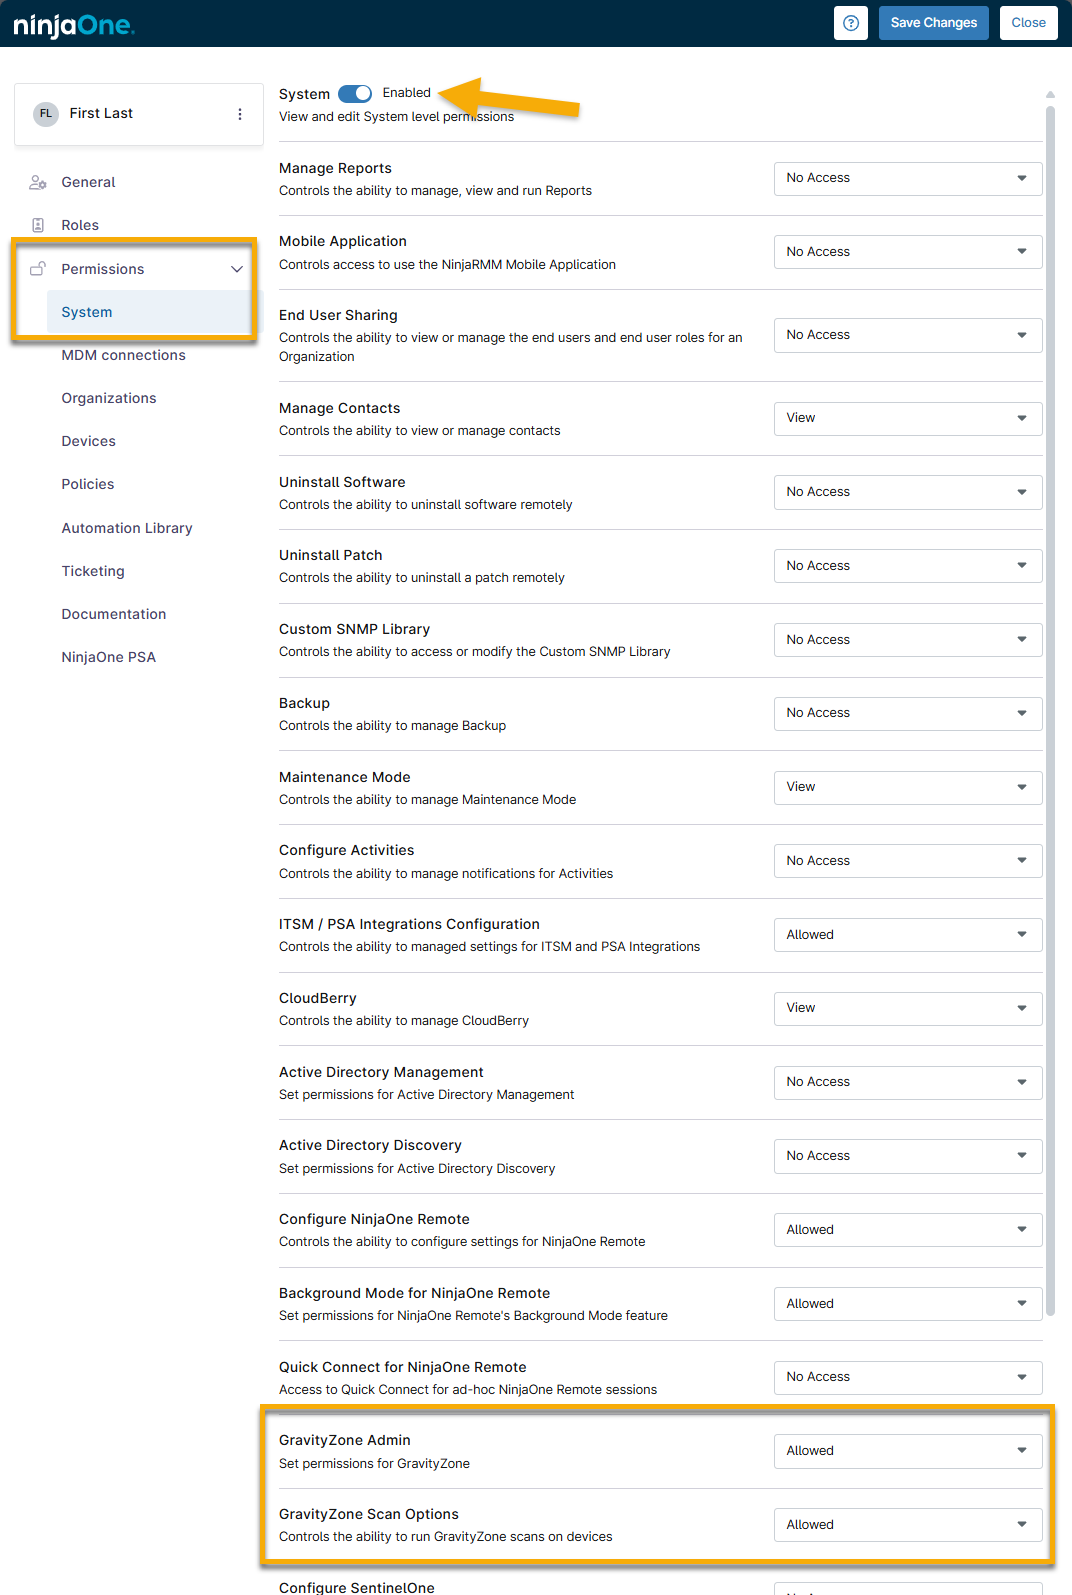
Figure 1: GravityZone permissions (click to enlarge)
Grant Access Via a Role
- Navigate to Administration → Accounts and select the role to which you would like to grant GravityZone access.
- Under Permissions, select the System tab. If system access is not enabled, use the toggle switch to enable it.
- Scroll down to the GravityZone options. There are two roles available:
- GravityZone Admin: This role grants the user complete rights to administer the integration, including enabling or disabling it and starting or canceling scans.
- GravityZone Scan Options: Users in this role are only allowed to start and cancel scans.
Select No Access or Allowed for each role. Then, click Save Changes.
Bitdefender SDK Branding
The Bitdefender SDK installation pulls information directly from the Branding section of NinjaOne to customize the technical support information that shows up under the About section of the Bitdefender SDK systray icon for the end user.
Navigate to Administration > General > Branding and click Edit under the Website section.
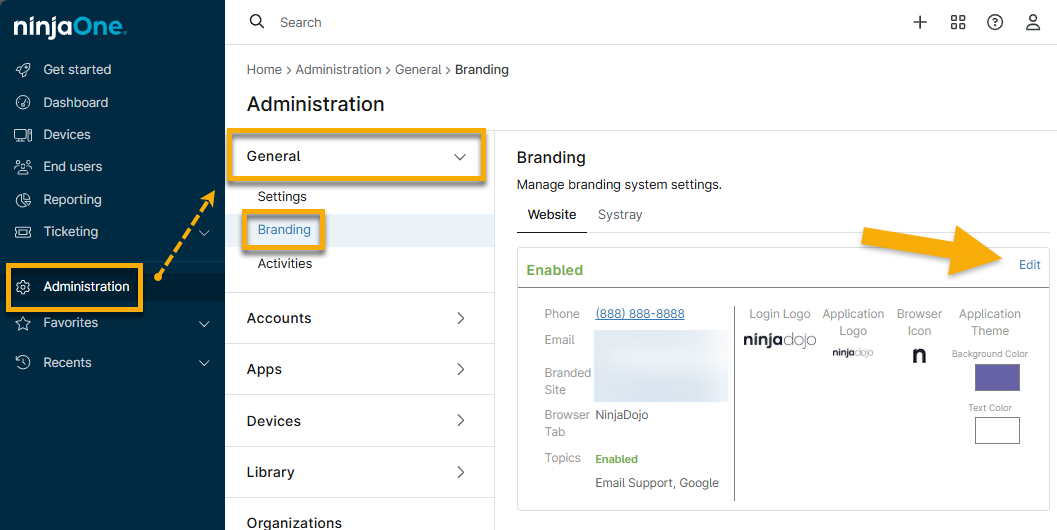
Figure 2: Edit branding for custom NinjaOne website
Bitdefender SDK uses the provided phone number, email address, and help website as the technical support information. From the website, the end user can view this information by right-clicking the Bitdefender systray icon, and then selecting About.
Deploying Bitdefender SDK to Devices
Please review the following notes prior to deploying Bitdefender SDK to your devices:
- NinjaOne does not support arm-based Windows 11 devices at this time.
- We highly recommend that you uninstall any other antivirus software prior to installing Bitdefender SDK on a device, as having multiple antivirus software installed may cause poor performance and other unexpected behavior.
- If you have previously been using a Bitdefender SDK integration with GFI, N-Central, or any other RMM, you need to disable the integration for the device(s) in the other RMM prior to enabling NinjaOne's Bitdefender SDK integration. Not doing so will prevent NinjaOne from being able to install our integrated SDK version of Bitdefender.
- If you have previously been using another version of Bitdefender (such as GravityZone), you will need to uninstall it prior to enabling NinjaOne's Bitdefender SDK integration. Not doing so will prevent NinjaOne from being able to install our SDK integrated version of Bitdefender.
To deploy Bitdefender:
- Navigate to Administration > Policies and select a policy for which you would like to enable Bitdefender SDK (and therefore deploy Bitdefender to the devices under said policy).
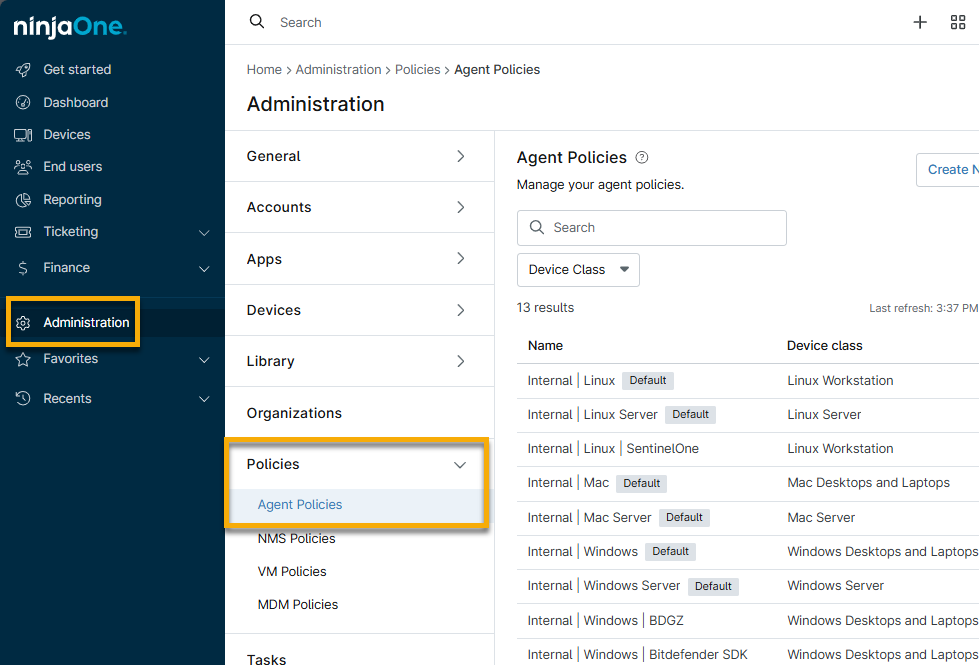
Figure 3: Access policies in NinjaOne
- Select the Antivirus tab, and then select Bitdefender SDK from the drop-down list.
You will receive a prompt asking you if you are sure you wish to deploy Bitdefender SDK to the devices under your policy. If you are sure, click Yes.
Important Note: Even after clicking Yes on this prompt, Bitdefender SDK will not be deployed to the devices under this policy until you save the policy.- Configure your preferred Bitdefender settings. Refer to this article's section titled Bitdefender SDK Settings for more information.
- Click Save to trigger Bitdefender to attempt to install on the devices under this policy.
For any devices that are online and under the policy, you should now see Bitdefender begin to install. When this occurs, a message appears both in the Health section for the device, as well as the Activity Feed that indicates the Bitdefender download has started or notifies you if it failed and the message provides more information regarding the failure. The Installation settings specified in your policy for "If Bitdefender installation fails" trigger in this scenario (see below for more information about these settings).
If the Bitdefender installation fails, you have a few options: move your cursor over the entry under the Health section for the device and click the expand arrow.
-
- Schedule Install: Choose a daily or interval (every 'x' hours) schedule at which further Bitdefender installation attempts will occur for the device. Selecting this option creates a device-level policy override for the Bitdefender Installation settings.
- Retry Install: Trigger another installation attempt immediately.
- Cancel Install: Choose not to install Bitdefender on the device. This option creates a device-level policy override to disable Bitdefender.
Bitdefender SDK Settings
The Bitdefender SDK integration is a single-pane-of-glass integration, so all options and settings are configured from directly within your Ninja policies. Please see the following for a breakdown of the available policy settings for Bitdefender.
- Installation
- Post Install Reboot Options
- Action
- Quick Scan Schedule
- Custom Scan Schedule
- Full Scan Schedule
- On-Access
- Advanced Scan Options
- Custom folders to scan
- End User Options
- Miscellaneous
- File Extensions
- Purge quarantined files after (days)
- Scan Exclusions
Installation
This section allows you to configure how the Bitdefender SDK installation behaves under the following possible circumstances.
- If another antivirus software is installed, you can choose whether you'd like to:
- Notify and take no action—users are notified, but Bitdefender does not attempt to install (this option is selected by default).
Notify and proceed with installation anyway—users are notified, and NinjaOne proceeds with attempting to install Bitdefender on the device in question.
Important Note: We highly recommend that you uninstall any other antivirus software prior to installing Bitdefender on a device, as having multiple antivirus software installed may cause poor performance and other unexpected behavior. Therefore, to proceed with this action, you will be prompted to enter your user's email address for confirmation.
- If Bitdefender installation fails, you can choose whether or not you would like NinjaOne to reattempt the installation (by toggling the Enabled option), and if so, you can specify either a daily or interval (every 'x' hours) schedule.
Post Install Reboot Options
With the Bitdefender integration, a reboot may required to complete installation or successfully remove a threat. This section allows you to configure how the device will behave under the following possible circumstances.
- If a user is logged in, you can choose whether you'd like to:
- Prompt to reboot until accepted—the end user is prompted every 'x' number of minutes/hours/days until the reboot is accepted.
- Notify user then reboot—the end user is notified that their device will reboot, and then proceed to reboot after 'x' number of minutes/hours/days.
- Automatically reboot—the device automatically reboots after 'x' number of minutes.
- Do nothing—the device does not reboot, and the reboot remains pending until further action is taken.
- If a user is not logged in, you can choose whether you'd like to:
- Reboot immediately—the device reboots immediately.
- Attempt to reboot until successful—select a daily, interval, or weekly schedule at which you'd like the device to attempt to reboot.
- Do nothing—the device does not reboot, and the reboot remains pending until further action is taken.
Action
This section allows you to configure how Bitdefender will behave under the following possible circumstances.
- When an infected file is found, you can choose whether you'd like to:
- Disinfect, Delete, or Quarantine the file.
And, which of the above actions you'd like to occur if the previous action fails.
Important Note: If 'Disinfect' is selected as an action but the disinfection fails, Bitdefender will delete the file. This applies regardless of whether 'Disinfect' is selected for the first or second action. A message in the UI will indicate as such whenever 'Disinfect' is selected.
- When a suspicious file is found, you can choose whether you'd like to:
- Disinfect, Delete, or Quarantine the file.
- And, which of the above actions you'd like to occur if the previous action fails.
- Important Note: If 'Disinfect' is selected as an action but the disinfection fails, Bitdefender will delete the file. This applies regardless of whether 'Disinfect' is selected for the first or second action. A message in the UI will indicate as such whenever 'Disinfect' is selected as an action.
Quick Scan Schedule
This setting allows you to enable or disable quick scans from running on a schedule (by toggling the Enabled option), as well as to specify a daily or weekly schedule at which you'd like a quick scan to run.
Full Scan Schedule
This setting allows you to enable or disable full scans from running on a schedule (by toggling the Enabled option), as well as to specify a daily or weekly schedule at which you'd like a full scan to run.
Custom Scan Schedule
This setting allows you to enable or disable custom scans from running on a schedule (by toggling the Enabled option), as well as to specify a daily or weekly schedule at which you'd like a custom scan to run.
On-Access
This setting simply allows you to enable or disable on-access scanning, which is Bitdefender's real-time protection tool. This feature will scan files as users access them.

Figure 4: Example of reported threats on the device
Advanced Scan Options
These settings allow you to customize what types of files are scanned during quick scans, full scans, custom scans, and during on-access scanning (if enabled).
- For more information about Potential Unwanted Applications, click here to see an article from Bitdefender's knowledge base.
- If you opt to have Bitdefender scan Archives, it will scan inside of archive files (such as zip files).
- To avoid long scan durations, we limit the max depth of the archives to be scanned. For full and quick scans, the limit is 2. For custom scans, the limit is 5.
- If you opt to enable SmartScan, Bitdefender will check the checksum of the file. If the file hasn't changed since the last scan, it will not be scanned again.
You can also select the priority level for quick, full, and custom scans—this determines how much CPU can be taken by a scan (low priority will take up less CPU).
Custom folders to scan
This setting allows you to select particular custom folders to include in scans. Click 'Add a folder' in the top right to add a new custom folder to scan.
Then, proceed to type the location of the folder in text box.
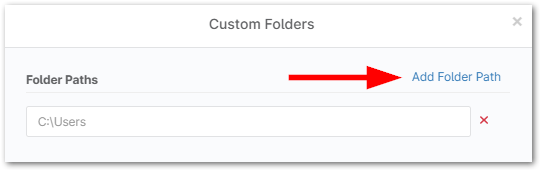
Figure 5: Add path for custom folder scan
End User Options
These settings allow you to choose whether you'd like end users to be able to trigger quick and full scans from the Bitdefender UI locally on the machine, and whether you'd like to password protect the Bitdefender installation.
- Checking the Enable/Disable Quick and Full scans from Bitdefender UI option determines whether or not end users will see the option to trigger quick and full scans when they open Bitdefender locally on the machine.
- Checking the Password protect Bitdefender installation option makes it so that Bitdefender cannot be uninstalled locally on the machine, as the end user will be prompted with a password to do so.
- If this option is enabled, Bitdefender can only be uninstalled by disabling it in your Ninja policy.
Miscellaneous
Selecting the Make up missed schedules with a quick scan option causes a device to perform a quick scan upon initial check-in if it is offline at the time when a scheduled scan was supposed to run.
File Extensions
There are three different options for file extensions to be scanned:
- All—all files to be scanned.
- Application—only programs to be scanned.
- Custom—you can select particular custom extensions to be scanned in addition to all known extensions (add new custom extensions by clicking Add in the top right corner).
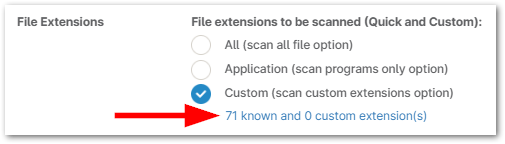
Figure 6: Manage custom file extensions
Purge quarantined files after (days)
This setting allows you to choose the time frame after which quarantined files should be purged.
Scan Exclusions
This setting allows you to configure any of the following types of exclusions:
- General File Exclusion - type a path to a particular file that you would like to exclude
- Folder Exclusion - type a path to a particular folder that you would like to exclude
- Extension Exclusion - specify a particular extension that you would like to exclude
- Process File Exclusion - type a path to a particular process that you would like to exclude

Figure 7: Add an exclusion path
Running an Ad-hoc Bitdefender Scan
You can run a Bitdefender scan on a device ad-hoc (outside of schedule) in one of two ways:
- Navigate to the device you wish to run a scan on, hover your cursor over the play button > Antivirus, and select the type of scan you wish to run (custom, quick, or full scan).

Figure 8: Run the antivirus from the device dashboard
- Navigate to the Devices search page, select the device(s) you want to run a scan on, click Run > Antivirus, and select the type of scan you wish to run.
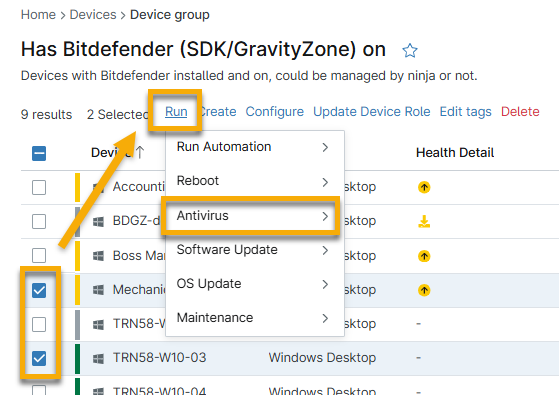
Figure 9: Run the antivirus from the device search page
Viewing the results of a Bitdefender scan
After a Bitdefender scan is run, any blocked or quarantined threats will show up under the Health section on the device dashboard or the Device Health section on the system dashboard.
View more granular data about any current active, blocked or quarantined threats from the Devices > Threats tab on the system dashboard. For more information about the Threats tab, refer to Using Dashboards in NinjaOne.
Taking Action on Blocked or Quarantined Threats
Blocked Threats
Blocked threats appear with a red shield icon (![]() ) on devices.
) on devices.

Figure 10: Example of a blocked threat icon
If Bitdefender encounters a potential threat that is not included in its definitions and it therefore is unable to take action (disinfect, quarantine, or delete) on, it blocks this file. Blocked files are still on the machine but are inaccessible to the end user until the device is rebooted.
There are two different options for handling a blocked threat:
- Add Exclusion—if you have deemed that the file being blocked is not actually a threat (and is therefore a false positive), you can an add an exclusion for the file, which in turn causes the blocked file to be released and it will not be included in scans going forward. Exclusions are added as device-level policy overrides and can be visible under the Scan Exclusions section of the Bitdefender policy settings.
- Manually Delete—since the file is blocked due to Bitdefender being unable to take action, you need to manually remove the file in question if it is a legitimate threat. After a reboot, the blocked file will be accessible again on the machine, at which point you can delete it.
- Important Note: If a blocked threat is detected on a file used at boot up, the threat is immediately re-blocked by on-access scanning after a reboot, rendering it once again inaccessible (before you are able to manually delete it). In order to successfully delete a threat in this scenario, you need to boot into safe mode.
Quarantined Threats
Quarantined threats appear with a yellow shield icon (![]() ) on devices.
) on devices.
Threats are quarantined if you have configured Bitdefender to quarantine suspicious and/or infected files under your policy settings.
There are three different options for handling a quarantined file:
- Restore Threat—in the case of a false positive, you can restore the file on the machine. Doing so should return the file to its original location.
- Delete Threat—in the case that the threat detected is legitimate, you can delete the suspicious or infected file from the machine.
- Restore & Add Exclusion—in the case of a false positive, you can restore the file to the machine, as well as add an exclusion for the file in question so that it is not included in future scans. Restoring the file should return it to its original location. Exclusions are added as device-level policy overrides and can be visible under the Scan Exclusions section of the Bitdefender policy settings.
Bitdefender Search Filters
There are four Bitdefender-related filters that can be found under Additional Filters from the Search page:
- Devices with install issues
- Devices Requiring Reboot to Install
- Devices Requiring Reboot to Upgrade AV Engine
- Devices Requiring Reboot to Disinfect
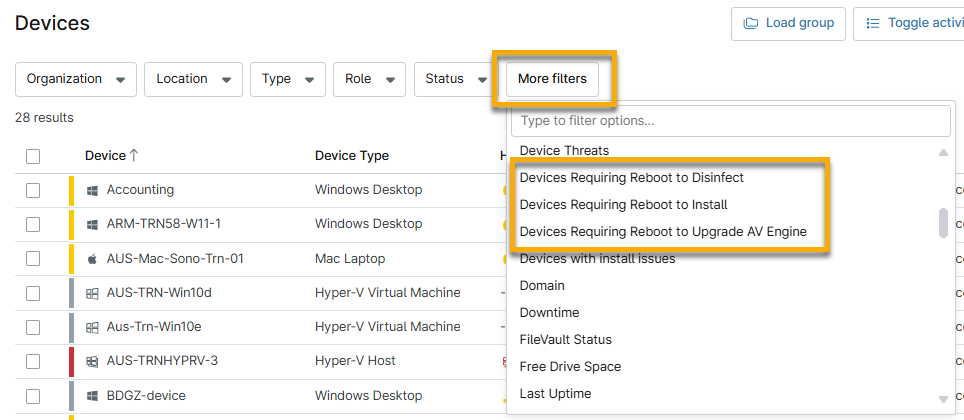
Figure 11: Apply filters related to Bitdefender from the Devices search page
The search page also provides built-in search groups for Bitdefender:
- Has Bitdefender on
- Has Bitdefender SDK managed by NinjaOne

Figure 12: Load search group from the Devices search page
Additional Resources
For a list of frequently asked questions about the Bitdefender integration, please see Bitdefender: FAQ.