Topic
This article discusses image backup plans in NinjaOne Backup.
Environment
NinjaOne Backup
Description
About NinjaOne Image Backup
NinjaOne Image Backup backs up your data at the volume level. It allows you to back up complete operating systems, applications, and files, ready for restoration in the event of hardware failure, malware, or other disasters. The latest version of NinjaOne Image Backup requires only one full backup, while recording periodic revisions as defined by the retention schedule you specify in your backup plan. This feature saves significant storage space and running backup time compared to the previous version of the NinjaOne Backup product.
Learn more about setting up NinjaOne Backup here.
Image Backup Plans
A backup plan is the predefined set of instructions that NinjaOne follows to create and save your backups. You can configure image backup plans in two different ways: at the policy level or the device level (as a policy override). These options offer the flexibility to configure image backup plans for either multiple devices or a single device, depending on your needs. The video below provides a brief explanation of the available options.
Want to learn more about NinjaOne Backup? Check out our video library.
Refer to the sections below for more information on image backup options.
For instructions on setting up NinjaOne Backup, refer to NinjaOne Backup: Setup Guide.
Creating a Backup Plan
The following two sections provide a brief overview of creating a backup plan at the policy level or device level.
Policy Level
A policy-level backup plan applies to all devices assigned to that policy. For more information on how policies work in NinjaOne, refer to NinjaOne Policies: Create and Manage a Policy.
To create an image backup plan at the policy level:
- In NinjaOne, navigate to Administration → Policies and select the policy that you'd like to configure an image backup plan for, and then
- Select the Backups tab in the side navigation bar.
- From the Backup drop-down menu, select Image.
- Click Enable to enable the Image Backup Plan.

Figure 1: Enable image backup planning in NinjaOne
- In the General section, select your Backup Destination (Local, Cloud only, or Hybrid).
- Set your desired schedule. You can also back up your image volumes on an hourly, daily, weekly, or monthly basis.
- When setting the Image backup schedule to monthly, you can select a custom date from the calendar. Note that this option does not allow you to select days 29–31, because they cannot be applied to all calendar months.
- With hourly Image retention plans. You can manually sync specific revisions to the Cloud. Refer to the Sync to the Cloud section below for details.
- Select your Retention options from the drop-down lists. NinjaOne pre-populates these fields with default retention settings that meet the needs of most users, but you can adjust them to suit your own preferences. Refer to NinjaOne Backup: Image Backup Plans: Retention Options for a detailed explanation of retention options and settings.
- Choose one or more of the additional settings listed in the "Additional Backup Policy Settings" section below.
- Click Save.
Device Level (Policy Override)
You can create a device-level policy that overrides a policy-level backup plan by modifying the backup plan at the device level. Device-level policies only apply to the specific device you set them for.
To set up a device-level policy override, follow these steps:
- In NinjaOne, navigate to the dashboard for the device you want to configure a backup plan for.
- Open the Settings tab.
- Select Policies on the left of the page.
- Scroll down the Policies page and in the Device Overrides section, select Edit.
- Select Backups from the left navigation menu.
- From the Backup drop-down menu, select Image.
Select Edit to the right of this section.
The device-level policy editor page will display. This page shows the same options you had when creating the policy-level plan above; however, any changes you make here will override the policy-level settings for the device.
- When you've made your selections, click Save.
Inherited Policies
Inherited policies are the policies a device is using based on the backup plan at the policy level. NinjaOne will display a label next to each policy to indicate whether it was inherited from the policy or has been overridden.
To revert an override to its original policy setting:
- Move your cursor over the page to reveal the option to revert an overridden status to its inherited value.

- Select Revert
- Click Save.
Additional Image Backup Policy Options
This chart lists the additional options available when creating Image Backup plans.
| Setting | Options |
|---|---|
| Exclusion | You can exclude specific volumes and removable disks as needed. There are two types of exclusions you can make:
|
| Power options | Prevent device from sleeping: This option does not apply to devices running on battery power and cannot be used with laptops currently. Currently, these features are only compatible with desktops and servers. Attempt to wake device if sleeping: This applies to devices sleeping during a scheduled backup. Currently, these features are only compatible with desktops and servers. Run plan immediately if missed: This applies to offline devices at the regularly scheduled time. If you select this option for multiple backup plans on a device, and the device misses various plans, all missed plans will run when the machine returns online. |
| Pre/post plan automations | If you would like to schedule a script to run before or after the backup job (for example, you could stop specific applications from running during backup or install all available patches after completion), use the Add Automation hyperlinks under Pre/Post plan automation to select an option from the Automation Library. For post-plan automations, you can 1) Mark the backup job as failed if the automation returns a failure code or 2) Mark the backup job as completed with a warning if the automation returns a failure code. |
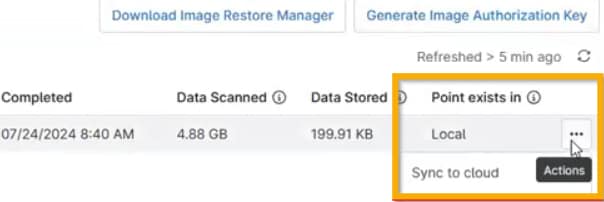
Sync to the Cloud
While not strictly part of a backup plan, hourly Image retention plans provide the added ability to sync specific revisions to the cloud manually. You can access this option by navigating to Backup → Device → Manage from the device dashboard.
You must have a local backup point to use this feature. The column entry for Point exists in will indicate whether the backup point listed is local.
Additional Resources
Refer to the articles listed below for more information on Image Backup Plans.