Topic
This article explains how to remove the NinjaOne agent from endpoints and organizations.
Environment
NinjaOne Endpoint Management
Description
This guide provides instructions for deleting an inactive, rejected, or archived device from the NinjaOne console and uninstalling the NinjaOne agent.
View additional tutorials in our video library.
Select a topic to continue:
- Uninstall from the NinjaOne Interface (Preferred)
- Uninstall NinjaOne for an Entire Organization
- Manual Uninstall
- NinjaOne Uninstall Prevention
- Additional Resources
Uninstall from the NinjaOne Interface (Preferred)
If a device is online and checking in with NinjaOne, deleting a node from within NinjaOne triggers a silent uninstall of the NinjaOne Agent. When uninstalling devices from NinjaOne, you have several options:
- Uninstall at the device level: Delete a specific device. The NinjaOne agent remains installed on all other devices within that organization.
- Uninstall from the Devices search page: Delete one or more devices regardless of their organization. The NinjaOne agent remains installed on all other devices on the console.
- Uninstall from the organization level: Reject devices, triggering immediate uninstallation and preventing the selected devices from re-registering in NinjaOne. You must use this method for Hyper-V device types. You can also reject other device types by using this method.
Uninstall from the Overview Tab on the Device Dashboard
- In NinjaOne, navigate to the dashboard of the device you'd like to remove.
- On the Overview tab, click the Edit menu.
- Select Delete device.
Uninstall from the Devices Search Page
- Click Devices, select the checkboxes next to the device names, then click Delete. NinjaOne will prompt you to confirm the uninstallation.
Uninstall from the Organization Configuration Page
Use this method to remove devices at the organization level.
Uninstall Hyper-V Machines
Deleting these device types removes the host and all guest VMs.
- In NinjaOne, navigate to Administration → Organizations and select the organization.
- The organization's configuration page will open. Click Virtualization, then place your cursor over the host's row and click Delete.

Reject Devices and Restrict Them from Registration in NinjaOne
Follow these steps to reject devices from the organization and prevent them from reconnecting to NinjaOne.
- In NinjaOne, navigate to Administration → Organizations and select the organization.
- The organization's configuration page will open. Click Devices, then click the Status tab.
3. Click the Pending, Approved, or Rejected tab to find the devices by status, then select their checkboxes and click Reject.
Uninstall NinjaOne for an Entire Organization
Use the following procedure to remove the NinjaOne agent from all devices by deleting the entire organization. Deleting the organization from within NinjaOne triggers a silent uninstallation of the NinjaOne agent on all devices in the organization.
- In NinjaOne, click Dashboard and select the organization.
- In the organization's dashboard, click Edit settings, then select Delete organization from the drop-down menu. A confirmation window will appear. NinjaOne will ask you if you wish to keep any stored backup data or delete it permanently. Enter your email address to confirm.
Manual Uninstall
Use the steps below only for cases where the agent has not checked in or the installation is corrupt.
Microsoft Windows Agent Manual Removal
You can use one of the following methods to uninstall NinjaOne silently.
If You Do Not Have Uninstall Prevention Activated
Use the following command to complete the silent uninstall:
"C:Program Files (x86)<NinjaInstallFolder>uninstall.exe" --mode unattended
If You Do Have Uninstall Prevention Activated
Follow these steps to complete the silent uninstall:
- Ensure the NinjaRMMAgent service is running on the device.
- Run this command to restore the agent uninstaller for the device:
"C:Program Files (x86)<NinjaInstallFolder>NinjaRMMAgent.exe" -disableUninstallPrevention
- Run the following command to perform the silent uninstall:
"C:Program Files (x86)<NinjaInstallFolder>uninstall.exe" --mode unattended
After Uninstallation
To ensure complete removal, check for and delete the following folders:
C:Program Files (x86)<OrganizationName-Version>
C:ProgramDataNinjaRMMAgent
Program Files (x86). Remove all relevant folders.Alternatively, use the NinjaOneAgentRemoval.ps1 PowerShell script available in our Custom Script: NinjaOne Agent Removal (Windows) article. Refer to the following instructions on how to use this script.
Windows Agent Removal with PowerShell Script
Use this script-based method to automate and ensure complete removal of the NinjaOne Windows agent. You must run the script as an administrator.
- Download the NinjaOneAgentRemoval.ps1 PowerShell script from our Custom Script: NinjaOne Agent Removal (Windows) article. Do not save the download to OneDrive, as PowerShell may not recognize it from this location.
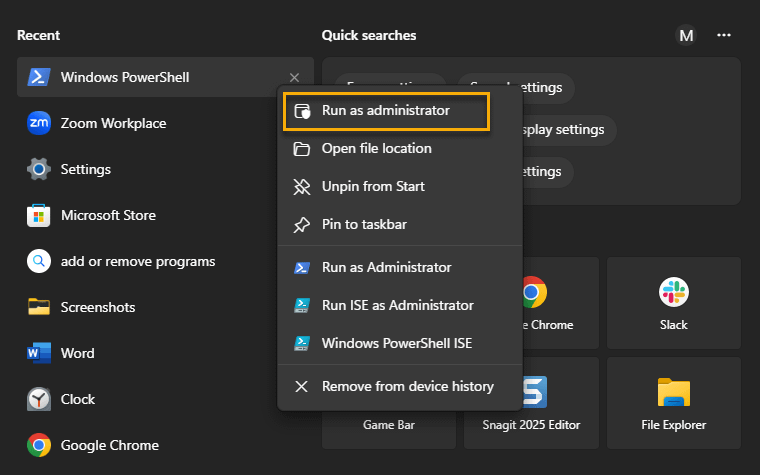
- Open Windows PowerShell from your Start menu. Ensure you run the program as an administrator. If this option is not available on the screen, right-click the application to select it.
- If you have not already set the execution policy to allow scripts to run, use the following command:
Set-ExecutionPolicy -ExecutionPolicy Bypass -Scope Process
- Navigate to the directory where you downloaded the
NinjaOneAgentRemoval.ps1script. Use the CD (change directory) command followed by the path to the directory containing the script.
cd "C:/Users/MRogers/Desktop"- Use the following command to execute the script with the desired options.
.NinjaOneAgentRemoval.ps1
- If you receive an error message, type the following commands, pressing the Enter key for each, before moving on to step 7. These operations may take several minutes to complete.
Set-ExecutionPolicy -ExecutionPolicy RemoteSigned -Scope LocalMachine
Unblock-File -Path .NinjaOneAgentRemoval.ps1
- When the script fully executes, verify that the old agent has been removed and check for any error messages or prompts that may have occurred. When the script successfully removes the old agent, you can install a new agent. If you encounter any issues during the process, gather as much information as possible, including screenshots of error messages, and contact NinjaOne Support for further assistance.
Apple macOS Agent Manual Removal
- Navigate to Finder.
- Select Applications.
- Type Shift + Command + Period to reveal the hidden NinjaRMMAgent folder.
- Select Uninstall. Be sure to include the following in the uninstall:
networkd_settings_read_from_fileInitialized network settings by reading the list directly.default 09:15:44.324203+1000 ninjarmm-macagent-patcherReceived configuration update from daemon (initial).default 09:15:44.328373+1000 ninjarmm-macagent-patcher UNIX error exception: 17.
Alternatively, you can use the NinjaOneAgentRemovalmacOS.sh script available in our Custom Script: NinjaOne Agent Removal (macOS) article. You must run the script as root.
Location of System Services
Use the system services below to have the NinjaOne agent download the certificate:
/Library/LaunchAgents/com.ninjarmm.trayicon.plist
/Library/LaunchDaemons/com.ninjarmm.agentd.plist
/Library/LaunchDaemons/com.ninjarmm.patcher.plist
Linux Agent Manual Removal
Use the appropriate uninstall script below to remove the NinjaOne agent from a Linux device. Change directories to /opt/NinjaRMMAgent/programfiles/ and run one of the following commands:
sudo ./ninja-deb-uninstall.sh
sudo ./ninja-deb-harakiri.sh
sudo ./ninja-rpm-uninstall.sh
/tmp directory to allow for a fresh installation:sudo mv /var/lib/dpkg/info/<packagename.*> /tmp
NinjaOne Uninstall Prevention
When NinjaOne uninstall prevention is activated, deleting a device from the NinjaOne console using the steps above still successfully uninstalls the NinjaOne agent when the device is online and connected to NinjaOne. This procedure is the recommended method of uninstallation. Refer to NinjaOne Agent: Uninstall Prevention for more information.
If you require manual uninstallation (for example, if a device is offline and not connecting to NinjaOne), but uninstall prevention is activated, use one of the manual uninstallation procedures described in the Windows Agent Manual Removal section of this article.
To learn about uninstalling the components from optional NinjaOne integrations (such as TeamViewer, Webroot, or Cloudberry), refer to NinjaOne Integrations: Uninstalling Integrated Components.
Additional Resources
Refer to the following articles for additional guidance on managing, uninstalling, and troubleshooting NinjaOne components.