
Ticket automation streamlines IT support by creating an automated ticket for each request, using automated ticket routing to assign issues to the right technician or team, and tracking progress until resolution. This automated ticket system reduces errors, ensures consistent handling, improves response times, and provides actionable insights, while ticket routing and workflow automation make managing requests faster, more organized, and fully automated.
Performing ticket automation without NinjaOne
Performing ticket automation without NinjaOne involves using built-in tools and third-party solutions to streamline IT support workflows. Built-in tools can include remote access, knowledge base integration, SLA management, ticket routing, automated ticket creation, and ticket templates. Third-party ticket management solutions often provide more advanced automation capabilities, such as ticket routing, SLA enforcement, self-service portals, and integrations with other IT tools. Ticketing functions are also commonly included in PSA tools as part of a larger IT service management feature set. While these may not be as specialized as dedicated ticketing systems, they often include basic automation features. Certain ticket-related tasks—such as creating folders, assigning tickets based on email addresses, and sending automated responses—can be handled using email filters, rules, or simple scripts. Regardless of the approach, ticket automation enhances IT support by improving responsiveness, efficiency, and customer-focused service. NinjaOne addresses these challenges by combining ticketing and endpoint management into a single platform, enabling technicians to manage tickets and perform remote troubleshooting without leaving the ticketing system, which significantly boosts productivity and efficiency.
Ticket Automation for Enhanced Efficiency with NinjaOne
NinjaOne offers robust ticket automation features to streamline IT support operations. IT professionals can improve team efficiency, enhance customer satisfaction, and make data-driven decisions to optimize support. Automation enables repetitive tasks to be handled automatically, allowing experts to focus on complex issues, quickly allocate and rank tickets, provide timely updates, handle all tickets from a single platform, and generate reports for performance analysis.
Here’s how to configure and use NinjaOne ticket automation.
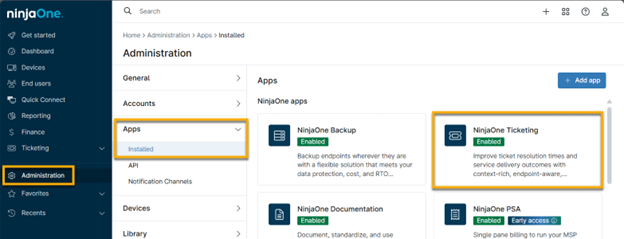
Important Note: You must have the NinjaOne Ticketing application enabled.
You can configure automation for NinjaOne Ticketing by using the Triggers and Templates tabs on the application configuration page (Administration → Apps → NinjaOne Ticketing).

The following table provides a description for each automation type:
| Automation Type | Description or Purpose |
Triggers | |
| Event-based | These automation rules trigger when any or all of the specified conditions are met. Conditions can include actions (ticket created), business hours, ticket type or status, assigned organization, associated custom fields, and more. |
| Time-based | These automations trigger based on conditions pertaining to events and time. This option can be used to enable notifications for tickets that have been open and are not meeting timelines. Important Note: The more conditions you add under ALL, the narrower the requirements will be for that ticket to be routed to the board. If you have conditions under both ALL and ANY, and the ticket meets the ANY conditions but not the ALL conditions, then the ticket will not be routed to the board. |
Templates | |
| Activity rules | These automation rules can be used for system activities. When a ticket is created, it will use the fields configured for the selected ticketing form. Refer to Device and System Activity Notification Feed for more information about using ticketing rules when managing system activities. |
| Condition rules | Configure the settings to be used on ticket creation and updates from conditions. When a ticket is created, it will use the fields configured for the selected ticketing form. For this automation, you can select what happens when the condition is reset or retriggered. Refer to Policies: Condition Configuration for more information about using ticketing rules when configuring conditions. |
| Script rules | These automation rules can be used for scheduled automations at the policy level. When a ticket is created, it will use the fields configured for the selected ticketing form. Refer to Policies: Scheduled Automations for more information about using ticketing rules with scheduling automations. |
| Response templates | The response template automation creates a canned template that allows for a quick response to common tickets. You can use it to add a comment or perform a different action on a ticket. Response templates can be added from the ticket page. Refer to NinjaOne Ticketing: Ticket Handling for more information about using response templates. |
Create Automation Rules for the Ticketing Application
To configure ticketing automations, perform the following steps:
- Go to Administration → Apps → NinjaOne Ticketing.
- Use either the Triggers or Templates tabs to create ticketing automations. Select a category to see instructions based on your automation needs:
- Ticketing Automations: Triggers
- Ticketing Automations: Templates
Ticketing Automations: Triggers
Select which type of trigger automation you would like to create for NinjaOne Ticketing:
- Event-based
- Time-based
Create Event-based Ticketing Automations
To create an event-based rule, perform the following steps:
- Open the Event Based tab and click Add to begin.
- Use the toggle switch to enable the condition and enter a unique identifier into the Name field.
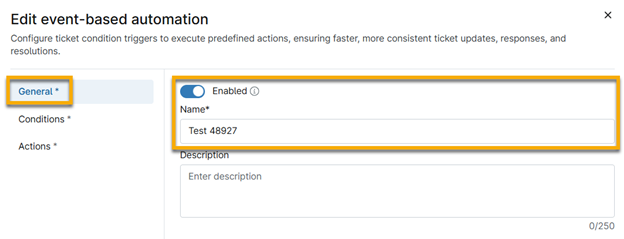
Figure 3: Event-based ticketing automation → General information → Enable
- Open the Conditions
- Click Add condition under either Meets all conditions or Meets any conditions classifications. Once you decide the conditions, you can select the action that will be taken for that criterion in the Actions tab (which we will explain in Step 5). You will also see options to add custom fields that were configured for automation (refer to Custom Field Setup for more information). For a description of each condition offered in the drop-down menu.

Warning: The more conditions you add under “all,” the narrower the requirements will be for that ticket to be routed to the board. If you have conditions under both “all” and “any,” and the ticket meets the “any” conditions but not the “all” conditions, then the automation will not be applied.
Note that tickets can exist on multiple boards simultaneously, and if the conditions for a specific board are no longer met then it will be removed from that board.
- Open the Actions tab and add at least one action to perform when the condition(s) is met. For a description of each action offered in the drop-down menu.
- Click Save.
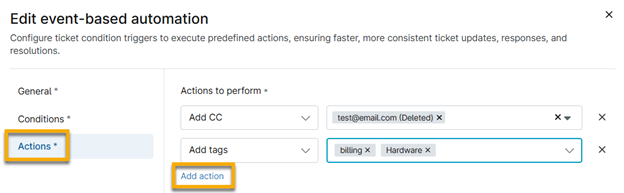
Figure 5: Event-based ticketing automation → Add actions to trigger when conditions are met
Create Time-based Ticketing Automations
To create a time-based rule, perform the following steps:
- Open the Time-based tab and click Add to begin.
- Enter a name and optional description.
- In Conditions, click Add under either the ALL or ANY classifications to determine what tickets will be routed to the board. For a description of each condition offered in the drop-down menu.
Warning: The more conditions you add under “all,” the narrower the requirements will be for that ticket to be routed to the board. If you have conditions under both “all” and “any,” and the ticket meets the “any” conditions but not the “all” conditions, then the automation will not be applied.
Note that tickets can exist on multiple boards simultaneously, and if the conditions for a specific board are no longer met it will be removed from that board.
- Next, open the Actions tab and add at least one action to perform when the condition is met. Then, click Save. For a description of each action offered in the drop-down menu.
Warning:
- Add tags and Add CC will publish new tags and contacts in addition to the ones originally created with the ticket. In contrast, Set tags and Set CC will clear all current tags and contacts and publish the new tags or contacts.
- Send Notification allows users to have the automation send a notification to a configured Notification Channel.
Ticketing Automations: Templates
Templates provide automation rules for ticket creation and handling, based on activities, conditions, scripts, or response actions.
Activity Rule
To create an activity rule, perform the following steps:
- Select Templates → Activity rules and click Add to begin.
- When creating or editing a new activity rule, several options can be configured in the Ticket creation For a description of each option.
- Once you have completed the configuration, click Save.
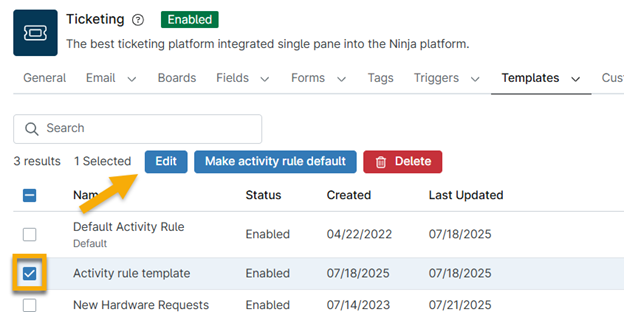
Once saved, you can select the checkbox next to the template name to edit it, make it default (if applicable), or delete it. You cannot delete a template that is set as the default.
Condition Rule
Controls how tickets are generated and updated when NinjaOne conditions are triggered.
| A default condition rule is automatically created for all NinjaOne Ticketing instances. This default condition rule can be edited but not deleted. |
- Open the Templates → Condition rule tab and click Add to begin.
- In the General section, use the toggle switches to enable the condition. Assign a name to the new condition rule.
- Configure the settings in the Ticket creation An asterisk (*) indicates that the field is required. For a description of each option offered in the drop-down menu.
- Open the On Condition Reset tab and configure the ticket behavior when the NinjaOne condition is reset. Select the new status for the ticket in this case, as well as any time that should be automatically applied to the ticket timer.

- Open the On Condition Retrigger tab and configure the ticket behavior for situations in which the NinjaOne condition re-triggers after having been reset.
| The Action field determines whether the previously existing ticket should be appended or if a new ticket should be opened, in addition to the status for the appended or new ticket. |
- Click Save.
Response Template
- The response template automation allows for a quick response to common tickets.
- Open the Templates → Response template tab and click Add to begin.
- Use the toggle switches to enable the condition and assign a unique identifier to the Name.
- In the Actions tab, click Add action to select the action this response template will execute. For a description of each action offered in the drop-down menu.
- Click
Script Rule
Script rules provide automation for how Ticketing handles incoming tickets triggered from scheduled scripts.
- Open the Templates → Script rules tab and click Add to begin.
- Use the toggle switches to enable the condition and give the Name a unique identifier.
- Configure the settings in the Ticket creation An asterisk (*) indicates that the field is required. For a description of each option offered in the drop-down menu.
Enable or Deactivate Automations in Bulk
Technicians with access to the Ticketing permission for Administrative Actions can enable or deactivate automations in bulk.
To enable or deactivate automations in bulk, select the checkboxes next to all automations you want to manage and then click the applicable option.
Benefits of Using NinjaOne for Ticket Automation
- Unified Ticketing & Management: Centralizes ticket creation, monitoring, and automation within one platform, minimizing context switching for technicians.
- Automated Workflows: Handles repetitive actions—such as routing, tagging, and status changes—so teams can focus on higher-value tasks.
- Accelerated Response Times: Automatically assigns, escalates, and updates tickets to ensure issues are addressed as quickly as possible.
- Consistent Ticket Handling: Uses templates and rules to standardize how tickets are created, updated, and resolved.
- Improved SLA Compliance: Time-based automations help prevent deadlines from being missed by triggering reminders and escalation actions.
Best Practices
- Start Simple, Expand Over Time: Begin with basic automations, such as auto-assignment or status updates, before implementing more advanced workflows.
- Define a Clear Ticket Lifecycle: Maintain consistent status transitions to avoid confusion across teams.
- Automate Routine Actions: Use triggers and templates to handle repetitive tasks like tagging, prioritizing, assigning, and sending notifications.
- Optimize SLA Management: Set realistic SLA timelines and use time-based automations to alert technicians before breaches occur.
- Smart Ticket Routing: Route tickets based on technician skills, team responsibilities, or business hours to ensure faster and more accurate handling.
- Utilize Knowledge Base Resources: Link tickets to relevant knowledge articles to support quicker resolutions and empower user self-service.
- Review and Adjust Regularly: Periodically analyze automation performance and update rules to remove inefficiencies, reduce noise, and improve accuracy.
With NinjaOne, smart ticket automation transforms the way IT teams work. By streamlining repetitive tasks, improving ticket routing, and ensuring timely responses, you can significantly elevate the efficiency and consistency of your support operations. Maximize the power of NinjaOne’s automation features to reduce workload, enhance service quality, and keep your IT environment running smoothly. Start optimizing your workflows today and experience how NinjaOne can simplify IT management and boost overall performance.