Topic
This article describes how to transfer files to endpoints that have the NinjaRMM agent deployed.
Environment
- NinjaOne endpoint management
- macOS
- Windows
- Linux
Description
The File Transfer automation tool allows you to host various files for your automations and script workflows. Transfer compressed archives, configurations, certificates, and many other small file types to multiple endpoints simultaneously, whether the file is from a source outside of NinjaOne or hosted within the application.
Select a category to learn more:
Requirements
- File Transfer Automations are limited to 200 MB.
- Destination path length can hold no more than 250 characters.
How it Works
- Our File Transfer Automation tool runs the same way as any other automation in NinjaOne.
- The agent creates a target directory on the endpoint if one does not already exist. If a duplicate file already exists in the destination, the file will be overwritten with the newly transferred data.
- If you are transferring a file with a .zip file extension, the file transfer configuration modal will display an option to decompress the file in the target folder. The folder structure within the .zip file will be retained.
Create a File Transfer Automation
- Access the Automation Library in NinjaOne. In the top right corner, click Add and then select File Transfer.

Figure 1: Add a file transfer automation in NinjaOne
Refer to the following table as a guide to complete all applicable fields in the File Transfer configuration modal.
Field Description Required? (Y/N) Name Enter a unique identifier for the automation. Yes Description Enter a description of the file being transferred. No Operating System Select the destination endpoint's operating system from the drop-down. Yes Destination folder Enter a single path to which the file will be transferred. Destination folders support paths with environment variables, and paths with and without trailing slashes.
This field accepts a maximum of 250 characters.Yes File From the drop-down menu, select the file type (URL or upload). The corresponding field will change depending on the type, allowing you to type in any valid URL or upload the file from your local computer. Yes Categories Optionally, select one or more categories to associate with the file. No - Click Submit.
A notification will display on the screen to confirm processing. Click the View status button to navigate to the Automation Library's Under review tab, where you can check the scan status or delete the automation.
To delete, move your cursor over the row, click the ellipsis button, and then click Delete.

Figure 2: Delete a file transfer automation that is under review in NinjaOne
File Transfer Failures
If your file transfer fails, an event will be logged under Activities on the system dashboard. This event will provide the time the failure occurred and a reason so you can troubleshoot the issue.
Use File Transfers in NinjaOne
After a file is successfully configured, it shows up under the Automations tab in NinjaOne's Automation Library. You can quickly find these automation types by selecting "File Transfer" in the Type filter.
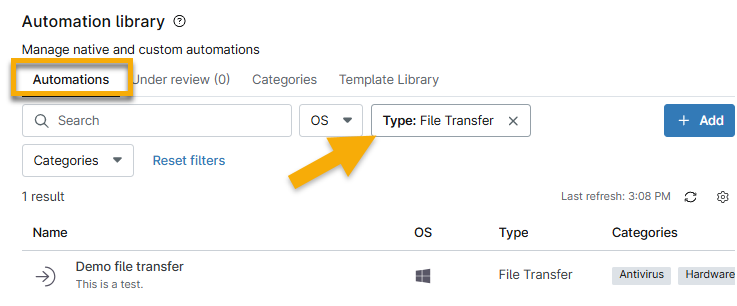
Figure 3: Filter automations to find file transfers in NinjaOne
You can use these file transfers in the following places in NinjaOne:
- Scheduled automations
- Windows patching (pre- or post-script automation executions)
- Policy conditions
- Scheduled tasks
- Device actions
Add to a Policy Scheduled Automation
When adding a scheduled automation, you can add the file transfer as an automation.

Add to Windows Patching Jobs
- Navigate to a Windows policy configuration page and open Windows Patches.
- In the Pre/Post Automation Execution section, click Add Automation before or after the update.

- In the Automation Library selection modal, click the file transfer you want to run.
Add to a Policy Condition
When adding a condition, you can add the file transfer as an automation.

Add to a Scheduled Task
When creating a scheduled task, you can add the file transfer as an automation.

Run on a Device
- Find a device that can run automations and navigate to its device dashboard in NinjaOne.
- Click the action button next to the device name and select Run Automation.
- Click File Transfer.

Figure 4: Run a file transfer automation for a device in NinjaOne
- In the Automation Library selection modal, click the file transfer you want to run and then click Yes in the confirmation window.