Topic
This article describes how to create and edit dynamic policies in NinjaOne.
For an overview of dynamic policies and the logic they use, refer to NinjaOne Policies: Getting Started With Dynamic Policies.
Environment
NinjaOne Endpoint Management
Description
Dynamic policies enable you to configure individual policy components and settings that target users and devices dynamically while leveraging a prioritization matrix to resolve conflicts.
NinjaOne administrators and technicians can create, edit, and delete dynamic policies across your entire organization from a single location within the platform. To learn how to do so, select a topic to continue.
Overview
You can manage dynamic policies within the NinjaOne platform at Administration → Dynamic policies → Windows.
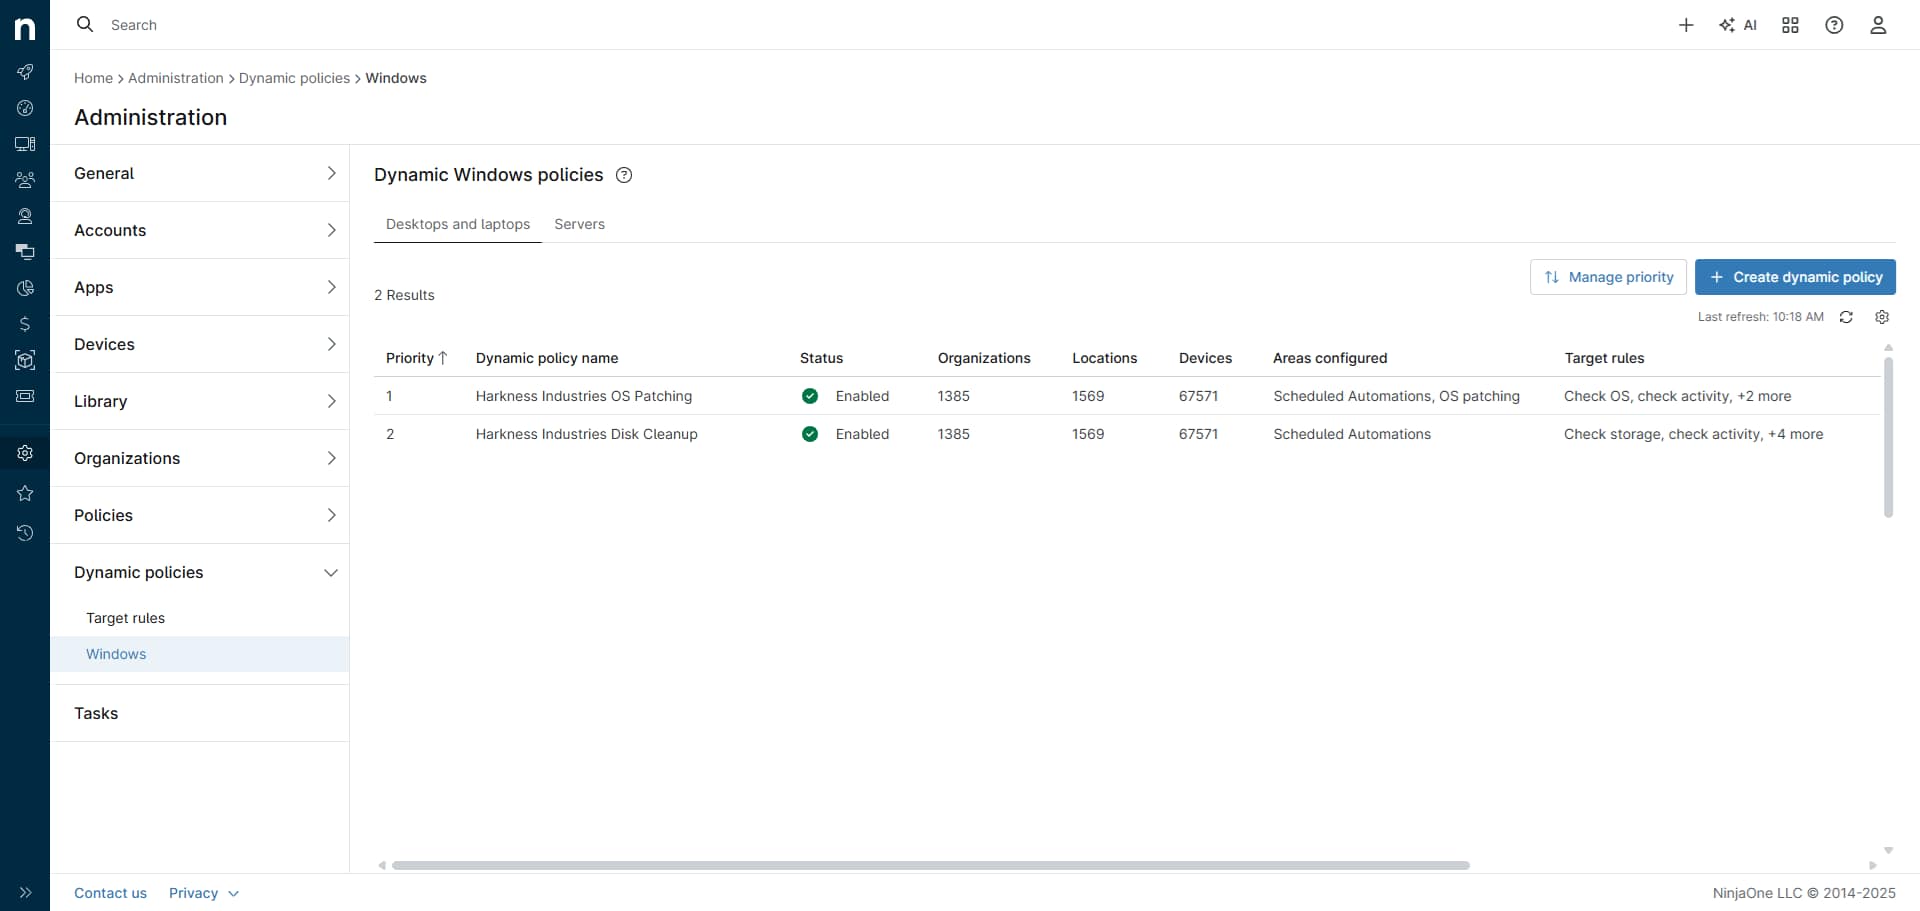
The Dynamic Windows polices page consists of the following features and fields:
| Feature | Description |
|---|---|
| Desktops and laptops | NinjaOne organizes dynamic policies into tabs based on policy type, with one tab for Microsoft Windows desktops and laptops and another for Microsoft Windows servers. You prioritize policies within each type separately. |
| Servers | |
| Manage priority | NinjaOne sorts policies by priority, where a lower number indicates higher priority. By default, policy lists order policies from highest to lowest priority. Click Manage priority to view and customize the prioritization of your dynamic policies |
| Create dynamic policy | Begin the workflow for creating a new dynamic policy; for more information, refer to the Creating or Editing a Dynamic Policy section of this article. |
| Refresh ( | Refresh the dynamic policies table. |
| Table settings ( | Configure sort behavior, column visibility, and ordering for the dynamic policies table. |
| Dynamic policy table | This table enumerates the policies you've created across all organizations and surfaces status and configuration details for each. Click any interactive header to sort the displayed records by the column's value. Move your cursor over any entry in the table to invoke its Actions drop-down menu. Click any entry to view and edit its configuration. For column definitions, refer to the Dynamic Policies Table Columns section of this article. |
| Actions ( | Enables you to edit or delete the selected policy |
Dynamic Policies Table Columns
The dynamic policies table provides a comprehensive list of all active and inactive dynamic policies across your organization. By default, the table displays the following information:
| Column | Description |
|---|---|
| Priority | A numeric representation of the policy's priority; the lower the number, the higher the priority; to learn more about priority, refer to NinjaOne Policies: Getting Started With Dynamic Policies |
| Dynamic policy name | Assigned a user-friendly name to the policy; NinjaOne uses this value throughout the platform when referencing the policy |
| Status | Indicates whether the policy is active; when inactive, the policy's settings will not apply or appear on lists of dynamic policies affecting an endpoint |
| Organizations | Total number of organizations and locations to which this policy applies; click any number to view and export granular lists for each type |
| Locations | |
| Devices | Enumerates a count of all devices to which the policy applies |
| Areas configured | A comma-separated list of configured areas within the selected policy |
| Target rules | All target rules within which the policy is assigned; for further details, review our NinjaOne Policies: Working With Target Rules article |
You can customize the table with the following optional columns:
| Column | Description |
|---|---|
| Last updated date | The most recent date that the policy underwent changes |
| Last updated by | Identity of the most recent technician to update the policy |
| Created date | The date of the policy's creation |
| Created by | Identity of the technician who created the policy |
Creating or Editing a Dynamic Policy
To create or edit a dynamic policy, perform the following steps:
Create or Select a Policy
- In NinjaOne, navigate to Administration → Dynamic policies → Windows.
- On the Dynamic Windows policies page, select the Desktops and laptops or Servers tab.
If you're creating a new policy:
- Click Create dynamic policy.
- The Create dynamic policy modal will open.
- In the Name field, input a user-friendly value that clearly identifies the policy.
- Optionally, in the Description field, enter a description of the policy's purpose (up to 250 characters).
To automatically activate the dynamic policy upon its creation, select the Enable dynamic policy toggle.
Dynamic policies that are not active will not apply to devices.- Click Continue.
- Proceed to the Configure the Policy section of this workflow.
If you're editing an existing policy:
- In the dynamic policies list, click the name of the policy you'd like to configure. Alternatively, move your cursor over the policy's list entry, click its Actions menu, and click Edit.
- Proceed to the Configure the Policy section of this workflow.
Configure the Policy
- Once you've completed the steps in the Create or Select a Policy section of this article, the dynamic policy's detailed view will open, where the following page features will be available to you:
| Feature | Description |
|---|---|
| Page actions ( | Edit the policy's details or activate, deactivate, or delete the policy. |
| Close | Close the policy's detailed view. |
| Save | Save changes to the policy. |
| Conditions | Manage conditions for the policy. Refer to the Conditions section of this article for additional page details. |
| Scheduled Automations | View and manage automations associated with the policy. For further information, refer to the Scheduled Automations section of this article. |
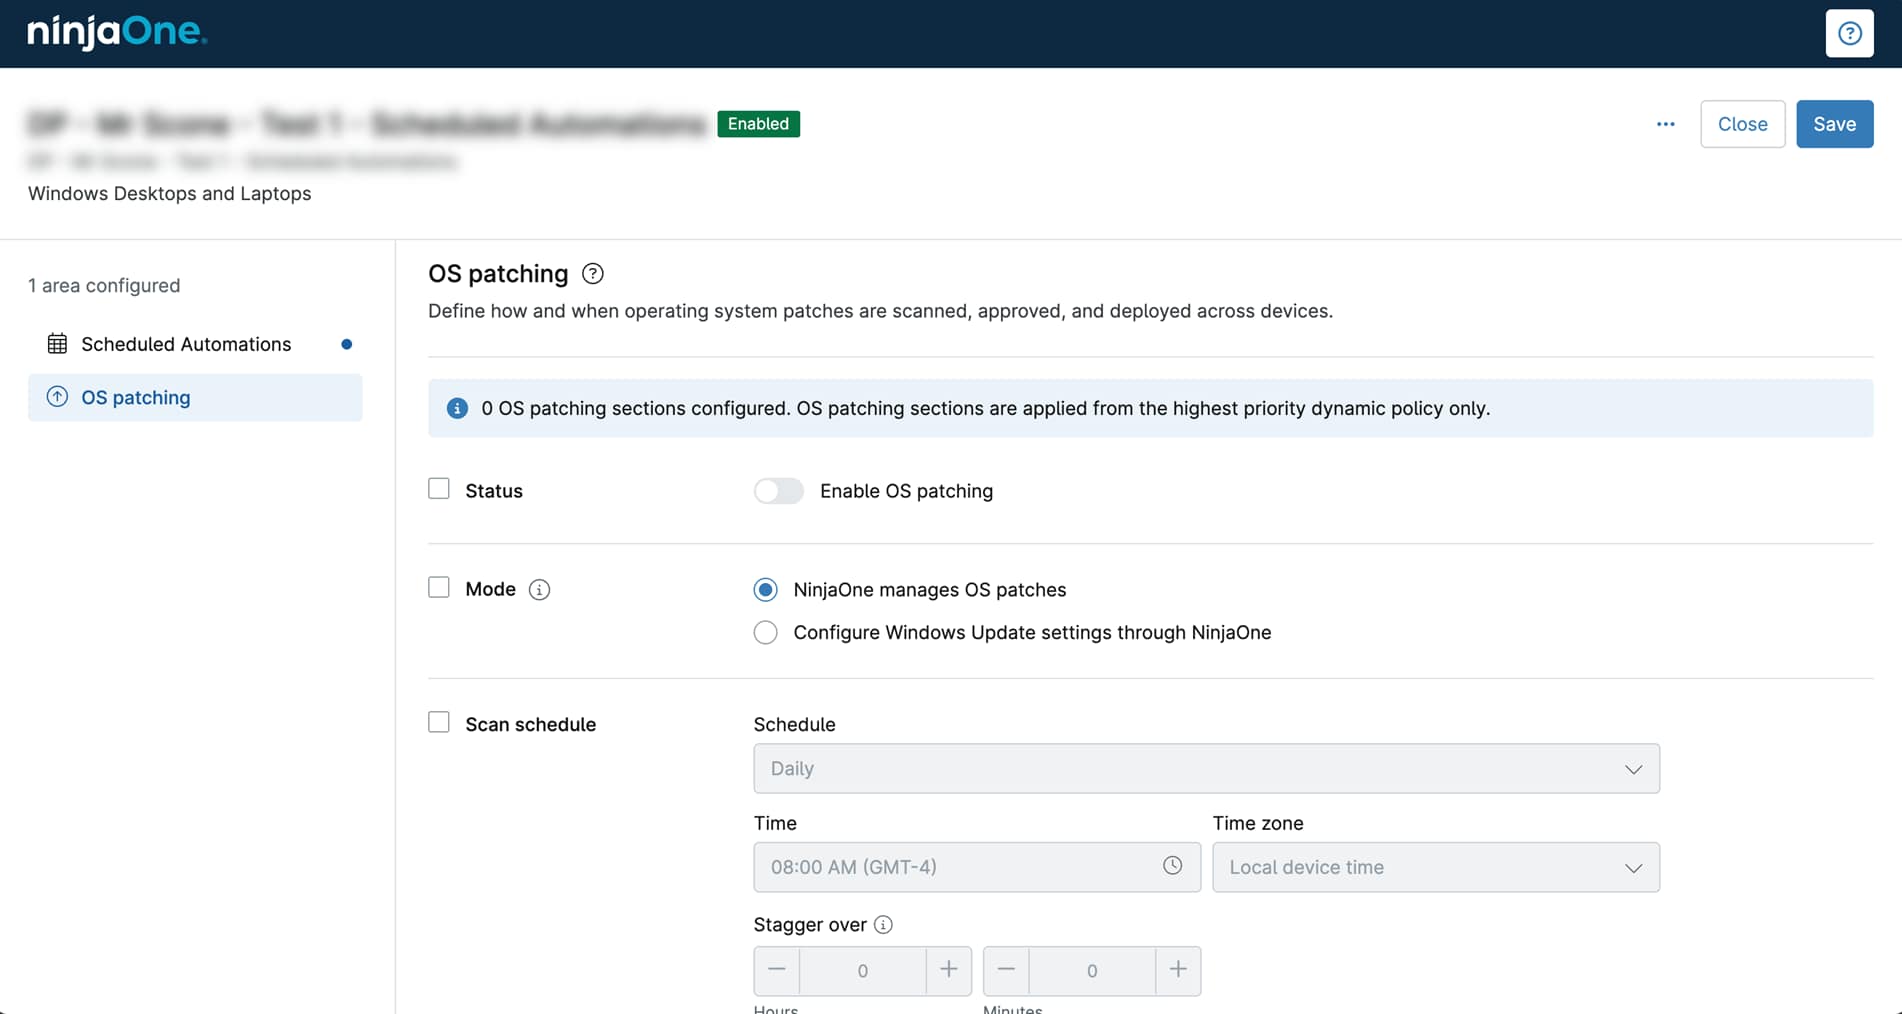
| OS patching | Define how and when the dynamic policy scans, approves, and deploys operating system patches across devices. Review this article's OS Patching section to learn more. |
- Make all desired customizations to the dynamic policy. For guidance about each configurable area, refer to the Conditions, Scheduled Automations, OS Patching, and Good to Know sections of this article.
When you finish making changes, click Save. To discard your changes, click Close.
If you have partially configured a dynamic policy and want to work on it later, and you don't want it to apply until you have done so, save the policy and then deactivate it from the policy's page actions drop-down menu.- NinjaOne will redirect you to the Dynamic Windows policies page.
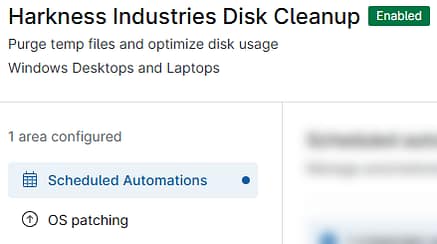
- If you created a new policy, it will appear in the dynamic policies table, as shown in the preceding Figure 1.
Conditions
In remote management and monitoring (RMM), policy conditions are rules set by managed service providers (MSPs) or IT departments to remotely oversee endpoints. When these conditions are met, they trigger actions such as opening a ticket, running an automation, or sending a notification. A common use case for conditions is identifying issues or problematic situations requiring resolution.
Compound conditions in NinjaOne are combinations of multiple criteria that increase the granularity of how alerts are triggered and actions are executed. They enable administrators to define more precise rules for device targeting, monitoring, and automation.
Conditions in a dynamic policy stack together. If more than one policy applies to a device, their conditions are added together and sent to the agent as a single combined set. Refer to the Additive and Merging and Policy Application Order sections of NinjaOne Policies: Getting Started With Dynamic Policies for more information about additive and policy application behavior in NinjaOne.
The Conditions page enables you to review and customize the conditions, compound conditions, and notifications associated with the selected dynamic policy.
Page Features
Move your cursor over any entry in the conditions table to invoke its Actions drop-down menu. Click any entry to view and edit its configuration.
| Feature | Description |
|---|---|
| Search | Enter a partial or whole value to filter current view to matching records. |
| Import template | Add conditions from a categorized library of pre-defined templates. |
| Add condition | Associate a new single or compound condition with the selected policy. To learn how to do so, refer to the Adding or Editing a Condition section of this article. |
| Conditions table | View and manage all conditions associated with the selected policy. |
Page Fields
Click any interactive header to sort the displayed records by the column's value.
| Field | Description |
|---|---|
| Name | The name of the scheduled automation and a brief description of its behavior; move your cursor over any automation entry to access its action menu |
| Status | Indicates whether the condition is active or inactive |
| Device health | Designates the device health status that will apply to any monitored endpoints where the condition is met |
| Type | Indicates whether the ruleset is a single condition or a compound condition |
| Ticketing | Actions the condition will take, if any, in NinjaOne Ticketing |
| ConnectWise | Actions the condition will take, if any, in ConnectWise |
| Channels | Enumerates the channels by which technicians will receive notifications when the condition is met |
| Actions ( | Enables you to edit, activate, inactivate, or delete the selected condition |
Adding or Editing a Condition
NinjaOne policies enable the activation of predefined conditions and the creation of new custom policies from templates or from the ground up. Each policy can include multiple conditions, and each condition can have several associated automations, with parameters that you can configure for each condition. To add a condition to your dynamic policy, perform the following steps.
- Create or select a dynamic policy by following the steps in the Create or Select a Policy section of this article.
- Open the policy's detailed view.
- In the left navigation menu of the policy details page, select the Conditions tab. Then, proceed to the Adding a New Condition From a Template or Creating a New Condition section of this article.
Adding a New Condition From a Template
- On the Conditions page, click Import template.
- The Monitoring Templates modal will open.
- Select a template category from the Folders tree. The preconfigured templates in that category will populate in the Available Templates column. To filter the list, enter a term in the Search box. For template definitions, refer to NinjaOne Policies: Condition Templates.
- Select a template from the Available Templates list.
- The newly-added condition will populate in the conditions table in an Enabled status. To learn how to review or edit its configuration, proceed to the Configure the Condition section of this article.
Creating a New Condition
- On the Conditions page, click Add condition (Figure 4-1).
- The Add condition modal will open, with the Condition tab selected by default (Figure 4-2).
- Proceed to the Configure the Condition section of this workflow.
Configure the Condition
- If you added a condition from a template, or you're editing an existing condition, click its name in the conditions table. The Add condition modal will open. If you created a new condition, the Add condition modal will already be open.
- On the Condition tab, define the parameters under which the condition will trigger. The available parameters will vary depending on the selected condition. For field definitions, refer to NinjaOne Policies: Condition Types Breakdown. Figure 4 shows the parameters for the Memory condition.
- Next, on the Settings tab, use the following configuration areas to review the condition's run rule, set the condition's name, and customize reset and health impact behaviors:
| Configuration | Description |
|---|---|
| Condition | This read-only field describes the circumstances under which the condition will trigger, as defined by the settings on the Condition tab. |
| Custom name | Optionally, you can designate a user-friendly name to identify this condition in the conditions table. |
| Auto-reset after time period | If you'd like the condition's run rules and device health impact to automatically reset, even if the condition is currently met, select this checkbox and choose an interval from the drop-down menu. |
| Reset when no longer met for | If you'd like the condition's run rules and device health impact to reset only after the condition hasn't been met for a designated period, select this checkbox and choose an interval from the drop-down menu. |
| Device health impact | When the condition is met, NinjaOne will reflect the device health status you select here on the Devices dashboard. If you select Use global default, the condition will inherit your status settings from Administration → Devices → Health status. |
- If you'd like the dynamic policy to run designated automations when the condition is met, click the Automations tab. Then, click Add automation to associate a new automation with the condition. Automations added to the condition will run in descending order, beginning with the first in the list and ending with the last. Use your mouse cursor to click and hold the
(move handle) icons to adjust the run order.
- Finally, select the Notifications tab to specify how and whom the dynamic policy should notify when the condition is met. You can define the following criteria:
| Configuration | Description |
|---|---|
| Severity | Define the extent to which this condition can impact an endpoint when it occurs. |
| Priority | Select a value to indicate how urgent the condition's resolution is relative to all other open issues they might currently be triaging. |
| ConnectWise ticket | Designate the notification actions the dynamic policy will take, if any, in ConnectWise and NinjaOne Ticketing when the condition is met. |
| Ticketing rule | |
| Notification channels | If technicians should receive notifications when the condition is met, choose the specific alerting channels or points of contact within all configured instant messaging, webhook, email, SMS, and integrated communication methods where those notifications should populate. |
| Notify technicians via SMS/Email | Activate this toggle switch to send notifications to technicians via all configured SMS and email channels, alongside any other selected notification channels for the condition. |
| Notify on reset | When this toggle switch is active, NinjaOne will generate notifications when the condition resets in addition to when it triggers. |
- If you're creating an entirely new condition, when you finish making configuration changes, click Add. If you're editing an existing condition (including one added from a template), click Update.
- The configured condition will appear in the conditions table. New conditions populate in an Enabled status by default.
- Click Save to commit the changes to your dynamic policy.
Scheduled Automations
NinjaOne streamlines information technology (IT) operations by centralizing software deployment, system monitoring, reporting, and endpoint management through policy-driven processes for routine tasks such as password resets, software installations, and device reboots. The platform also supports scripting tools like PowerShell for more complex operations, including service restarts, disk cleanups, and device provisioning. Additionally, policy-based workflows enable full automation of patching, antivirus scans, and backup management, helping to maintain endpoint health and ensure compliance.
From the Scheduled Automations page, you can view and manage automations associated with the policy. To learn how to create an automation, associate it with a policy, and set a deployment schedule, refer to our NinjaOne Policies: Scheduled Automations article.

Page Features
Move your cursor over any entry in the scheduled automations table to invoke its Actions drop-down menu. Click any entry to view and edit its configuration.
| Feature | Description |
|---|---|
| Search | Enter a partial or whole value to filter current view to matching records. |
| Add automation | Associate a new scheduled automation with the selected policy. |
| Table settings ( | Configure sort behavior, column visibility, and ordering for the scheduled automations list. |
| Scheduled automations table | View and manage all scheduled automations associated with the selected policy. |
Page Fields
Click any interactive header to sort the displayed records by the column's value.
| Field | Description |
|---|---|
| Name | The name of the scheduled automation and a brief description of its behavior; move your cursor over any automation entry to access its action menu |
| Status | Indicates whether the automation is active or inactive |
| Ticketing | Actions the automation will take, if any, in NinjaOne Ticketing |
| ConnectWise | Actions the automation will take, if any, in ConnectWise |
| Notify technicians | Indicates whether technicians will be notified when the scheduled automation executes |
| Channels | Enumerates the channels by which technicians will receive notifications when the scheduled automation executes |
| Actions ( | Enables you to edit, activate, inactivate, or delete the selected scheduled automation |
OS Patching
NinjaOne streamlines the automatic deployment of operating system patches across Windows, macOS, and Linux, reducing manual updates and maintaining device security. You can create tailored OS patching policies and minimize disruptions by scheduling updates during low-usage or maintenance windows. Flexible, policy-driven deployment ensures remediation aligns with your organizational risk tolerance, while manual controls provide IT with the ability to respond instantly to zero-day vulnerabilities.
On the OS patching page, you can define how, when, and whether the dynamic policy scans, approves, and deploys operating system patches across devices. For information about creating and managing policy-based patching, review Patching: Resource Catalog.
Page Features
| Feature | Description |
|---|---|
| Status | Activate or deactivate OS patching. |
| Mode | Define whether NinjaOne fully manages OS patches for endpoints associated with the dynamic policy or if managed devices should adhere to a specified Windows Update configuration. |
| Scan schedule | Designate the frequency and time at which endpoint OS patch scans should occur, whether NinjaOne should stagger the scheduled start time for all devices in the policy, and the actions NinjaOne should take to address missed scans and offline endpoints. |
| Update schedule | Specify the frequency and time at which endpoint OS patch updates should occur, whether NinjaOne should stagger the scheduled start time for all devices in the policy, and the actions NinjaOne should take to address missed updates and offline endpoints. Customize maintenance mode behaviors, update pre-staging, and metered connection handling. |
| Automations | Select optional automations to run before and after applying OS patch updates. Choose whether the patch update continues or terminates if the pre-script returns a failure message. |
| Reboot options | Configure reboot behaviors for logged-in and logged-out users, including prompt intervals and scheduling. |
| Approvals | Define if and how NinjaOne should automatically approve or reject security updates and general updates. |
| Advanced approvals | Choose the approval actions that the dynamic policy will apply to important and optional driver patches and feature updates. |
| Patch Intelligence AI approvals overrides | Customize alternate actions that the patch approvals process should take if NinjaOne's Patch Intelligence AI detects known issues or major reasons for concern with an OS patch. Learn how to leverage this powerful autonomous approval feature in our NinjaOne Patching: Windows Patch Intelligence AI Approval Overrides article. |
| Approval overrides | Add specific patches to the policy that NinjaOne should automatically approve or reject, regardless of any other existing rules. |
Good to Know
When configuring a dynamic policy, keep the following details in mind.
A blue dot next to the Conditions, Scheduled Automations, or OS patching tab in the left navigation menu indicates that the area has active configurations.
A count of the total number of configured areas will also appear.
To configure an area, select the checkboxes next to the features you'd like to adjust. Then, modify their settings. In nearly all scenarios, you must select a feature's checkbox before you can edit it. The only exception to this rule is the OS patching → Mode feature.
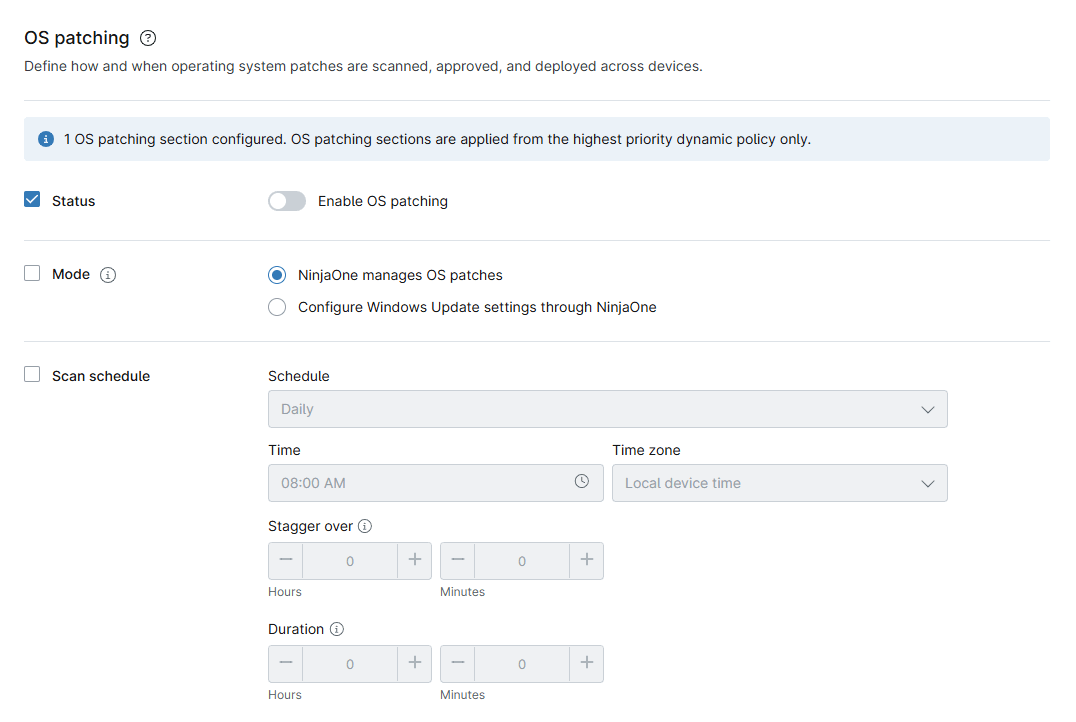
To save a policy, you must configure at least one feature in one area. For example, in Figure 9, Status is configured, while Mode and Scan Schedule are not.

The header of each configurable area reports the number of configured sections and the method NinjaOne will use to resolve setting conflicts. To learn more about dynamic policy conflict resolution, refer to NinjaOne Policies: Getting Started With Dynamic Policies.
Deleting a Dynamic Policy
To delete a dynamic policy, perform the following steps:
- In the NinjaOne platform, navigate to Administration → Dynamic policies → Windows.
- Select the Desktops and laptops or Servers tab.
- In the dynamic policies table, locate the policy you'd like to remove.
- Move your cursor over the policy's list entry and click its Actions menu icon, or click the policy's name to load its detailed view, and click the page actions menu icon.
- Delete the policy as follows:
- From the dynamic policies list, in the Actions drop-down menu, click Delete.
- From the dynamic policy's detailed view, in the page actions drop-down menu, click Delete policy.
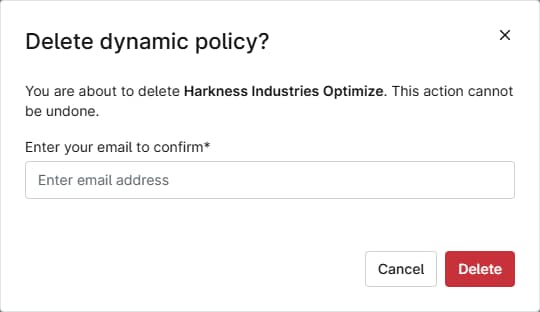
- NinjaOne will prompt you to confirm the removal of the policy. In the Delete dynamic policy? modal, enter your NinjaOne email address. Then, click Delete.
- You can only delete dynamic policies that are not assigned to a target rule. If NinjaOne does not detect any rule associations, the policy's removal will succeed.
- If the dynamic policy is assigned to one or more target rules, you'll see a Dynamic policy cannot be deleted modal similar to the example shown in Figure 12.
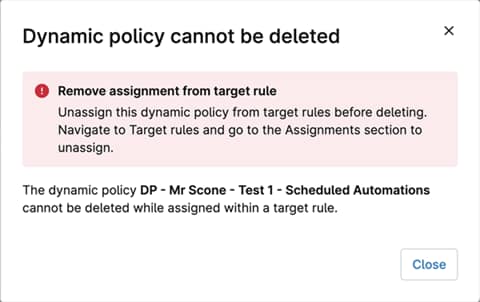
- You can review the policy's associated target rules by navigating to Administration → Dynamic policies → Target rules. Use the page filter to locate the policy and view its target rule details.
- Remove all of the dynamic policy's rule associations. Then, repeat Steps 1 through 6 in the Deleting a Dynamic Policy section of this article.
Additional Resources
The following articles provide further learning resources to help you leverage policy-based endpoint management in your environment:
- NinjaOne Policies: Getting Started With Dynamic Policies
- NinjaOne Policies: Configuring Dynamic Policy Priorities
- NinjaOne Policies: Working With Target Rules
- NinjaOne Policies: Resource Catalog
- NinjaOne Policies: Condition Configuration
- NinjaOne Policies: Compound Conditions
- NinjaOne Policies: Scheduled Automations