![]()
NinjaOne integrates with GravityZone, which uses the API and is configured at the policy level through the SDK. For information about the Bitdefender SDK, refer to Bitdefender SDK: Integration Guide.
Our integration with NinjaOne + Bitdefender GravityZone is now available, and NinjaOne recommends using this method to install BDGZ. Please see the following documentation: Bitdefender GravityZone: Integration Guide and Bitdefender GravityZone Managed Device Mapping.
Table of Contents:
- Training Materials
- Install Bitdefender GravityZone on Windows Devices
- Install Bitdefender GravityZone on Mac and Linux devices
Training Materials:
Check out the following Bitdefender videos/documentation to assist in onboarding with GravityZone.
- Content Control (bitdefender.com)
- Bitdefender GravityZone Management Flows - Videos
- Bitdefender GravityZone Protection Layers Availability - DocumentationImportant Note: Agent Protection for Mobile Operating Systems and 2, 3, & 4 in Agentless Protection are not offered as a part of GravityZone for MSPs.
- .
Install Bitdefender GravityZone on Windows Devices:
- Download the Bitdefender MSI (Microsoft installer) Wrapper archive and extract the MSI file per the steps in this Bitdefender documentation (specifically, Step 1 of the Deploy BEST via msiexec.exe command line section).
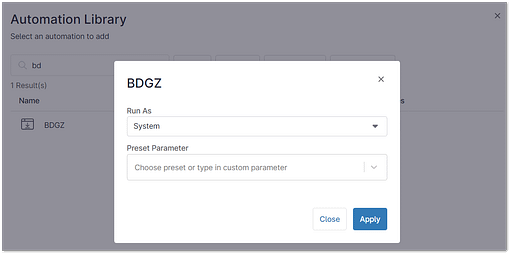
- Refer to the Install Application instructions in our Automation Library guide to upload the MSI file. You can name the automation per your preference; for the purposes of this guide, we used the name 'BDGZ'.
- Add the following string to the Parameters section:
/qn GZ_PACKAGE_ID=<string> REBOOT_IF_NEEDED=<parameter>
- Where:
stringis the actual string between brackets from the installation package name.parameter(optional) reboots the machine when you deploy BEST over a competitor's product; 1 = TRUE; note that a notification prompts the user with a 10-minute time frame before restarting the machine.
- Example:
Installation package name:setupdownloader_[aHR0cH-bGFuZz1lbi1VUw==].exe
GZ_PACKAGE_ID value:aHR0cH-bGFuZz1lbi1VUw==Important Note: The string in the example is only for illustration purposes. The actual string is different and much longer. For more information about configuring the string and parameter values, please see this Bitdefender documentation (specifically, step 3 of the section entitled "Deploy BEST via msiexec.exe command line").
- Add the following string to the Parameters section:
- Next, navigate to your NinjaOne console and create a new Scheduled Automation under a policy, or create a new Scheduled Task. Select your recently added automation and then select 'System' from the Run As dropdown.
- Finish configuring the schedule and other applicable options for your scheduled automation or scheduled task, and then save the policy or task in question.
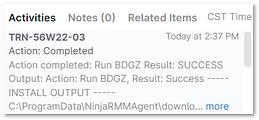
- Verify that the Bitdefender installation has completed as scheduled. When the installation begins, you should see an activity indicating as such in the NinjaOne Activity Feed.
You will also see the installer file running on the host machine. Important Note: This installation can take a while to complete.
 - When installation is complete, the NinjaOne Activity Feed indicates as such. Reboot will likely be required to complete installation.
- In the Bitdefender GravityZone console, you should now see your machine appear under the Endpoints tab.

You should also now see Bitdefender within the Add/Remove Programs list on the machine(s), as well as the Software Inventory for the device(s) in the NinjaOne Console.
Install Bitdefender GravityZone on Mac and Linux devices:
Currently, we do not have a native method of deploying GravityZone from NinjaOne to Mac or Linux devices through NinjaOne. However, this may be possible via custom scripts.
The installers for Mac and Linux may be found in the the GravityZone console. 