Topic
NinjaOne Billing is a Professional Services Automation (PSA) tool that offers a single-pane view of billing and invoice management.
Environment
- NinjaOne Billing
- QuickBooks
Description
NinjaOne Billing allows you to:
- Automate the billing of devices by quantity and manually bill other items. Manage billing in advance or in arrears, or with different offsets.
- Automate the billing of ticket time entries.
- Automatically generate invoices from agreements on a recurring schedule per organization.
- Synchronize generated invoices to QuickBooks Online.
Index
- Technician Permissions: Access and Configure the Tool
- Enable and Configure the Billing Tool
- Manage Agreement Services, Invoices, and Time Entries
- Billing Activities and Notifications
- Additional Resources
Technician Permissions: Access and Configure the Tool
A new permission has been added to technician accounts and technician roles: NinjaOne Billing. Activate the toggle switch at the top to enable the permission, and then select an option from the drop-down menu to allow or restrict the ability to configure and access the NinjaOne Billing tool and its ticketing features.
Refer to User Permissions: Permission Options for more information.

Figure 1: Give technicians access to NinjaOne Billing (click to enlarge)
Enable and Configure the Billing Tool
To enable the NinjaOne Billing feature, navigate to Administration → Apps → NinjaOne Billing and click Enable.
Integrations
After enabling the NinjaOne Billing, you can enable the QuickBooks integration. This allows you to map organizations and products in NinjaOne to QuickBooks data.
After you click Enable in the Integrations tab, you will be directed to sign in to QuickBooks using your existing Intuit Account. If you do not already have an account, you can create one at this point in the process.
When QuickBooks is enabled, a Settings button will display; click this button to configure and sync your QuickBooks settings with NinjaOne.
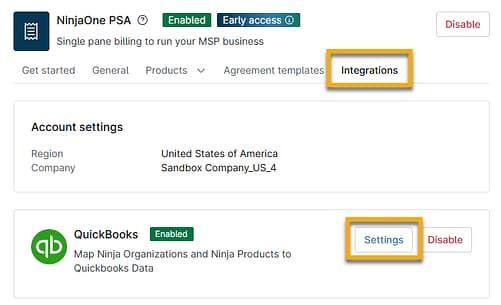
Figure 2: Integrate your QuickBooks account with NinjaOne Billing
- Customers: Map your organizations created in NinjaOne to the customers you created in QuickBooks. If the names match, you can use the Auto Map button. If not, select the checkbox next to any mapped or unmapped organization to view the Change Mapping option. The Auto Map option displays a modal that allows you to confirm the mapping is correct.
- You can type in the customer's name as it is reflected in QuickBooks or select an option from the drop-down menu. Then, click Update to confirm.
- When the organization is mapped to a QuickBooks customer, selecting it will also display a Clear Mapping option.
- At this time, NinjaOne does not support mapping locations or sub-customers.
- QuickBooks resource: Add and manage customers in QuickBooks Online (intuit.com).
- QuickBooks resource: Group products and services into different categories in QuickBooks Online (intuit.com).

Figure 3: Map your NinjaOne organizations to QuickBooks customers
- Accounts: map high-level PSA product types to your QuickBooks chart of accounts.
- QuickBooks resource: Add an account to your chart of accounts in QuickBooks Online (intuit.com).
- QuickBooks resource: Learn about the chart of accounts in QuickBooks Online (intuit.com).
- Items: map your products in NinjaOne to items created in QuickBooks.
- QuickBooks resource: Add product and service items to QuickBooks Online (intuit.com).
General
Edit Settings to determine which currency will be used across all invoices created in NinjaOne through QuickBooks. At this time, NinjaOne only supports USD, and a future release will support CAD (Canadian Dollar), EUR (Euro), and GBP (Great British Pound); submit a feature request to help us determine other currencies to add in future releases.
- The Default invoice due days field allows you to set a universal default number of days from which the Agreements will inherit.
Edit Invoices to control how time entry items are displayed on invoices. This allows you to present information in the format of your preference. For more information, refer to NinjaOne Billing: Invoices.
- Select an option from the Placeholders drop-down menu to copy data to your clipboard. Then, paste the data into either the Public or Private time entry text field.
- This tool works similarly ticketing email automation in NinjaOne.
Products
Products are the line items or merchandise being sold, which can be added to service agreements for invoicing. When selecting Products on the NinjaOne Billing configuration page, choose whether you want to view active or inactive products. Inactive products can be reactivated for use.
Refer to NinjaOne Billing: Products to learn how to create a product for the PSA.
Agreement Templates
Agreements bill a specific product or groups of products at a certain frequency and create rules for mapping time entries. Agreement templates build the core data for invoice creation.
Agreement templates can be created in the Billing administrator section and then copied into each organization under Finance → Agreements.
Refer to NinjaOne Billing: Agreement Services to learn how to create a service agreement template.
Manage Agreement Services, Invoices, and Time Entries
Once enabled, the NinjaOne Billing tool provides a Finance tab in the left side navigation pane, where you can create and manage agreements, view invoices, and recalculate prices on time entries. You can also perform these actions from the Finance tab on the organization dashboard.

Figure 4: NinjaOne Finance tab
Understanding Billing Periods
Next Bill Date
- Only displayed for agreements set to automatic billing.
- Automatically populated if not set, based on the Interval and Date / Day of the Month / Day of the Week settings, an invoice will be created for the next date.
- Can be edited to a future date.
- You can only select dates that align with the Day of the Month / Day of the Week settings for quarterly, monthly, and weekly intervals.
- No invoices will be automatically generated until this date is reached.
- The date automatically increments when an invoice is automatically generated. It is calculated based on the interval.
Start Bill Date
- Initially, this is set to be the same as the agreement start date.
- Can be edited to any date in the past or future.
- If it overlaps with an already billed period, you will be prompted to confirm.
- The date automatically increments when an invoice is generated, either automatically or manually. It is calculated based on the interval.
Billing Periods
- When an invoice is generated, the billing period start date and end dates for that invoice are tracked.
- When an invoice is generated, the billing period start and end dates for each non-time-entry product on the invoice are tracked.
- The billing period start and end dates can be edited before an invoice has been approved.
Agreements
Refer to NinjaOne Billing: Agreement Services to learn how to manage agreement services from the Finance tab.
Invoices
Refer to NinjaOne Billing: Invoices to learn how to manage invoices from the Finance tab.
Time Entries
Refer to NinjaOne Billing: Time Entries to learn how to manage time entries from the Finance tab.
Billing Activities and Notifications
Direct events to alert notification channels or technicians or create ticketing rules from Administration → General → System activities. Learn more about creating alerts or notifications for these activities with our Device and System Activity Notification Feed article.

Figure 5: Configure Billing system activities (click to enlarge)
When these alerts are created, they display on the system or organization dashboard under the Activities → All tab. Select "Ninja PSA" from the Activity type filter to focus your search results. There is also a "PSA" filter which is related to the integrated vendor PSA offerings in NinjaOne. Refer to our Integrations and Third-Party Apps: Resource Catalog to learn more about integrated vendors.
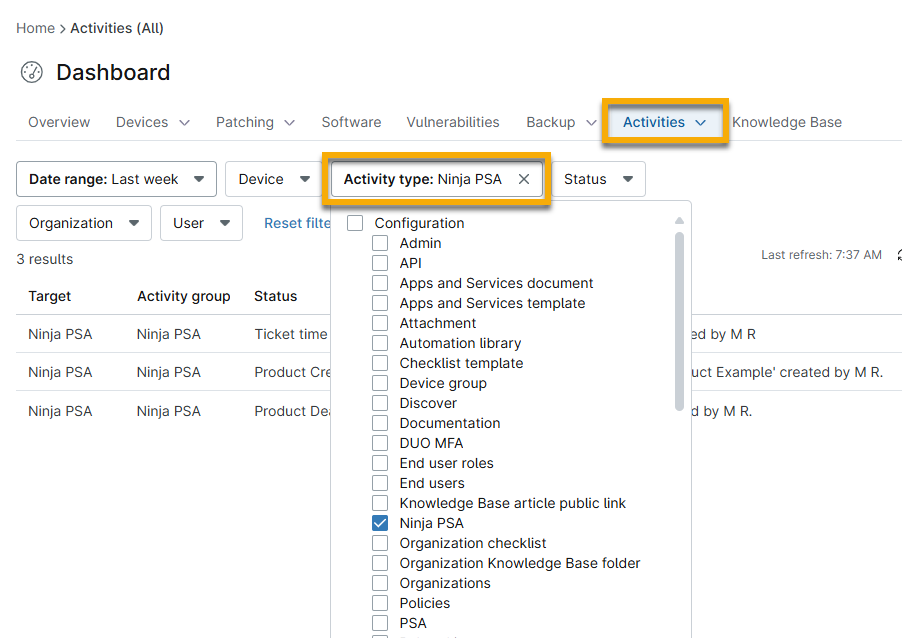
Figure 6: Filter dashboard activities for NinjaOne PSA (click to enlarge)
Additional Resources
Refer to NinjaOne Billing: Resource Catalog to view all related articles.