Topic
This article discusses how to configure and manage mobile device management (MDM) policies for Android devices in NinjaOne.
Environment
NinjaOne Mobile Device Management
Description
Android policy functionality depends on how you enroll the device in NinjaOne Mobile Device Management (MDM). Policies take complete control over work-only types; if the device is personally owned, some policy settings, like restrictions, may be limited.
You must enable the Android MDM Application before configuring the Android MDM policy. Refer to Enable the Android MDM application for more information.
Mobile Device Usage Types
After you enable MDM and enroll your Apple or Android account, you can add mobile devices to NinjaOne as either "Personal Usage" or "No personal usage allowed." When you add a mobile device, you can categorize the usage/enrollment type as Personal usage, No personal usage allowed, or Dedicated device.
Usage types define how a device is enrolled. Android MDM has three usage types:
Personal usage (personally-owned): A personally owned device is typically considered a BYOD (Bring Your Own Device) enrollment. NinjaOne (or any MDM) has limited access to device information and actions.
NinjaOne enrolls these devices from the Android Device Policy application or a link on an already set-up device that is in active use. NinjaOne then allows an organization to manage the applications and data within the work profile alone, with no visibility or management of the personal (or parent) profile.
- No personal usage allowed (For Work or Company-Owned): These devices are owned by the employer but personally enabled (COPE), allowing platform-level separation of work apps and data. NinjaOne provides more detailed information about the device, including serial numbers and network-related details. Employers control data and security policies within the work profile. Outside the work profile, the device remains suitable for personal use.
- Android devices must be blank (out of the box), or you will receive an error message when attempting to add the device to NinjaOne.
- During setup, NinjaOne will prompt the user to add their own accounts and information in addition to the configured work profile. The organization has some control over the personal (parent) profile for things like cameras, screenshots, and other data loss prevention policies; however, it still maintains limited visibility of anything outside of the work profile.
- Dedicated device (no specific user): This usage type is similar to No personal usage allowed, but the device is not associated with a single user and does not expect personal usage or corporate identity authentication. For additional details, refer to the Android API's dedicated Device provisioning guide (external link).
Create a New Policy
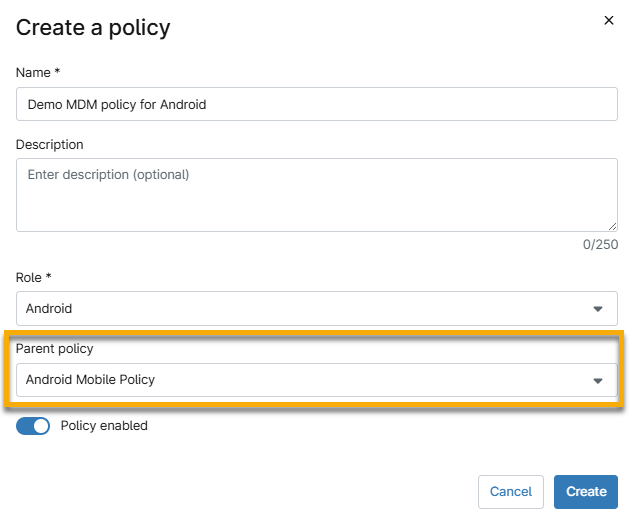
- In NinjaOne, navigate to Administration → Policies, then select MDM Policies from the drop-down menu and click Create New Policy.
- Select a device role, enter the policy details, and activate the Policy enabled toggle. The role you select determines which policies you can set as the parent. Refer to the Inherited Policy Details section of this article for more details. When finished, click Create.
Inherited Policy Details
NinjaOne supports policy inheritance for MDM policies. The role you select determines which policies can serve as the parent policy. You must choose an MDM-specific role to create an MDM-specific parent-child policy relationship.
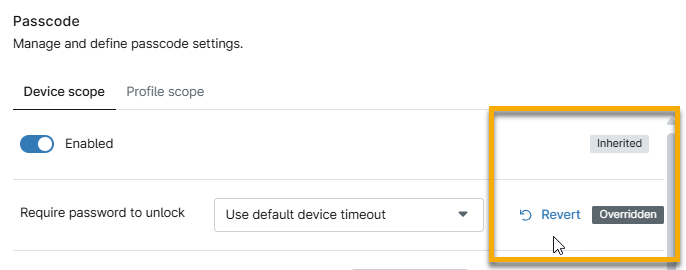
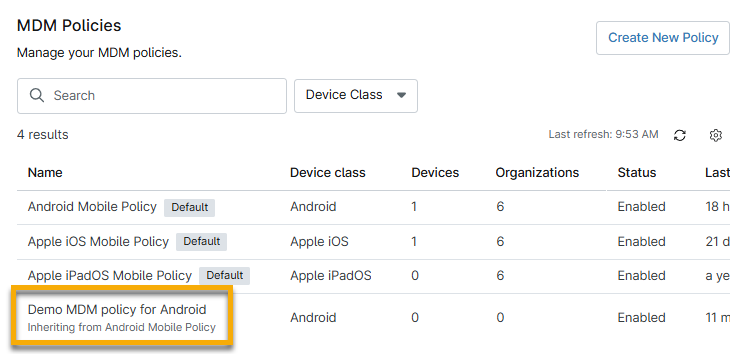
NinjaOne will display an Inherited tag in the new policy, along with an option to override individual settings. You can revert to inherited settings by placing your cursor over them and clicking the Inherited policies display descriptions beneath their names on the MDM Policies page.
Important Considerations
- Inherited policies cannot remove applications, Wi-Fi configurations, or Android policy enforcements. Instead, you must deactivate these items in the configuration editor.
- Deactivating changes the status column to Inactive, and the Inherited label changes to Overridden.
Configure the Policy
Select a section to learn more about configuration options:
Passcode
Passcode settings let you require and set passcodes to unlock devices and profiles.
Passcode Options Explained
Use the table below to learn about each pascode configuration option.
| Setting | Description |
|---|---|
| Device scope and Profile scope | Set the passcode on the device, the work profile, or both. |
| Enabled | Activate this toggle to require passcode entry. |
| Require password to unlock | Choose whether the device will need a passcode to unlock after every timeout, or every day. |
| History length | Specify the number of previously-used passcodes NinjaOne will remember and prevent from their reselection. |
| Maximum failed passwords for wipe | Define the number of password attempts before NinjaOne wipes the device. The maximum is 100. |
| Maximum age (days) | Specify the maximum password age (in days) after which NinjaOne will require a newly created password. |
| Password quality | Select the criteria for acceptable password strength. |
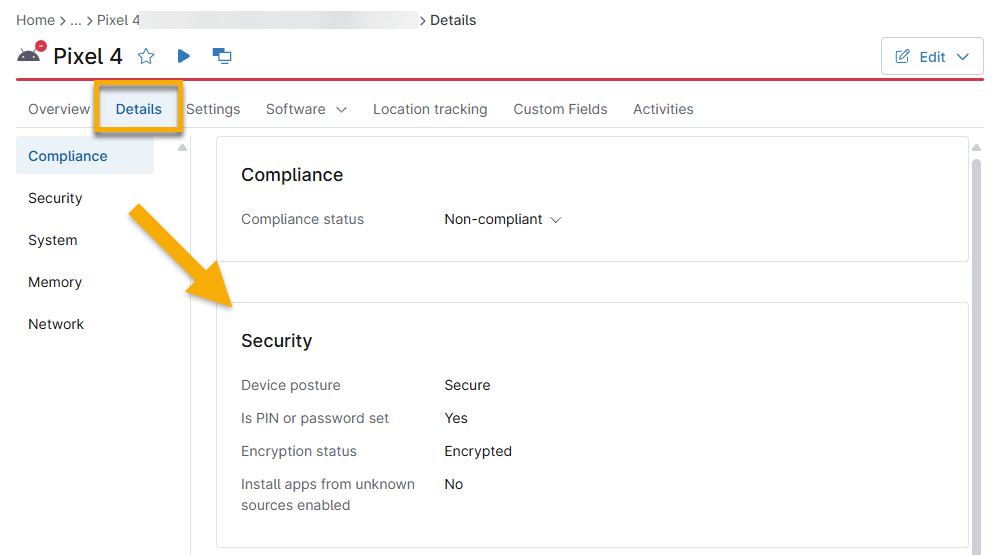
Viewing Passcode Status in the Devices Dashboard
NinjaOne will show passcode setting information in the Devices dashboard → Details → Security.
Restrictions
NinjaOne obtains most Android policy restrictions directly from the Android Management API, which provides relevant JSON representation and definitions. In this section, you can activate or deactivate device functionality, security, and connectivity.
- NinjaOne will only deliver values that have been modified from their default settings to a device.
- If the device was enrolled with a work profile, the restrictions will apply only to that profile.
Restrictions Options Explained
Use the table below to learn about the configuration options for restrictions.
| Category | Description |
|---|---|
| Functionality | Restrict device functions, such as:
|
| Application | Control application parameters such as:
|
| Security & Privacy | Control the ability to perform functions affecting device security or privacy, including:
|
| Network & internet | Govern the device's ability to use networks, including:
|
Applications
The Applications section has three tabs: Managed Apps, Kiosk Settings, and Advanced.

| Applications tab | Description |
|---|---|
| Management | Select specific applications to install or block on mobile devices. |
| Kiosk settings | Enable the native Android Kiosk environment and display all deployed applications added to the assigned policy. |
| Advanced | Add advanced configurations which can enable supported applications to perform system actions or access categories. For example: Setting a default Home or Launcher app. |
To learn more about adding and modifying these applications, refer to MDM: Android Application Management.
Personal Usage
The configuration options in the Personal usage section let you control policies for the parent device's personal profile.
Personal Usage Options Explained
Use the table below to learn about personal usage configuration options.
| Category | Description |
|---|---|
| Cross-profile policies applied to the device | Control policies that apply to both the personally-owned and company-owned profiles, including:
|
| Personal usage policies (company-owned devices only) | Set the following personal usage abilities:
|
| Managed personal applications | These options let you restrict the personal Google Play Store to specified applications, or allow full store access. |
Network
This section enables you to manage network settings for the device, including setting up proxies and specifying authorized WiFi networks.
Network Settings Explained
Use the table below to learn about network configuration options.
| Setting | Description |
|---|---|
| Manual proxy setup | Set up a proxy server for internet access. Enabling direct proxy deactivates any established Wi-Fi networks on the device. Refer to the Configure WiFi SSID Settings section of Android Enrollment Profiles for more information. |
| Wi-Fi network list | To add a WiFi network, click Add WiFi Network, then enter the configuration name and WiFi name (SSID), and select the appropriate security type. |
Security
The Security section allows system administrators to encrypt the device, manage developer settings, define how data is moved for work, and more.
Security settings are split into the following categories:
- General
- Private key rules
- Custom messaging
General Security Settings Explained
Use the table below to learn about general security settings.
| Setting | Description |
|---|---|
| Minimum Android version support (API level) | The minimum allowed Android API level. |
| Maximum time to lock (seconds) | Select the number of seconds that pass before the device is locked and the user is required to input the password. |
| User credentials configuration disabled | Prohibit users from managing how usernames and passwords are saved or used for authentication. |
| Encryption policy | Enable the policy to require a password. |
| Disabled keyguard customizations | Lock screen items, such as widgets, notifications, camera access, and other tools when the device is locked. |
| Battery plugged mode | Force a device to keep its screen active under specific conditions (for example, when plugged into AC power, on wireless charging, or connected to a USB connection). When using this setting, we recommend clearing Maximum Time To Lock so the device doesn't lock itself while it stays on. |
| Developer settings | Allow developer options, such as system behaviors, quick settings, and safe boot. For more information about Android developer settings, refer to Configure on-device developer options (external link). |
| Allowed input methods | Configure a list of package names for input methods or keyboard apps. |
| Allowed accessibility services | Determine the accessibility services permitted for use on a device, blocking all others. Note that this may detrimentally impact accessibility for device users reliant on specific services. |
| Memory tagging extension | This setting controls the Memory Tagging Extension (MTE), a hardware implementation of tagged memory, and is supported on Android 14 and above. |
| Send content to assist apps | Allow contextual content about the current app or screen state to assist apps such as Gemini, supported on Android 15+. Deactivate this setting to prevent content from being shared. |
| Factory reset protection allowlisted accounts | Define which Google accounts can unlock a device if factory reset protection is triggered. |
Custom Messaging Settings Explained
Use the table below to learn about custom messaging settings.
| Setting | Description |
|---|---|
| Custom messaging | Create custom messages to users from Security Administration when they attempt actions on the device. Click Add language to add the message in a NinjaOne-supported language.
|
| System Update Configuration | Specify an update configuration type:
|
| Freeze Periods | Set an annually repeating time period in which over-the-air (OTA) system updates are postponed to "freeze" or stop the OS version running on a device.
|
Private Key Rules
Private key rule settings enable you to create and manage private keys for authentication in NinjaOne MDM.
Adding a Private Key
- On the policy's configuration page, navigate to Security → Private key rules and click Add Key.
- In the Add key window, enter the following information:
| Setting | Description |
|---|---|
| Key name | Give the key a descriptive name (required). |
| Alias | Enter an alias the system can use to find the key (required). |
| URL pattern | Enter any URL heirarchies to which the key will be specific (optional). |
| Package names | Enter a package name, or use the drop-down menu to select the package name of the app to which the key will be specific. If you enter an invalid package name, you will see an alert in the drop-down menu. |
Editing or Deleting a Private Key Rule
NinjaOne displays a list of created private keys in Security → Private Key Rules. To edit a key's parameters or to delete a key, place your cursor over it and click the ellipsis (three dots) menu when it appears, then select Edit or Remove.
Policy Enforcement
Policy enforcement allows you to set rules that define behavior when a policy cannot be applied to a device. For example, you can block access to a specific setting on either a work profile or the entire device for a specified number of days. If certain aspects of the policy are not applied successfully, there is an additional option to wipe the device.
Applying policy enforcement
Follow these steps to set up a new policy enforcement:
- In Policy enforcement, click Add.
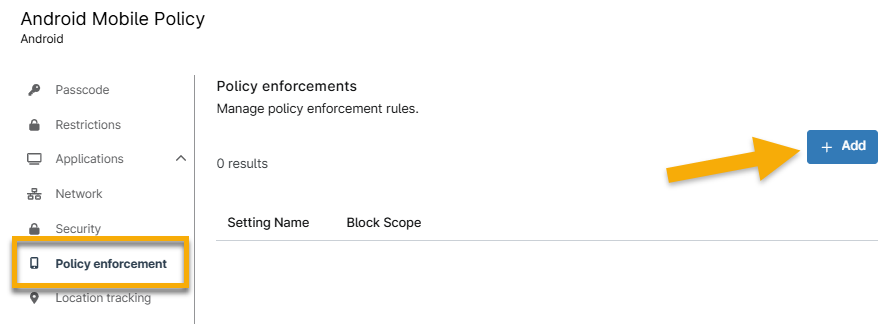
- The Add new policy enforcement window will open. Fill out the following information:
| Setting | Descriptions |
|---|---|
| Setting Name | Select the feature you want to block. Refer to the the Setting names explained table in this article for an explanation of each setting name. |
| Block Scope | Block access to apps and data on a company-owned device or in a work profile. This action also triggers a user-facing notification that, if possible, includes information on how to correct the compliance issue. |
| Block after days | Optionally, set a specific date for the setting to be blocked a specific number of days after the policy changes are saved. |
| Wipe after days | Reset a company-owned device or delete a work profile after a specified number of days. |
| Preserve Frp | Preserve the factory reset protection for personal profiles (optional). |
Setting Names Explained
Refer to the table below for an outline of each setting name.
| Setting | Desccription |
|---|---|
| Applications | Control policy settings applied to applications. |
| Keyguard disabled | Disable the lock screen on the primary or secondary display. |
| Permitted accessibility services | If the field is not set, any accessibility service can be used. If the field is set, only the accessibility services in this list and the system's built-in accessibility service can be used. In particular, if the field is set to empty, only the system's built-in accessibility services can be used. You can set this field on fully managed devices and on work profiles. When applied to a work profile, the option affects both the personal profile and the work profile. |
| Permitted input methods | If present, only the input methods provided by packages in this list are permitted. If this field is present, but the list is empty, then only system input methods are permitted. |
| Minimum API level | Define the minimum allowed Android API level. |
| Recommended global proxy | This setting controls the network-independent global HTTP proxy. Typically, you should configure proxies per network, usiong the in Network configuration optionas. However, for unusual configurations like general internal filtering, a global HTTP proxy may be useful. If the proxy is unavailable, network access may be disrupted. The global proxy is only a recommendation, and some apps may ignore it. |
| Location mode | Set the degree of location detection enabled. |
| Always on VPN Package | Specify whether the app is allowed to network when the VPN is not connected and enabled. This setting is only supported on devices running Android 10 and above. |
| Bluetooth config disabled | Disable Bluetooth connections to and from the mobile device. |
| Encryption policy | Determine encryption configuration. |
| Permission grants | Explicitly grant or deny permission for the app. |
| Password policies | Password requirement policies. The password Scope field in the policy can be set to different policies for work profiles or fully managed devices. |
| Advanced security overrides | Security policies are set to secure values by default. NinjaOne does not recommend overriding any of the default values to maintain a device's security posture. |
| Personal usage policies | Policies managing personal usage on a company-owned device. |
| Cross-profile policies | Determine whether data from one profile (personal or work) can be shared with apps in the other profile. |
After setting the policies, you can edit or delete them by placing your cursor over the policy's row and clicking the ellipsis button.

Location Tracking
Refer to MDM Location Tracking for more information.
Additional Resources
Refer to the NinjaOne MDM: Resource Catalogue for more information about managing Android devices.