Topic
This article explains how to activate and use NinjaOne's Warranty Tracking feature. it.
Environment
NinjaOne Endpoint Management
Description
In NinjaOne, you can use the Warranty Tracking feature to automatically monitor warranty expiration for your supported devices, and generate alerts and support tickets to act on them.
Misc: Warranty Tracking (NinjaOne Inc. 01:51)
Select a topic to continue:
- How Warranty Tracking Works
- Supported Devices
- Activate Automatic Warranty Tracking
- View Warranty Information
- Warranty Tracking Schedules and Notifications
How Warranty Tracking Works
NinjaOne finds and updates warranty information for devices in the following situations:
- A user performs an initial activation of the Warranty Tracking app.
- A user adds a new device to NinjaOne.
- A user clicks the Sync with Manufacturer button in the Devices dashboard.
Otherwise, NinjaOne uses a scheduled batch job to capture warranty end dates for supported devices. These batch jobs sync warranty information for dates between six months in the future or one year in the past, as these are the dates most likely to change or be updated. Automatic warranty syncs occur every Saturday at 1 A.M. UTC.
Supported Devices
NinjaOne supports warranty tracking for workstations, servers, and virtual hosts from the following manufacturers:
- Dell
- Hewlett-Packard (HP) non-Enterprise
- Lenovo
- Microsoft
- Toshiba
Activate Automatic Warranty Tracking
You must activate the NinjaOne Warranty Tracking app before you can use this feature. To do so, navigate to Administration → Apps → NinjaOne Warranty Tracking and click Enable.
Warranty information will automatically populate on the Devices dashboard after you activate the app. If a user deactivates and then reactivates the app, NinjaOne will track the last time a sync occurred and only resync if the elapsed time since deactivation is less than one week.
When NinjaOne receives a valid response from our warranty information sources, it will overwrite any manually-entered warranty data in the Devices dashboard. Refer to Manage Warranty Information in NinjaOne for more information. You can also track warranty information on your Network Management System (NMS) devices, making it easier to include network equipment in your device lifecycle planning.
View Warranty Information
You can view warranty information in two locations within NinjaOne: on the Overview page of an individual device or in the Devices search grid.
The Device Overview Page
- On a machine's Device Overview page, scroll through the Device information card to the Warranty date field.
- Click the Sync with manufacturer icon at the end of the warranty date.
Manually Setting the Warranty Start and End Dates
You can also manually set the warranty's start and end dates. To do so, click the Warranty date link, type the start and end dates into the Edit warranty date dialog box, then click Update.
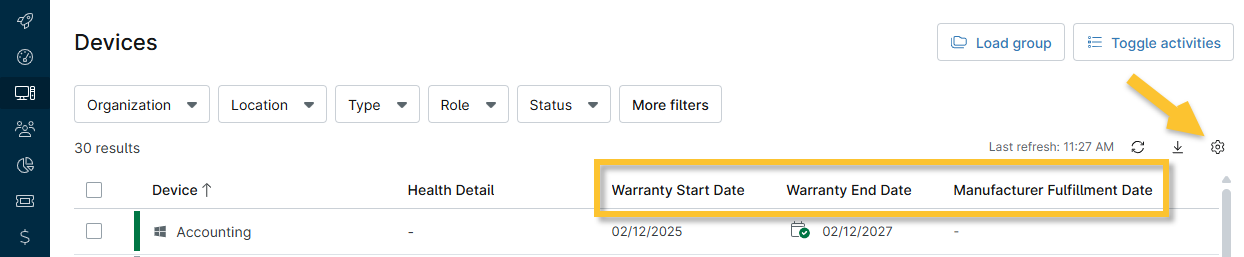
The Devices Search Grid
To view warranty start and end dates in the Devices search grid, you must add the Manufacturer Fulfillment Date column:
- Click the Table settings tool (gear icon). The Table settings window will open.
- In the Columns menu, type Manufacturer Fulfillment Date, then click the entry to add it to the column stack.
After you activate the Warranty Tracking app, this column will automatically populate with data as NinjaOne performs all warranty checks.
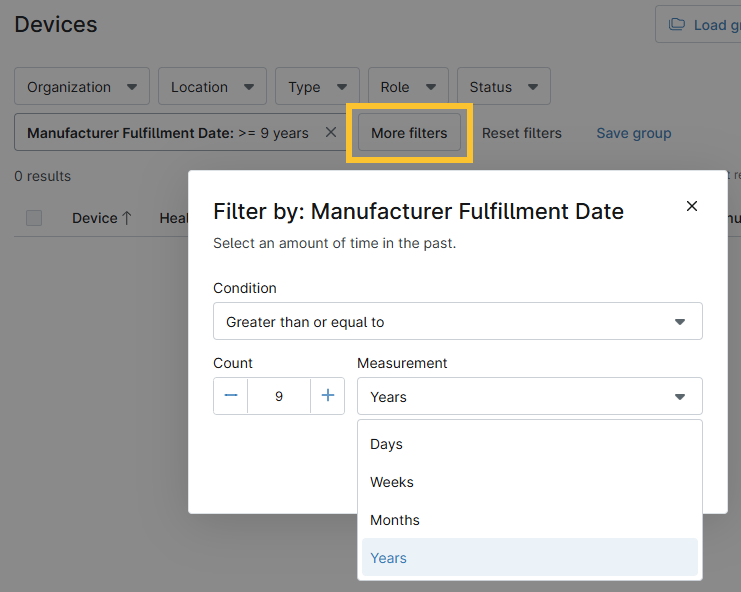
Viewing Warranty Information by Fulfillment Timeline
To find devices by a specific fulfillment timeline, click More filters and select Manufacturer Fulfillment Date, then enter your date criteria.
Setting Warranty Tracking Schedules and Notifications
You can configure device policies to set warranty expiration notification schedules, manage notification channels, and create ticketing rules.
- In NinjaOne, navigate to Administration → Policies → Agent policies, then select a policy from the Agent policies list.
- Policy configuration options will open. Click the Warranty Tracking tab, then configure the Schedule and Notifications settings to your needs. Place your cursor over the tooltip icons for explanations of key settings.
Warranty Tracking Settings
The table below explains the various warranty tracking settings.
| Setting | Description |
|---|---|
| Activity setting | Activate this toggle to activate warranty tracking. |
| Schedule | Use these settings to specify the time setting for your warranty alerts. You can specify the following:
Using the schedule settings in Figure 6 above, NinjaOne would send a notification only once, 90 days before the warranty expires. |
| Notifications | These options control how and to whom NinjaOne sends notifications when warranty conditions exceed the schedule parameters.
|