Topic
This article explains how to set up and use the Systray icon as part of your custom NinjaOne site.
Environment
NinjaOne platform
Description
NinjaOne allows you to create and deploy a custom Systray icon for your organization.
Branding: Systray Icon (NinjaOne Inc. 02:05)
Index
Select a category to learn more:
- Enabling the Systray icon
- Configuring the Systray Icon
- Deploying the Systray Configuration
- Deleting or Editing the Systray Icon
- The User Experience
- Advanced Usage
- Additional Resources
Enabling the Systray Icon
Before you can work with the Systray icon, you must enable it in NinjaOne. Click Administration in the NinjaOne navigation menu, then select Systray from the General drop-down menu and click the Enable button.
Once enabled, you can use the Add systray button to configure it.

Configuring the Systray Icon
Click Add systray to configure a new systray icon. To configure an existing systray, click the ellipsis button and select Edit.

In the Add Systray menu, you will customize what appears when users click the Systray icon.
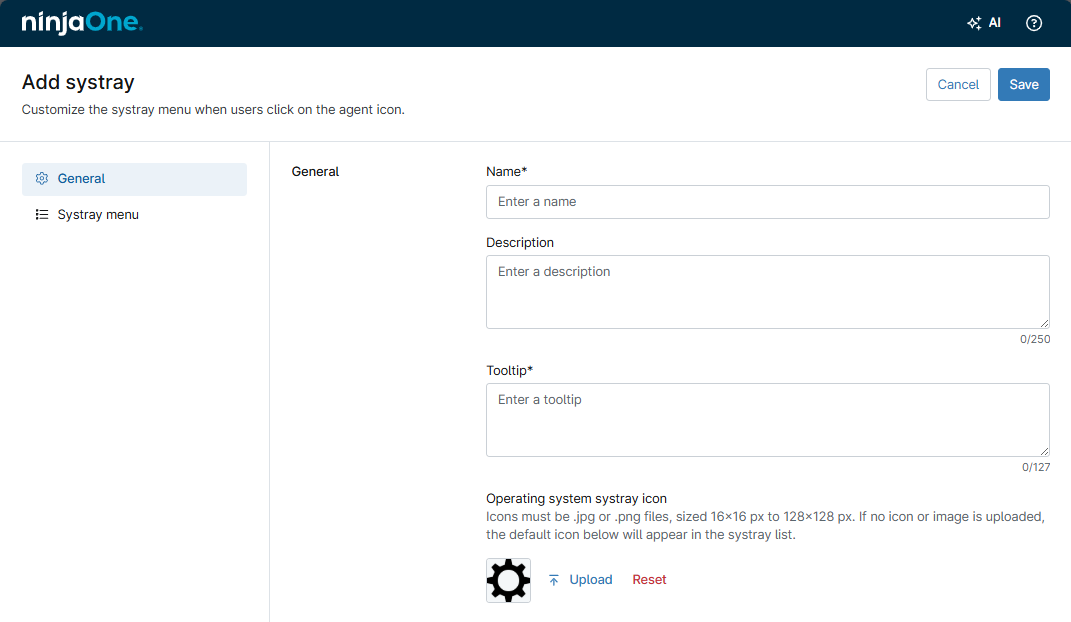
Click Add Systray, make sure you are on the General tab, then fill in the following fields:
- Name: Give the Systray icon a descriptive name.
- Description: Add an optional description.
- Tooltip: Add text that appears when a user moves their cursor over the information icon.
- Operating system systray icon: Upload the graphic image you would like to use as the Systray icon. This image must be a JPG or PNG file of equilateral size between 16x16 and 128x128 pixels.
Creating the Systray Icon Menu
In this step, you will configure the menu that appears when users click the Systray icon.
Adding Menu Items
- On the Systray Menu tab, click Add Menu Item, then select the item type from the drop-down list.
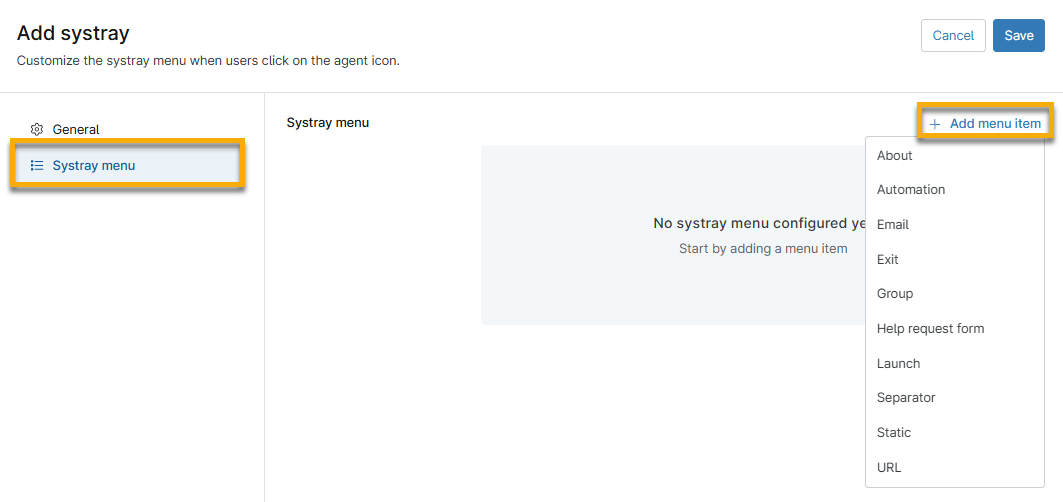
- Configure the menu item's settings. The configuration options will vary depending on the menu item type you select. Refer to the Menu Item Explanations table below to learn about each menu item type.

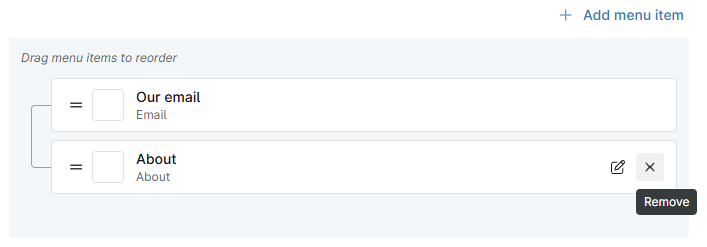
Editing Menu Items
To edit a menu item, place your cursor over it and click the Edit option when it appears. You can also drag and drop items in the menu tree to arrange them as desired. When finished, click Save Changes.

Deleting Menu Items
To delete a menu item, place your cursor over it and click the Remove option when it appears.
Menu item explanations
The following table explains each menu item type.
| Menu Item Type | Description |
|---|---|
| About | This item allows you to include information about your company. It is single-use and will always be at the root level position; it cannot be nested.
|
| Automation |
|
| |
| Exit | This single-use item will always be at the root level position. It cannot be nested. The item inserts an "exit" option to allow your users to close out of the Systray executable. |
| Group | Group lets you create menu headings for your Systray items. By default, items are added at the root level. You can create as many groups as needed. |
| Help Request Form |
|
| Launch |
|
| Separator | This item type inserts a line separator between menu items or groups. |
| Static | This command lets you enter static text the system will display to the user. |
| URL | This item type allows you to configure specific URLs for your customers to launch as needed. This command is helpful if you'd like to enable your customers to call you via Skype or any other dynamic URL. |
Deploying the Systray Configuration
After configuring the Systray icon, you can deploy it to individual or multiple organizations.
- Navigate to the Administration → Organizations tab.
- Select the checkbox next to the desired organizations. You can select more than one organization.
- Click Edit settings and select Systray from the drop-down menu.
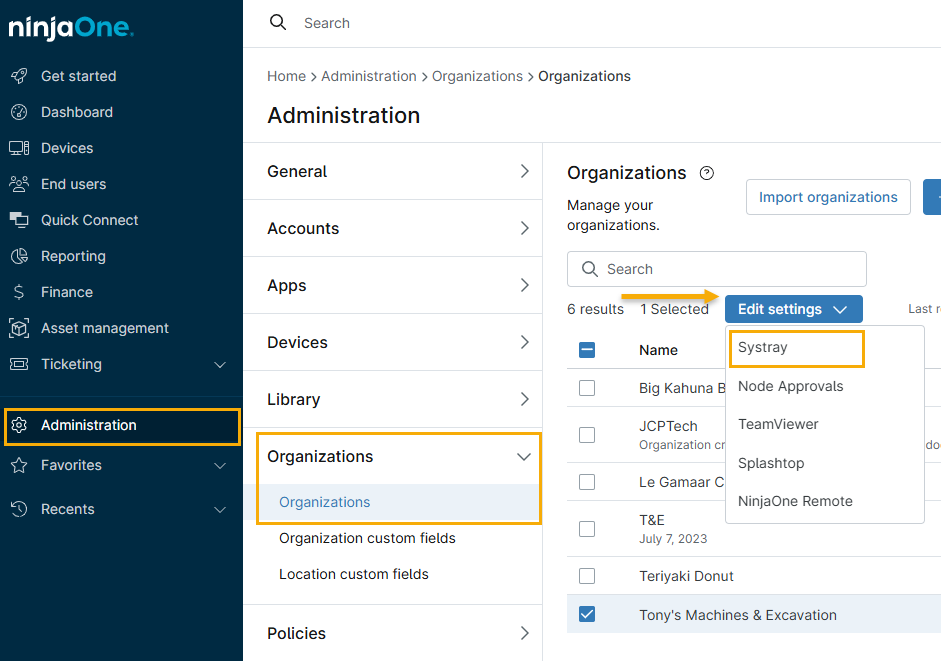
- Toggle the Enable systray switch, select the desired Systray template, and then select Apply to save changes.
Alternatively, you can deploy the Systray icon from the organization configuration page:
- Navigate to the Administration → Organizations tab and select the organization. The General tab will be open by default.
- Activate the Systray Icon toggle switch, select the desired icon template from the drop-down menu, and click Save.

Deleting or Editing the Systray Icon
- Navigate to Administration → General and open the Systray tab.
- Move your cursor over the Systray row and click the ellipsis (three dots) icon.
- Select the action.
The system will display an error message if the Systray icon is already configured with an organization. You cannot delete the Systray icon until you delete its organization configuration. Click the organization name in the dialog box to change that organization's Systray icon.
The User Experience
After deploying the Systray, the user's system will show the icon you designated (or the default gear icon), and users can interact with the tooltips you have configured.
Microsoft Windows Example

Apple macOS Example

Linux Example

Advanced Usage
Placeholders for Menu Items
Placeholders for use in menu items (URLs, Launch, or About dialog box):
- ${IP_ADDR}: IP Addresses
- ${USERNAME}: Username of current user
- ${HOSTNAME}: Machine hostname
- ${DOMAIN}: Domain machine that the node has joined
- ${TIMESTAMP}: Current timestamp in ISO format (UTC)
- Any environment variable, such as ${PROCESSOR_ARCHITECTURE}
Help Form Placeholders
- First Name: ${form.firstName}
- Last Name: ${form.lastName}
- Email: ${form.email}
- Phone: ${form.phone}
- Subject: ${form.subject}
- Problem Description: ${form.body}
- Device: ${node.displayName}
- Ninja URL: ${node.url}
- Device Role: ${node.nodeRole}
- Public IP: ${node.publicIpAddress}
- Private IPs: ${node.ipAddress}
- Device ID: ${node.id}
- Organization: ${client.name}
- Description: ${client.description}
- Organization URL: ${client.url}
- Policy: ${policy.name}
- Policy Description: ${policy.description}
- Policy URL: ${policy.url}
In addition, you can use any environment variable configured in the system with the env. Prefix.
- COMPUTERNAME: ${COMPUTERNAME}
- OS: ${env.OS}
- NUMBER_OF_PROCESSORS: ${NUMBER_OF_PROCESSORS}
- PROCESSOR_ARCHITECTURE: ${PROCESSOR_ARCHITECTURE}
- USERDOMAIN: ${USERDOMAIN}
- USERNAME: ${USERNAME}
Additional Resources
Refer to the following documentation for additional information: