
What are cloud backups?
Cloud backups involve storing copies of data in remote servers hosted by third-party providers, instead of local physical storage devices. This data is transmitted over the internet to a secure offsite location, where it is managed, maintained, and protected by the cloud provider.
One of the key benefits of cloud backups is data protection against local risks like hardware failure, theft, or natural disasters. Since data is stored offsite, it remains safe and accessible even if local systems are compromised.
Scalability is another major advantage. Cloud backup services offer flexible storage options, allowing users to increase or decrease capacity based on their needs without investing in expensive hardware. This flexibility helps businesses manage their costs efficiently.
In terms of security, cloud providers often offer strong encryption, both during data transmission and storage, ensuring that sensitive information is well-protected. Overall, cloud backups deliver reliability, cost-efficiency, and peace of mind for individuals and organizations alike.
Can NinjaOne perform cloud backups?
Yes, NinjaOne offers the NinjaOne Backup app, which can be configured to back up data to the cloud or a local device. To set up cloud backups, start by configuring a local bucket based on your geographic location and creating a backup plan that uses cloud storage within a policy. Any computers associated with this policy will store their backups according to the plan specified. Within the backup plans, you can choose to back up data either to the cloud or local storage. NinjaOne’s cloud backup leverages AWS storage services, ensuring your data is securely stored using AES 256 encryption, both at rest and in transit, to maintain data safety.
How can you configure a cloud backup location in NinjaOne?
The first step to configure NinjaOne Backup for cloud backups is to enable NinjaOne Backup. At some point, during this process you´ll choose a bucket.
Note: The storage bucket location can only be selected when there is no cloud storage used. Before enabling be sure to verify you have the right location.
If NinjaOne Backup is already enabled, you can skip step 1 and go directly to step 2.
- Enable NinjaOne Backup.
- Navigate to Administration, then Apps.
- Locate the NinjaOne Backup tile and click on it.
- Click Enable. A modal dialog appears.
- Select your cloud storage bucket based on your geographic location.
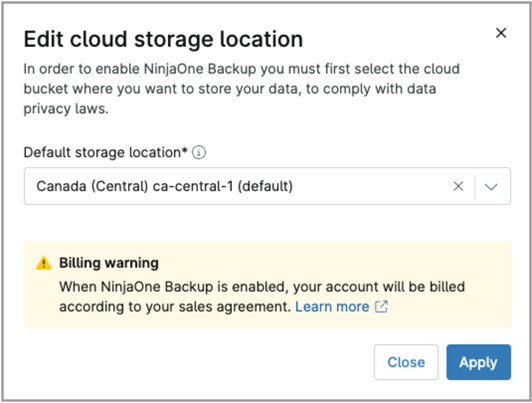
- Click Apply.
- The Backup tile should now be listed as Enabled.

- Deploy the NinjaOne backup agent to machines.
- Navigate to your Organization editor.
- Select the Backups tab on the left side panel.
- Select Backups tab from the navigation sidebar.
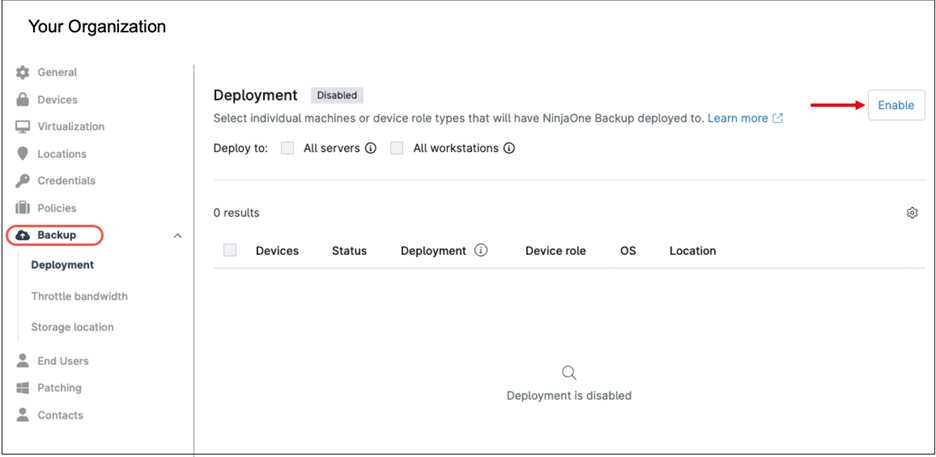
- Click Enable. This will populate the list with all devices that are eligible for backup.
- select the devices where you want to deploy the backup agent by checking each device individually, or you can choose All Servers or All Workstations to select them in bulk.
- Click Enable. A confirmation modal appears.

- Confirm your selection by clicking Enable.
- The device list will now be updated showing the devices with backup enabled.

- Click Save in the upper right corner of the Organization editor to apply these settings.
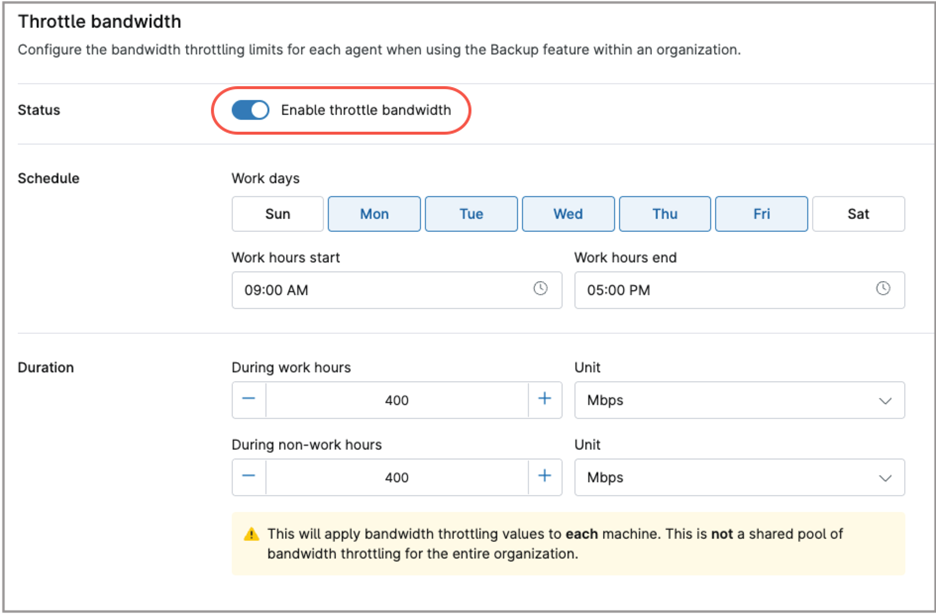
Optionally. If you want to limit bandwidth and prevent machines from using up all the available bandwidth during backups, you can enable the Throttle bandwidth option. Follow the steps below to enable this option.
- Select Throttle bandwidth from the navigation sidebar.
- Click the enable throttle bandwidth switch to turn on bandwidth throttling.
- Fill out the timing and bandwidth limits that will apply to each device during the backup process.
- Click Save in the upper right corner of the Organization editor to save these options.
Optionally. If you want to setup a local storage location for local or hybrid backups, follow the steps below. You can enter multiple locations.
- Select Storage location from the navigation sidebar.
- Click +Add. The Add local storage modal dialog appears.
- Fill out the local storage name and path.
- If credentials are required to access the storage, first add them by clicking +Add Credential. Multiple credentials can be entered, each identified by a unique name. Then, select the required credential name from the drop-down under Existing credentials.
- Check the option ‘Set as default network storage for this organization‘ if this is your preference, as multiple storage locations can be added.
- Click the Test button to test connectivity to your local storage, and correct settings if necessary.
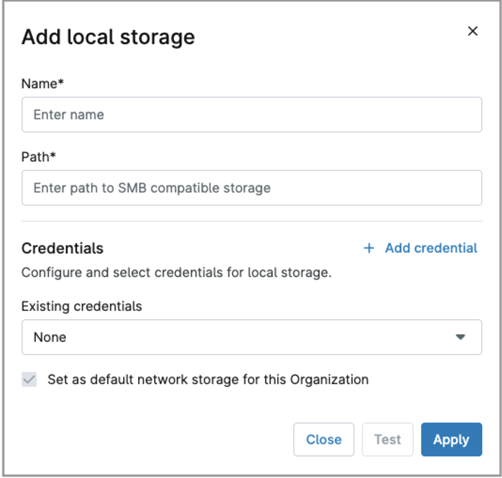
- Click Apply.
- Click Save in the upper right corner of the Organization editor to save these options.
How can I create a backup plan in NinjaOne?
Backup plans, defined within policies, provide granular control over backup frequency, destinations, and data types. Devices assigned to these policies automatically run the backup plan according to the configured schedule, ensuring consistent and reliable data protection.
Follow the steps below to create a backup plan:
- Navigate to the policy editor of the agent policy of your choice.
- Expand the Backup tab from the navigation sidebar (see below screenshot for reference).
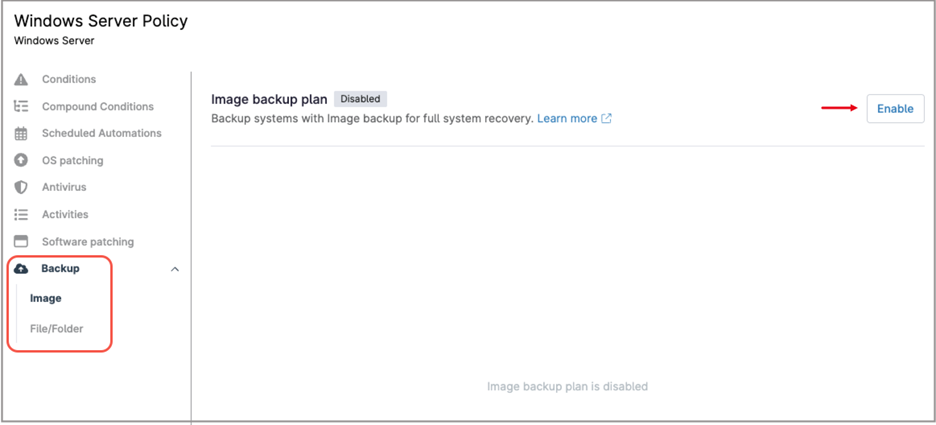
- Select Image from the navigation sidebar (go to step 13 if you don´t want to enable an image backup plan).
- Click Enable. The Image Backup Plan options appear.
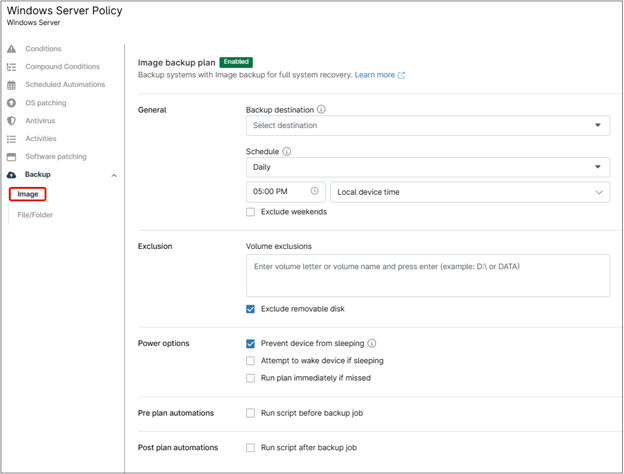
- Under Backup Destination, select Cloud Only, or Local Only or Hybrid, according to your preferences.
- Under Schedule, select the time and frequency (Hourly, Daily, Weekly, Monthly) for the backups.
- Under Exclusion, select the drives you want to exclude from the backup.
- Under Power Option, select if you want to “Prevent device from sleeping”, “Attempt to wake device if sleeping” or “Run plan immediately if missed”.
- Select whether you want to run a script before and after the backup.
- Click Save.
- Select whether you want to run a script before and after the backup (if you select these options, you´ll need to add an automation existing in the automation library).
- Click Save.
- Select File/Folder from the navigation sidebar.
- Click + Add Plan, the Add a File/Folder plan screen appears.

- Under the General tab, select your plan settings that include Plan name, Backup Destination, Schedule, Power Options, Revisions and Pre/Post plan automations.
- Under the Folders tab, select the folders you want to include or exclude.
- Under the Filters tab, type the files you want to include or exclude.
- The Advanced tab is used to manage common extensions to include or exclude when using filters.
- Click Add.
- Click Save.