
Importance of a backup strategy
Backups are essential for protecting critical data from loss due to hardware failure, cyberattacks, accidental deletion, or natural disasters. A solid backup strategy ensures that you can quickly recover and continue operations with minimal downtime. Local backups, stored on-site, offer fast recovery times and immediate access to data, making them ideal for quick restores. However, they are vulnerable to the same physical risks as the primary data, like fires or floods.
Cloud backups, on the other hand, store data off-site in secure, remote servers, protecting it from local disasters. They also provide scalability and access from anywhere, but recovery can be slower, especially with large data sets or limited internet bandwidth.
Hybrid backups combine the strengths of both local and cloud solutions. This approach offers the speed of local backups for quick recovery and the security of cloud backups for disaster resilience, making it a comprehensive strategy for data protection. Hybrid backups ensure that your data is safe, accessible, and recoverable in almost any situation.
Does NinjaOne include a backup solution?
Yes, NinjaOne offers a robust and secure backup solution designed to safeguard your critical data. With flexible options for cloud, local or hybrid backups, you can tailor your data protection strategy to meet your specific needs.
A key feature of NinjaOne’s backup solution is its block-aware design, which allows backups and restores to resume exactly where they stopped if an interruption occurs. This avoids restarting the entire job, reduces downtime, and improves reliability and efficiency.
NinjaOne also performs incremental backups, capturing only the changes made since the previous backup. This reduces backup time, network usage, and storage consumption. In addition, the solution uses deduplication to eliminate redundant data blocks. By storing only unique data, deduplication further conserves storage space, speeds up operations, and lowers bandwidth requirements.
Together, these capabilities provide a secure, efficient, and reliable backup solution optimized for modern business environments.
How do you configure backups in NinjaOne?
To configure backups in NinjaOne, there are three steps:
- Enable the NinjaOne App.
- Deploy the NinjaOne backup agent to endpoints.
- Create backup plans.
How to enable the NinjaOne App?
The first step to configure NinjaOne Backup is to enable the NinjaOne Backup App. If NinjaOne Backup is already enabled, you can skip this step.
Follow the instructions below to enable the NinjaOne Backup App.
- Navigate to Administration > Apps.
- Locate the NinjaOne Backup tile and click on it.
- Click Enable. A modal dialog appears.
- From the drop-down, select your cloud storage location based on your geographic location.

- Click Apply.
- The Backup tile should now display as Enabled.

How to deploy the NinjaOne backup agent to endpoints?
Follow the steps below to deploy the NinjaOne backup agent to endpoints and optionally configure throttling and a local backup location.
- Navigate to your Organization editor.
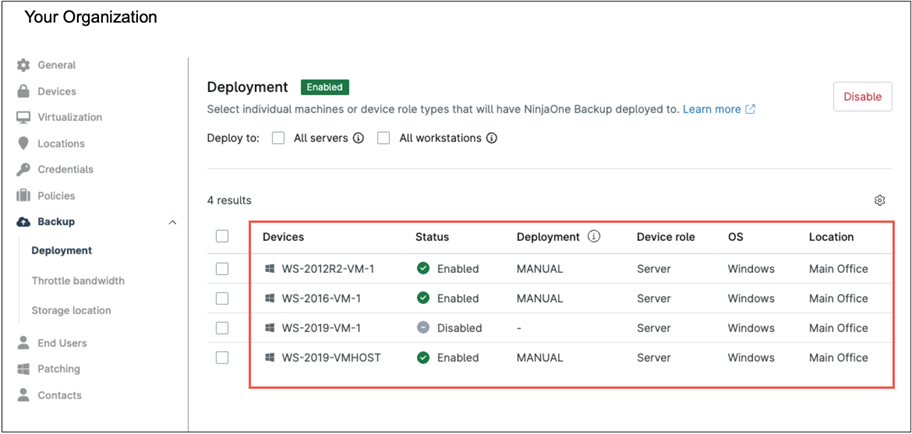
- Select Backups tab from the navigation sidebar.

- Click Enable. This will populate the list with all devices that are eligible for backup.
- Now, you can select the devices where you want to deploy the backup agent by checking each device individually, or you can choose All Servers or All Workstations to select them in bulk.
- Click Enable. A confirmation modal appears.

- Confirm your selection by clicking Enable.
- The device list will now be updated to show the devices with backup enabled.
- Click Save in the upper right corner of the Organization editor to apply these settings.
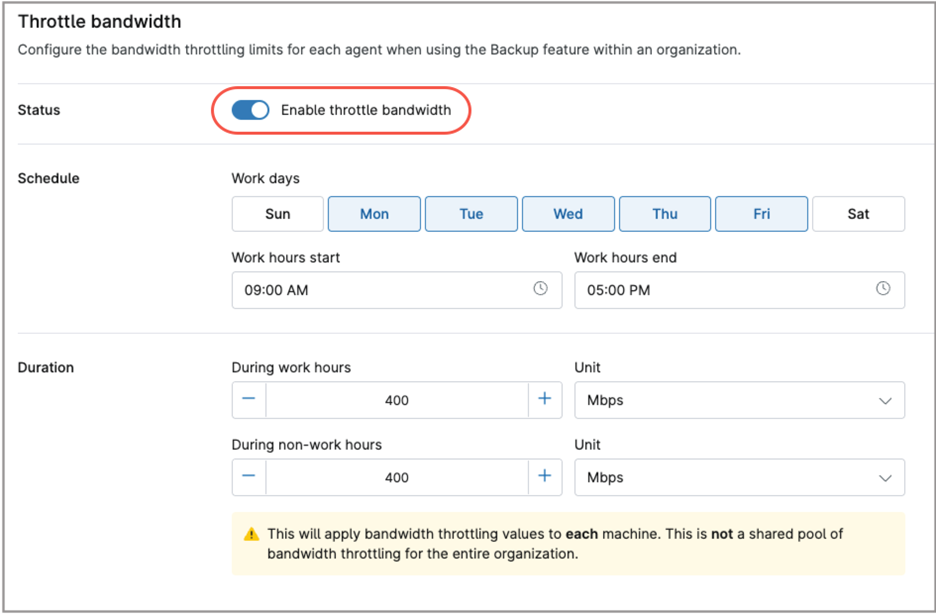
Optionally. If you want to limit bandwidth and prevent machines from using up all the available bandwidth during backups, you can enable the Throttle bandwidth option. Follow the steps below to enable this option.
- Select Throttle bandwidth from the navigation sidebar.
- Click the enable throttle bandwidth switch to turn on bandwidth throttling.
- Fill out the timing and bandwidth limits that will apply to each device during the backup process.
- Click Save in the upper right corner of the Organization editor to save these options.
Optionally. If you want to setup a local storage location for local or hybrid backups, follow the steps below. You can enter multiple locations.
- Select Storage location from the navigation sidebar.
- Click +Add. The Add local storage modal dialog appears.
- Fill out the local storage name and path.
- If credentials are required to access the storage, first add them by clicking +Add Credential. Multiple credentials can be entered, each identified by a unique name. Then, select the required credential name from the drop-down under Existing credentials.
- Check the option ‘Set as default network storage for this organization‘ if this is your preference, as multiple storage locations can be added.
- Click the Test button to test connectivity to your local storage, and correct settings if necessary.
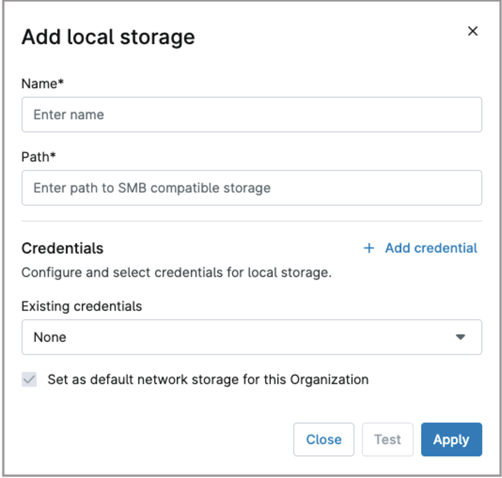
- Click Apply.
- Click Save in the upper right corner of the Organization editor to save these options.
How can I create a backup plan in NinjaOne?
Backup plans, defined within policies, provide granular control over backup frequency, destinations, and data types. Devices assigned to these policies automatically run the backup plan according to the configured schedule, ensuring consistent and reliable data protection.
Follow the steps below to create a backup plan:
- Navigate to the policy editor of the agent policy of your choice.
- Expand the Backup tab from the navigation sidebar (see below screenshot for reference).
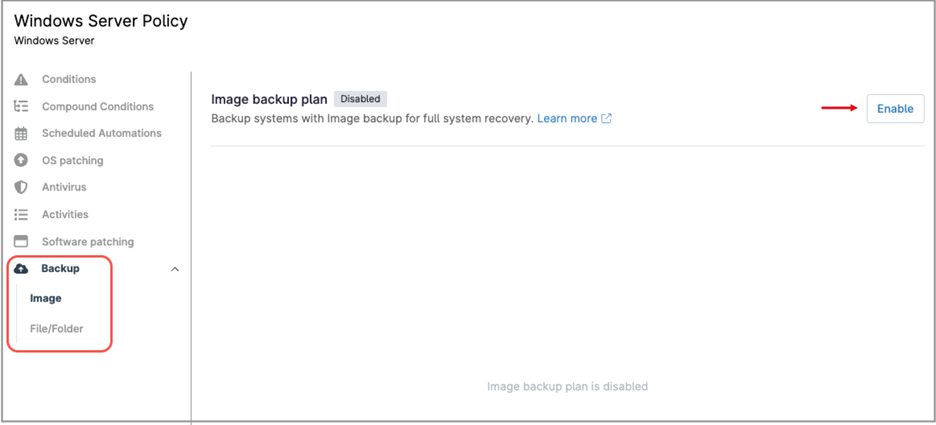
- Select Image from the navigation sidebar (go to step 13 if you don´t want to enable an image backup plan).
- Click Enable. The Image Backup Plan options appear.

- Under Backup Destination, select Cloud Only, or Local Only or Hybrid, according to your preferences.
- Under Schedule, select the time and frequency (Hourly, Daily, Weekly, Monthly) for the backups.
- Under Retention, choose how long the backups will be kept. You can select a period of up to 10 years.
- Under Exclusion, select the drives you want to exclude from the backup.
- Under Power Option, select if you want to “Prevent device from sleeping”, “Attempt to wake device if sleeping” or “Run plan immediately if missed”.
- Select whether you want to run a script before and after the backup (if you select these options, you´ll need to add an automation existing in the automation library).
- Click Save.
- Select File/Folder from the navigation sidebar.
- Click + Add Plan, the Add a File/Folder plan screen appears.

- Under the General tab, select your plan settings that include Plan name, Backup Destination, Schedule, Power Options, Revisions and Pre/Post plan automations.
- Under the Folders tab, select the folders you want to include or exclude.
- Under the Filters tab, type the files you want to include or exclude.
- The Advanced tab is used to manage common extensions to include or exclude when using filters.
- Click Add.
- Click Save.
Can I run backups on demand in NinjaOne?
Yes. If needed, you can run a backup plan manually for one or more devices.
Note: This option is only available if backup plans are defined in the policy assigned to the devices, and the devices are powered on. Follow the steps below to manually run a backup plan.
- From the NinjaOne main console, select to Devices.
- Select the device(s) for which you want to backup.
- Click the run icon ( ).
- From the drop-down, select Backup and then Run backup plan.
- Select the backup plan you want to run (File/Folder or Image).
- Click Run.
Another way to run a backup plan for one single device is as follows:
- Navigate to the device dashboard.
- Hover the mouse over backup icon () near the device name.
- Select Run backup plan.
- Select the backup plan you want to run (File/Folder or Image).
- Click Run.
Can network devices be backed up in NinjaOne?
Although this capability is not part of NinjaOne backup solution, NinjaOne can still create configuration backups for managed network devices, including firewalls, routers, and switches. NMS policies include a Configuration Backup option where you can configure the frequency of these configuration backups
