
What is the importance of patch automation?
Patching is essential to maintaining the security and integrity of an organization’s IT infrastructure. Most cyberattacks exploit known vulnerabilities, and timely patching directly addresses these weaknesses.
However, manual patch deployment is often tedious, error-prone, and difficult to scale. Applying patches across a large number of systems increases the risk of human error, which can leave critical vulnerabilities unaddressed. Achieving consistency and completeness manually is also challenging, potentially resulting in gaps in coverage.
Automating the patching process solves many of these issues. Patch automation reduces the operational burden on IT teams and minimizes errors associated with manual intervention. It enables the consistent, timely, and comprehensive deployment of security updates across all systems.
With automation, organizations can proactively remediate vulnerabilities before attackers can exploit them. This not only improves security but also helps meet compliance requirements. Automated patching strengthens defenses, reduces the risk of breaches, and improves overall operational efficiency.
How to configure Automated OS Patch Deployment in NinjaOne?
Automating OS patch deployment is easy with NinjaOne, by using policies. You can configure NinjaOne to automatically deploy OS patches on Windows, Mac, and Linux Endpoints.
There are two steps to configure automated patch deployment in NinjaOne:
- Enable patching at the policy level.
- Assign devices to policies in the Organization dashboard.
This configuration allows NinjaOne to handle patch deployment automatically across all applicable endpoints.
Note: Patches must be approved before they can be deployed. NinjaOne offers several methods for approving patches, which are explained later in this document.
How to enable OS patching at the policy level?
Follow the steps below to enable patching at the policy level.
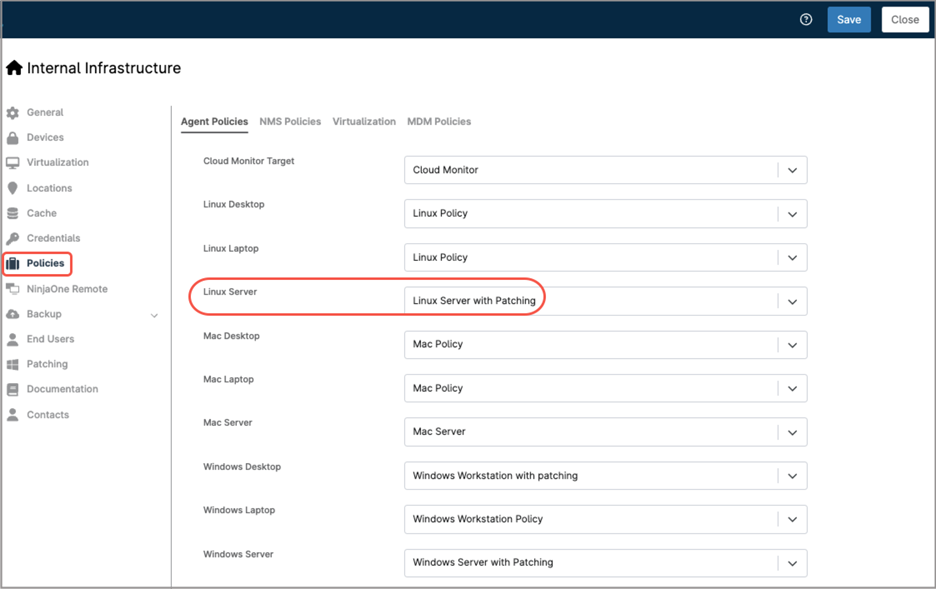
- From the NinjaOne main console, navigate to Administration > Policies > Agent Policies.
- Choose the policy you want to add OS patching to, or create a new one. For this example, we will use “Linux Server with patching”.
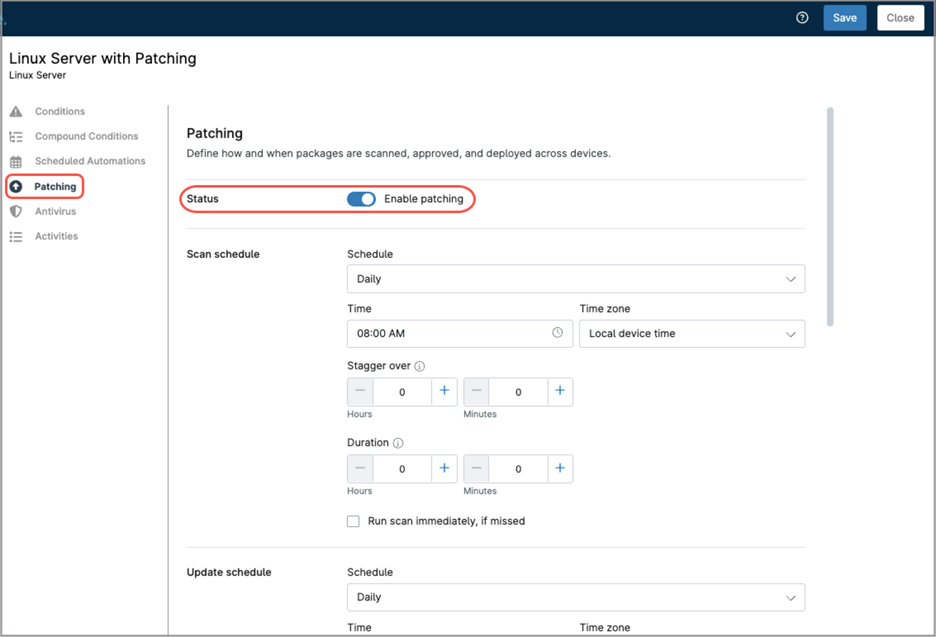
- Choose Patching in the sidebar, then toggle the status switch to activate patching for this policy.
- Fill out the remaining fields according to your preferences, here you have a granular control of the scan schedule, update schedule, reboot options, pre and post patching automations, and approvals. While NinjaOne supports automatic update approval, it is recommended that administrators thoroughly test updates before approving deployment.
- Once you’re done filling out all the fields, click Save and close. You may be prompted to complete your MFA verification.
How to assign devices to policies?
Follow the steps below to assign devices to policies in the Organization dashboard.
- Go to the Organization Editor.
- Choose Policies in the sidebar.
- On the right, you will see all policy assignments. Select Agent policies on top.
All device roles will appear showing the default policy assigned to them. Adjust as necessary, making sure your devices are attached to the policy of your preference. Once done, save and close.
How can I automate patch approvals?
Automatic patch approval in NinjaOne can streamline patch management workflows, but it should be used with caution. Some patches may introduce bugs, compatibility issues, or system instability if deployed without prior validation. A safer strategy is to reserve auto-approval for critical security updates or apply it only to a small set of test endpoints that can help verify patch stability before broader deployment. Using auto-approval in this controlled manner supports a staged rollout strategy, balancing the need for timely updates with operational reliability and aligning with the organization’s risk tolerance.
NinjaOne’s OS patching policy includes an approval section that allows patches to be auto approved. This section is divided into the following categories: Security Updates, General Approvals, Advanced Approvals, Patch Intelligence AI Overrides, and Manual Approval Overrides. Let’s review each one in detail.
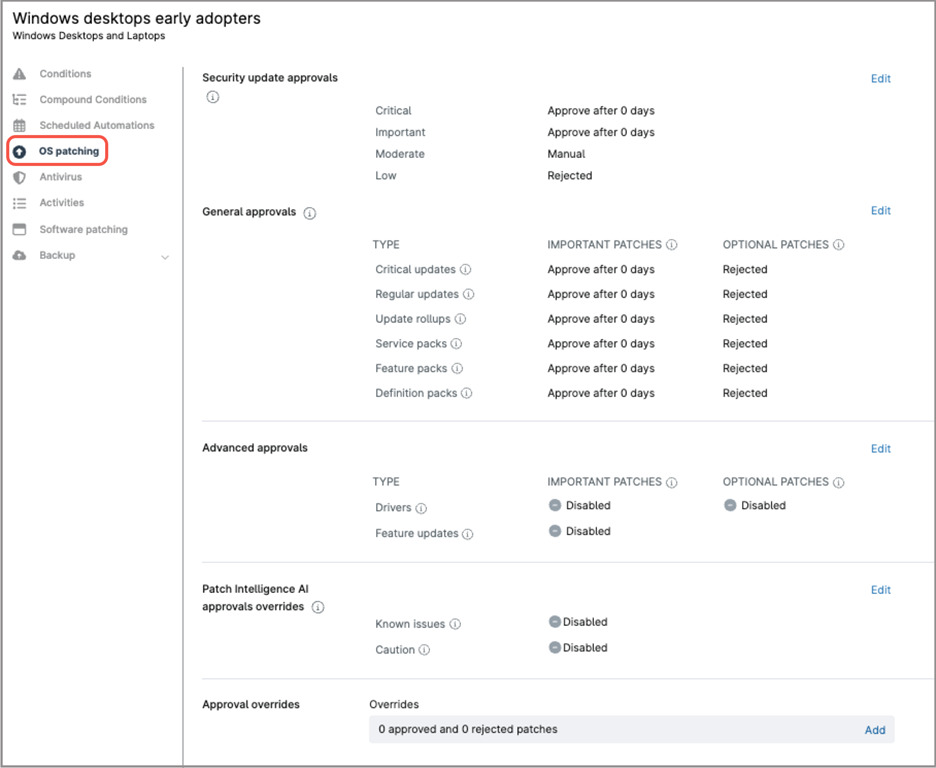
Security update approvals.
This subsection covers updates related to security vulnerabilities. Updates are categorized as Critical, Important, Moderate, or Low. For each category, you can configure automatic approval after a specified number of days, require manual approval, or reject them entirely.
General approvals.
This subsection covers non-security updates, such as improvements and bug fixes. Update types include Critical, Regular, Update Rollups, Service Packs, Feature Packs, and Definition Packs, each of them divided into Important and Optional patches. Each category can be configured to automatically approve after a specified number of days, require manual approval, or be rejected entirely.
Advanced approvals.
This subsection covers driver and feature updates. Driver updates are divided into Important and Optional. Each category can be configured to automatically approve after a specified number of days, require manual approval, or be rejected entirely.
Patch Intelligence AI approvals overrides.
This feature leverages AI-driven sentiment analysis and global user feedback to identify patches that may introduce compatibility, stability, or security issues. Patches flagged as potentially problematic are surfaced for IT teams to review before deployment. Within this section, you can choose to reject or manually approve patches that have known issues or patches that NinjaOne has flagged due to significant concerns.
Approval overrides.
In this subsection, you can preemptively approve or reject individual patches by their Knowledge Base (KB) number.
Can patches be preemptively approved globally?
Yes. Patches can be globally approved or rejected across the entire tenant, allowing consistent and automated deployment of updates. This reduces manual effort, speeds up response to critical vulnerabilities, and ensures uniform patching across all managed devices. Preemptively adding patches globally can only be done by KB number, this means that updates without a KB number (like drivers, feature updates, etc), cannot be added to the list.
Follow the steps below to configure global patch approval in NinjaOne.
- Navigate to Administration > Apps > NinjaOne Patching.

- Click Add. A modal dialog appears.

- Enter the patch KB number, a description, and approval status (approved or rejected).
- Click Save.
How are patches manually approved or rejected?
When patch approval is set to manual in a policy, applicable patches found will appear as pending in the System Dashboard or the Organization Dashboard. Follow the steps below to manually approve or reject pending patches.
- Either open the system dashboard or the organization dashboard.
- Navigate to Patching > OS patches > Pending.
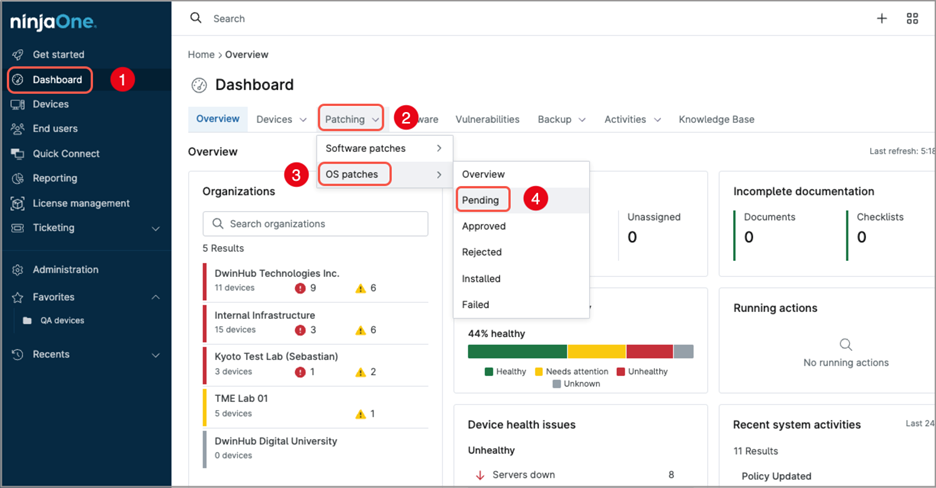
- All patches pending approval will be listed.
- Use the checkmark to select the patches you want to either approve or reject. An options menu will appear.

- If you want to approve the patch(es):
- From the options menu, select Approve.
- Select either Approve for policies or Approve for policies by KB*.
This option approves the patch(es) but it will be installed until the next apply window defined in the policy.
- If you want to approve and immediately install the patch(es):
- From the options menu, select Apply now.
- Select either Approve for policies and apply now or Approve for policies by KB and apply now*.
- If you want to reject the patch(es):
- From the options menu, select Reject.
- Select either Reject for policies or Reject for policies by KB*.
* Sometimes, a single KB number can include multiple related patches. When you approve or reject for policies by KB, all patches associated with that KB are approved or rejected— even if not all of them are currently listed.
In contrast, when you approve or reject for policies (without using the KB option), only the explicitly selected patches are approved or rejected.
How to configure Automated Software Patch Deployment in NinjaOne?
Just like OS patch deployment, software patch deployment can also be automated in NinjaOne through policies. NinjaOne can automatically deploy software patches to Windows and macOS endpoints, but Linux software patching is not supported.
The steps for configuring automated software patch deployment are similar to those used for OS patch deployment:
Enable patching at the policy level
- Navigate to Administration > Policies > Agent Policies.
- Choose the policy you want to add software patching.
- Choose the Software patching tab in the sidebar, then toggle the status switch to activate software patching for this policy.
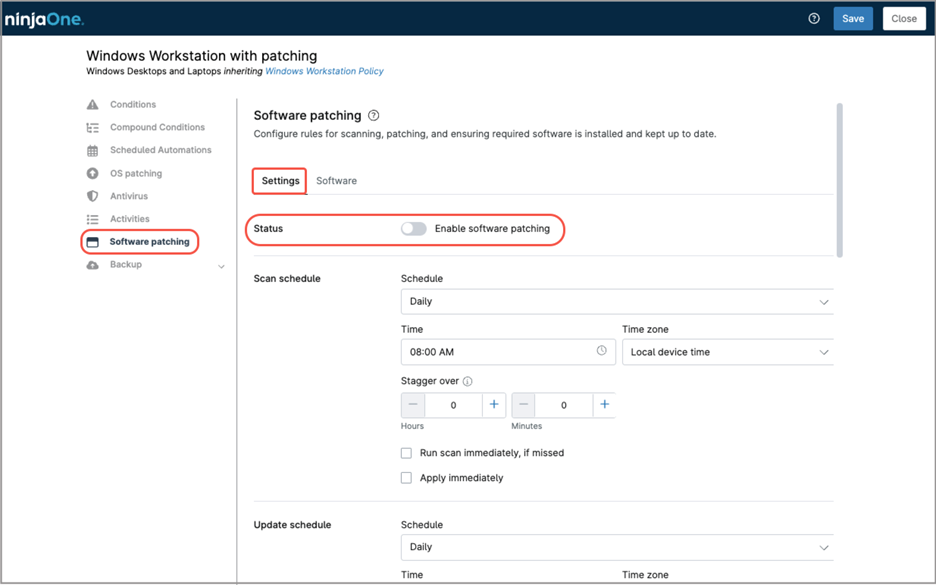
- Fill out the remaining fields according to your preferences, here you have a granular control of the scan window, update window, reboot options and approvals. Pay special attention to the Approvals fields; remember that testing and approving patches is a task that requires IT Administrator intervention. While NinjaOne can automatically approve all patches/updates this is not recommended. IT administrators should review patches, and test them before approving for deployment
- Go to the Software tab and click + Add software A software list appears.
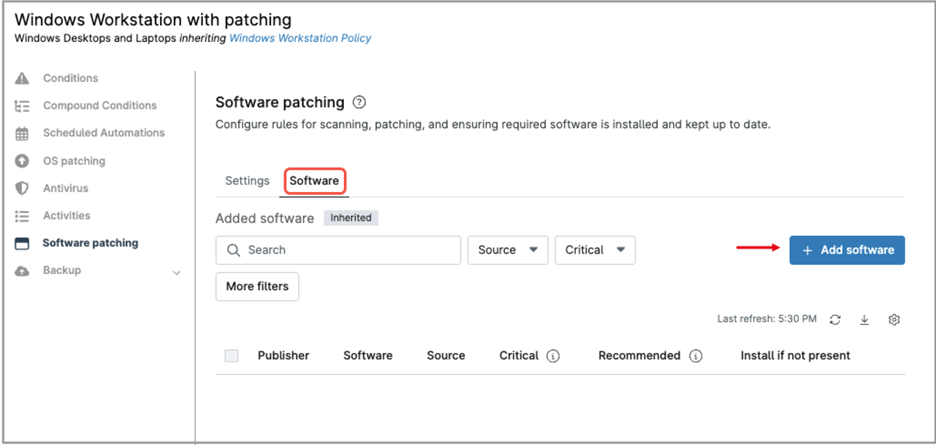
- Choose the software products you want to enable updates for and check their boxes. You can select multiple products.
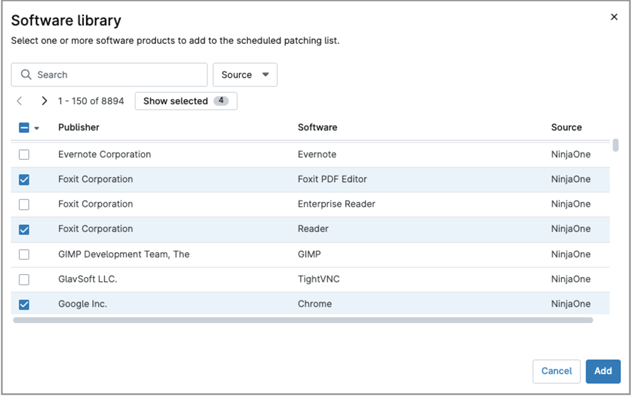
- Once you select all your software products, click Add.
- Once you´re done filling out all the fields, click Save and close. You may be prompted to complete your MFA verification.
Make sure your devices are attached to the correct policy in the Organization dashboard, just as you did for OS patching.
Bandwidth considerations
Bandwidth usage must be carefully considered when selecting a scan or update window. In large environments, having all endpoints scanning and downloading patches simultaneously can overload the network. NinjaOne offers different strategies to help optimizing bandwidth, let´s analyze each of them.
Staggered patch schedule.
The Stagger feature spreads out patch scan and installation times by assigning each device a random start time within a defined window. This prevents simultaneous updates, reduces network strain, and improves overall stability. To enable this feature, set a Stagger Over Time value different than zero in the scan or update schedule—this defines how long the system will spread patch activity across devices. Also, setup a duration window, which is the maximum amount of time the scan or update window will take before stopping.

Leverage a WSUS server.
For Windows environments, deploying a WSUS server is another effective strategy to avoid bandwidth saturation. WSUS requires only a Windows Server license and enables Windows endpoints to download each patch a single time from the Internet. All remaining endpoints then retrieve the update locally from the WSUS server. NinjaOne can configure Windows devices to use the organization’s WSUS server instead of downloading updates directly from Microsoft, significantly reducing Internet bandwidth usage.
Follow the next directions to setup a WSUS server for your organization:
- Go to the Organization editor for your organization.
- Choose Patching in the sidebar.
- Click Edit. A modal dialog appears.
- Select “Use the following WSUS server,” then fill out your WSUS server information: IP address, protocol, and port. Optionally, selective you want to use the default Microsoft update server in case the WSUS server is unavailable.
- Click Save in the dialog box, confirm, and then Click Save at the upper right of the screen, and then Close.
(see the next screenshot for reference)

Please note that when you use a WSUS server to distribute patches, the patch approval must be made in WSUS; it will be a mixed environment where WSUS manages patches and NinjaOne manages the patch scan window, patch installation window, and reboot options.
Leverage NinjaOne Patch Caching.
NinjaOne provides Patch Caching, a feature designed to reduce external bandwidth consumption for Windows patching. When Patch Caching is enabled, any Windows endpoint, regardless of edition or hardware class—can act as a cache node. That device downloads the required patches once and stores them locally, and other Windows endpoints in the same subnet retrieve the patches from the cache instead of downloading them individually from the Internet.
For more information about NinjaOne Patch Caching, including setup instructions, follow this link.
What are the advantages of using NinjaOne for automated patch deployment?
By leveraging NinjaOne for your automated patch deployment you can get:
Consistency
By using policies, all your endpoints will scan and install patches on the same schedule, ensuring no patches escape installation.
Security
All your endpoints will have the latest security updates installed, improving their ability to resist cyberattacks.
Flexibility
You can have different policies for different device groups, allowing patching at different schedules, facilitating patch testing and bandwidth utilization.
Cost savings
By leveraging NinjaOne for patch management, you don’t have to pay expensive patching software licenses.