
NinjaOne Remote gives IT teams and Managed Service Providers (MSPs) a fast, secure, and reliable way to connect to any endpoint, no matter where it’s located. With support for Windows, macOS, Android, iOS, and iPadOS, technicians can troubleshoot issues, deliver hands-on support, and resolve problems in real time.Because it’s built directly into the NinjaOne platform, there’s no need to juggle multiple tools, everything you need to manage and support devices lives in one place.
For MSPs and IT departments, the benefits are immediate. Faster response times mean less downtime for end users, while strong security with encrypted sessions and role-based access keeps every connection protected. By consolidating remote support into the same platform used for monitoring, patching, and automation, NinjaOne Remote not only improves technician efficiency but also reduces costs and complexity. The result is a smoother support experience, happier end users, and more time for IT teams to focus on strategic priorities.
How does NinjaOne Remote work?
NinjaOne Remote has two components:
- The streamer. This is the client component, deployed on each managed endpoint that will be remote controlled. The NinjaOne agent automatically installs the client in silent mode.
- The player. This is the program that initiates the connection and must be manually installed on the computer used to control the remote device.
The NinjaOne cloud service provides rendezvous and relay services for remote sessions, forwarding traffic between the source and target devices.
When a technician initiates a remote session by clicking the ![]() icon from the device dashboard, the remote endpoint receives a connection request and after some handshaking that takes a few seconds, the remote session starts. If “Ask end user for confirmation before connecting to device” is enabled in the configuration options, the session starts only after the end user approves the request.
icon from the device dashboard, the remote endpoint receives a connection request and after some handshaking that takes a few seconds, the remote session starts. If “Ask end user for confirmation before connecting to device” is enabled in the configuration options, the session starts only after the end user approves the request.
During the remote session, the endpoint displays a small notification window that states the device is being remotely controlled and identifies the remote party via the configured branding name. End users may hide the notification; hiding it does not end or affect the session.
In the technician’s viewer, the remote desktop is displayed within a framed window. The header bar at the top displays the remote endpoint´s name and provides icons for common actions.
What actions can the technician perform during a remote session?
Beyond full remote control (as if working locally at the endpoint), the technician can invoke a set of quick actions, such as: sending keystrokes (like CTRL-Alt-Del, F12, F10, etc), remote printing, file transfers, initiate a chat session with the end user, change the session settings, record the session, change the default directory to store the session recordings, adjust the video quality, and terminate the session, among other things.
How do I enable NinjaOne Remote in NinjaOne in my tenant?
To enable NinjaOne Remote in your tenant, you need to:
- Enable the NinjaOne App.
- Enable the NinjaOne client integration on each organization. This step automatically deploys the streamer to the devices you select by role (Windows Workstation, Mac, Android, etc).
How do I enable NinjaOne App in NinjaOne?
To enable NinjaOne App in NinjaOne, follow the steps below:
- Navigate to Administration > Apps.
- Click on NinjaOne Remote. The NinjaOne Remote configuration page appears showing NinjaOne Remote disabled.
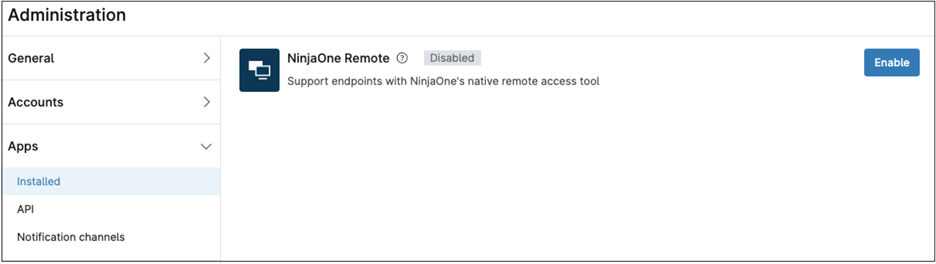
- Click Enable. The NinjaOne configuration options appear.
- At this point, the NinjaOne App is enabled with the default configuration, and you can proceed with deploying the streamer on the endpoints. A later section in this document describes the available configuration options and how to tailor them to your requirements, globally, at the organization level, or per device.
How can I change the NinjaOne Remote Default configuration options globally?
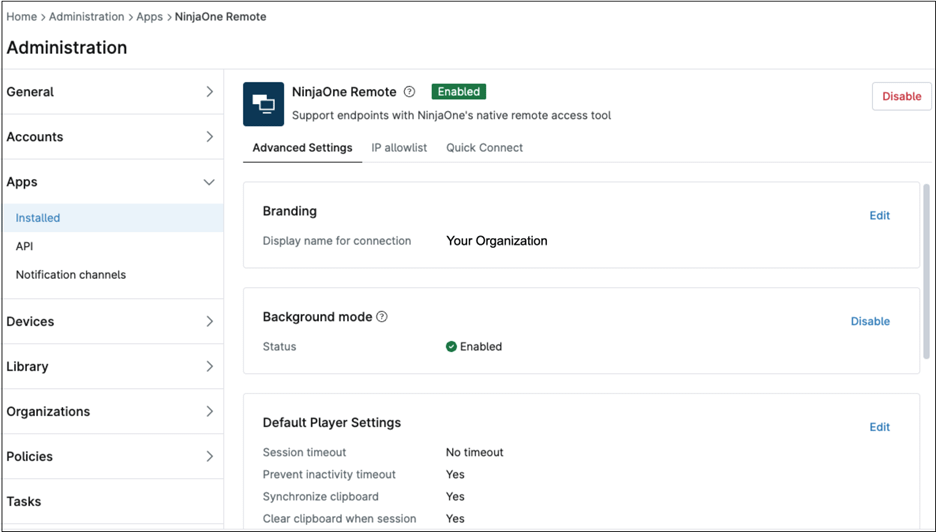
You can change the default configuration options right after enabling NinjaOne Remote by editing the available options, or by navigating to Administration > Apps > NinjaOne Remote. You will see a configuration screen with three tabs; click Edit to change the options. Let´s go over the options under each tab.
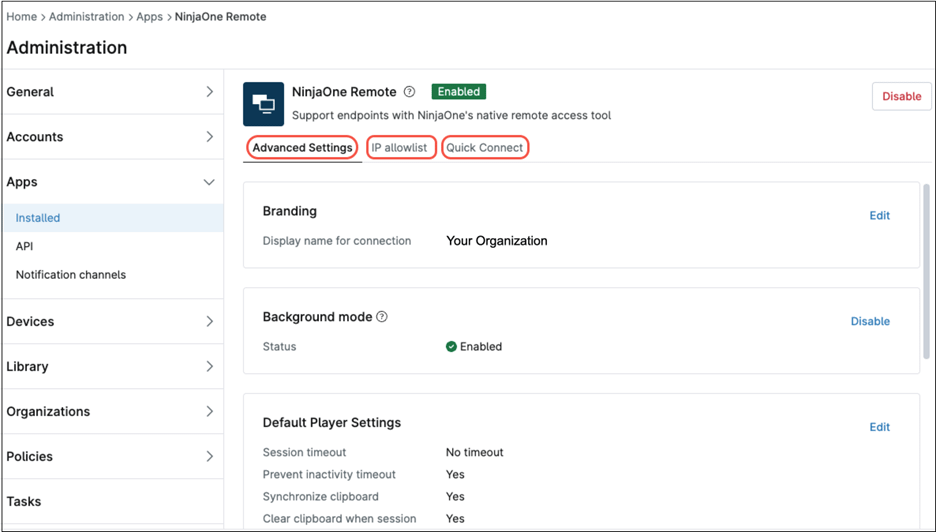
- Advanced Settings tab. See below the options under this tab.
- Branding. This setting determines the branding name displayed on the endpoint during remote-control sessions. The displayed name notifies the end user that the device is under remote control and identifies the controlling party.
- Background mode. This setting enables or disables the NinjaOne Remote background mode. A later section in this document explains this mode.
- Default Player Settings. This set of options determines how the player behaves, see below for available options.
- Session timeout – Defines the inactivity period after which the remote session is automatically terminated. Keyboard or mouse activity in the viewer resets the timer. This applies only to the remote session and does not modify the endpoint’s OS idle/lock policies. Upon timeout, you can configure the post-session action: no action, lock the workstation, or sign out the user.
- Prevent inactivity timeout – When this option is enabled, the endpoint is kept active during the remote session so that keyboard/mouse inactivity does not trigger the screensaver or auto-lock. This affects only the session and does not change system policies.
- Synchronize clipboard – When this setting is enabled, the viewer and endpoint clipboards are synchronized, enabling copy and paste in both directions between the technician’s computer and the remote device for the duration of the session.
- Clear clipboard when session closes – When enabled, the clipboards of both the technician’s workstation and the remote endpoint are cleared automatically upon session termination, helping prevent residual data exposure.
- Logout when session closes – Logs out the logged in user on the remote side when the session closes.
- Lock device when session closes – Locks the remote computer when the session closes.
- Disable remote wallpaper – When enabled, the viewer hides the remote desktop wallpaper to reduce bandwidth and improve performance. This setting affects only what the technician sees during the session; it does not permanently change the user’s wallpaper on the endpoint.
- Prevent technician keyboard and mouse – When enabled, the technician’s keyboard and mouse input are blocked; the session is view-only.
- Auto record – When enabled, the session is automatically recorded, the recording is stored on the technician´s computer on \users\<username>\videos. (Mac and Windows). As soon as the connection is terminated, a pop up window appears on the technician´s screen showing the recording file name.
- Default Streamer Settings.
Automatically update – When enabled, the streamer updates itself silently in the background whenever a new version is available.
- IP allowlist tab. There is only one option under this tab: IP Allow list.
When the IP Allowlist is enabled, the system permits remote connections only from the specified WAN source IP addresses. All other sources are blocked. Up to 10 IP addresses can be added to the list. Once the connection is established, it remains allowed even if the WAN/public IP changes. To enable this option, add at least one IP address to the list.
- Quick Connect tab. There is only one option under this tab: Quick Connect.
When this option is enabled, the Quick Connect add-on is available. Quick Connect enables remote access to devices that are not enrolled in NinjaOne, using a per-invitation (invitation-based) workflow. Access is temporary and scoped to the specific invitation.
How can I adjust the NinjaOne Default configuration options for one organization?
Organization-level options can be customized to meet the specific requirements of a given organization. When defined, these options override the global defined settings, just for that organization.
To define or adjust organization-level settings, follow the steps below.
- navigate to Administration > Organizations, then click on your organization. The organization editor appears.
- On the left side menu, click NinjaOne Remote. You´ll see the NinjaOne Remote options on the right side, showing two tabs: General and Advanced.
- Click Advanced.
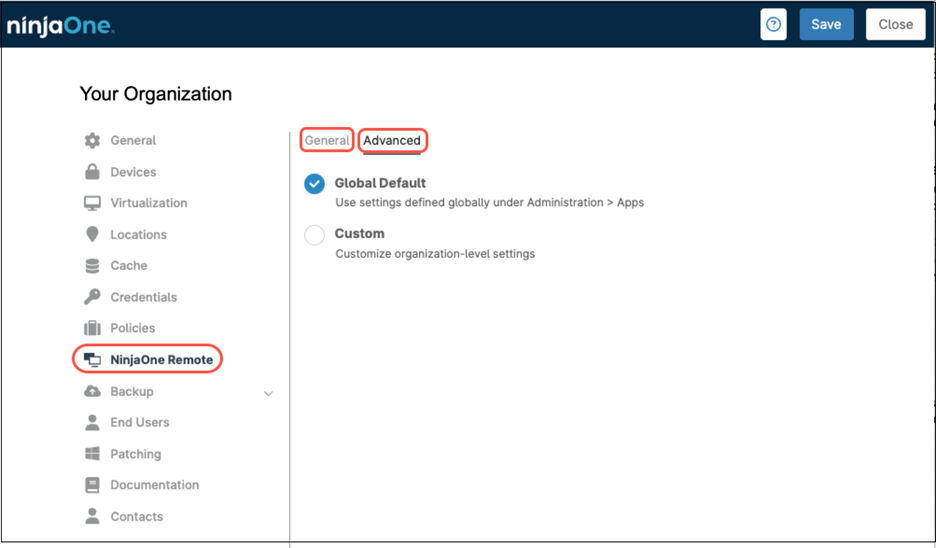
- Select Custom. The NinjaOne Remote options appear.
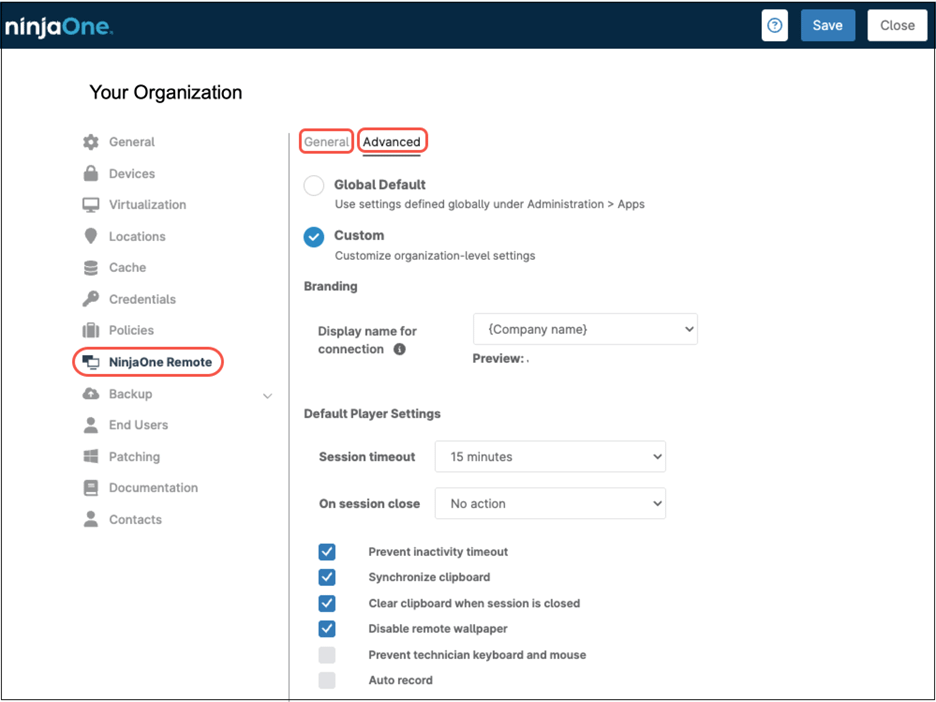
- Adjust the settings per your preferences; see below setting definition.
- Branding. Display name for connection – This setting determines the branding name displayed on the endpoint during remote-control sessions. The displayed name notifies the end user that the device is under remote control and identifies the controlling party.
- Default Player Settings. This set of options determines how the player behaves, see below for available options.
- Session timeout – This setting defines the inactivity period after which the remote session is automatically terminated. Keyboard or mouse activity in the viewer resets the timer. This affects only the session and does not change the endpoint’s OS idle/lock policies.
- On session close – Defines the action to perform when the remote session terminates. Options include no action, lock the workstation, or sign out the remote user.
- Prevent inactivity timeout – When this option is enabled, the endpoint is kept active during the remote session so that keyboard/mouse inactivity does not trigger the screensaver or auto-lock. This affects only the session and does not change system policies.
- Synchronize clipboard – When this setting is enabled, the viewer and endpoint clipboards are synchronized, enabling copy and paste in both directions between the technician’s computer and the remote device for the duration of the session.
- Clear clipboard when session is closed – When enabled, the clipboards of both the technician’s workstation and the remote endpoint are cleared automatically upon session termination, helping prevent residual data exposure.
- Disable remote wallpaper – When enabled, the viewer hides the remote desktop wallpaper to reduce bandwidth and improve performance. This setting affects only what the technician sees during the session; it does not permanently change the user’s wallpaper on the endpoint.
- Prevent technician keyboard and mouse – When enabled, the technician’s keyboard and mouse input are blocked; the session is view-only.
- Auto record – When enabled, the session is automatically recorded, the recording is stored on the technician´s computer on \users\<username>\videos. (Mac and Windows). As soon as the connections is terminated, a pop-up window appears on the technician´s screen showing the recording file name.
How can I adjust the NinjaOne Default configuration options for one single devce?
Certain devices may require more restrictive NinjaOne Remote configurations. Configure the options as illustrated below and follow the subsequent procedure to complete the adjustments.
- Navigate to the device editor.
- Click Settings.
- On the left side menu, click Apps.
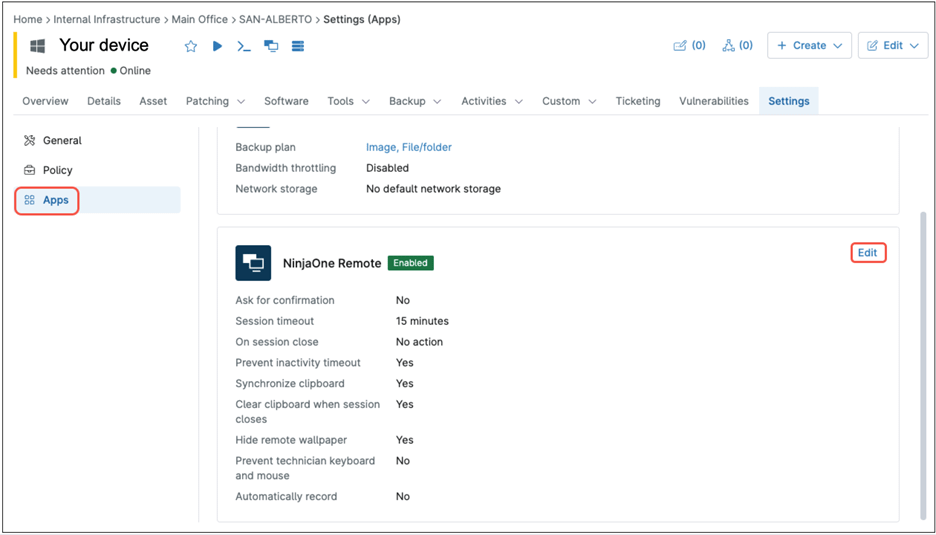
- Click Edit in front of NinjaOne Remote. The NinjaOne Remote editor appears.
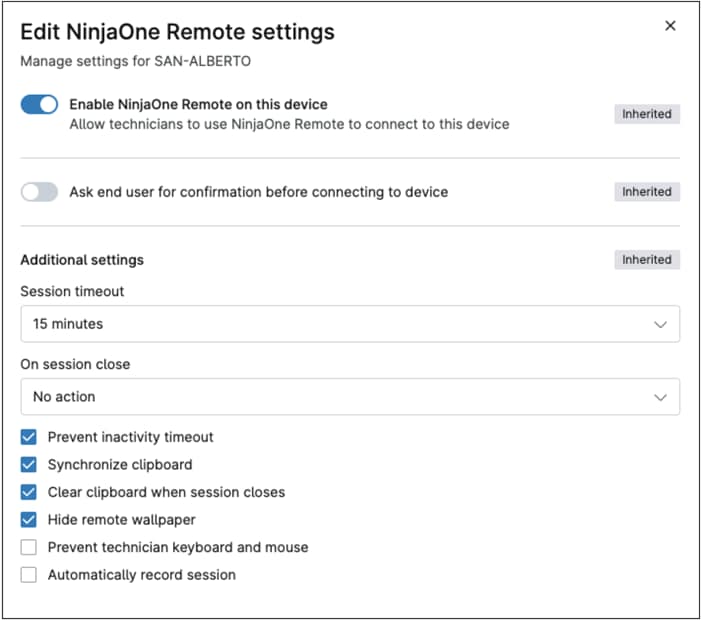
- From this screen you can disable NinjaOne Remote for the device or enforce an approval prompt on the endpoint. If the end user does not grant consent, the connection is blocked, and no session is established. Optionally, you can set a timeout which will allow the connection even if the end user does not grant his consent.
- The remaining options are the same as previously explained for global options and organization level options.
- Click Update.
How do I enable the NinjaOne client integration for my organization?
Enabling this integration deploys the NinjaOne streamer on the selected device roles. To enable the NinjaOne client integration for one organization, follow the steps below:
- Navigate to Administration > Organizations.
- Click your organization. The organization editor appears.
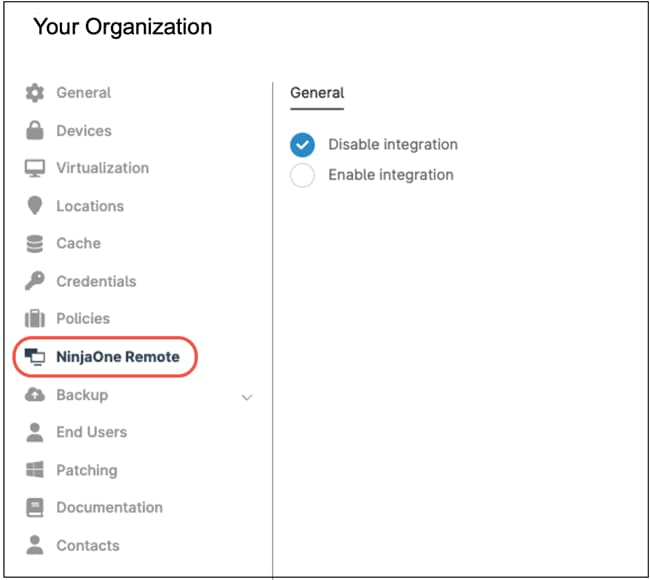
- Click Enable integration. A list of node roles appears.
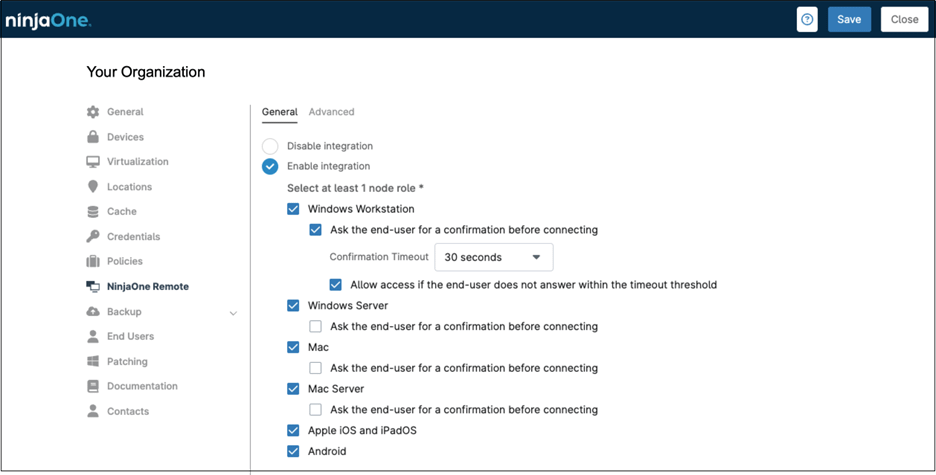
- Check the box for the node role where you want to deploy the streamer.
- If you select “Ask the end-user for a confirmation before connecting”, two more options appear: Confirmation timeout and Allow access if the end-user does not answer within the timeout threshold. Select these options per your needs. These options don´t apply for mobile devices.
- Click Save.
How do I install the NinjaOne Remote Player on my computer?
Follow the steps below to download and install the NinjaOne Remote Player on your computer.
- Navigate to Administration > Library > Downloads.
- On the right side, locate the NinjaOne Remote player for your OS from the list, and click on it. This will download it

- Once it´s downloaded, install it on your computer according to your OS.
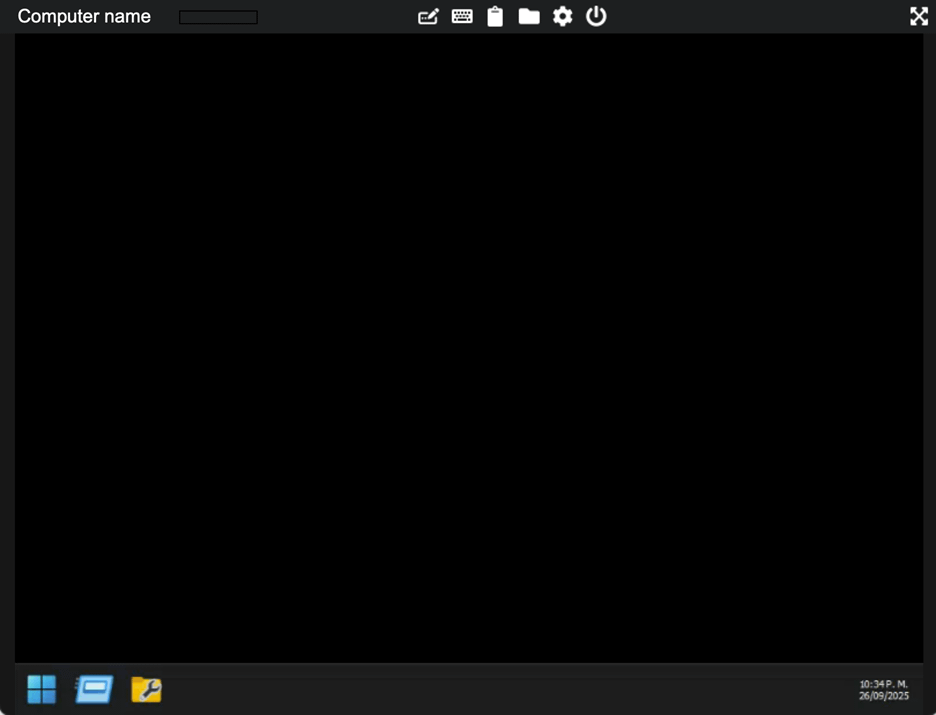
What is the NinjaOne Remote Background mode?
NinjaOne Remote Background Mode is a remote session type that runs under the Windows SYSTEM account on a separate, minimal maintenance desktop, independent of the user’s interactive session. It is purpose-built for silent, non-intrusive administration so the signed-in user can continue working uninterrupted. The environment presents a simplified black desktop and is not designed for end-user applications; software that depends on the user’s session, profile-bound tokens, or GPU/interactive graphics may not launch, however, core maintenance tools, like file browser, disk manager, registry editor, event viewer, service manager, PowerShell/CMD, etc., do run in this mode.
Technicians can use this mode when maintenance must occur during business hours. Actions that interrupt the user like reboots, logoffs, forced app restarts, or stopping critical services should be avoided. If a reboot is required, coordinate with the user and schedule it outside working hours or use a standard remote session.
Note: Only technicians that have explicitly granted permission, either by role or individually can access this feature.