
Efficient hybrid backup management is crucial for IT teams to protect critical data across both cloud and local storage. NinjaOne simplifies hybrid cloud backup solutions with an automated approach that manages both cloud and local backups across Windows and macOS systems. Features include AES 256-bit encryption, incremental backups, deduplication, and customizable backup plans, ensuring fast, secure, and cost-effective protection.
Configuring Hybrid Backup Policies in NinjaOne
Important Note: Before configuring hybrid backup policies in NinjaOne, ensure that NinjaOne backup is already enabled. Once verified, you can proceed with deploying the NinjaOne backup agent to machines and setting up a local backup location for hybrid backup configuration.
Set Hybrid Backups in the Policy Editor
To configure a hybrid image backup, begin by accessing the Policy Editor and adjusting the backup settings under the Backup section.
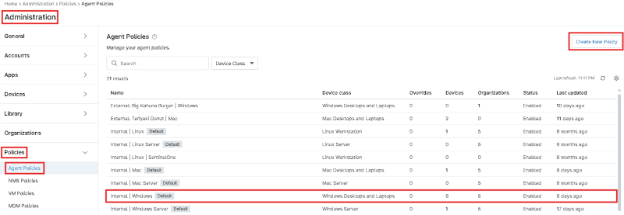
1. Navigate to Agent Policies
- Go to Administration > Policies > Agent Policies.
2. Select or Create a Policy
- Choose an existing Windows policy or click Create New Policy to create a new one.
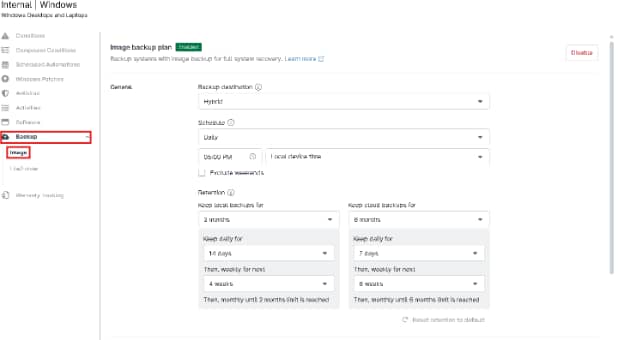
3. Access Backup Settings
- In the policy editor, select Backup > Image to configure the backup settings.
4. Configure Hybrid Backup Settings
- Backup Destination:
Select Hybrid as the backup destination to enable both cloud and local backup storage.
- Schedule (Controls Backup Frequency):
Set the backup schedule to your preference, choosing from options such as Hourly, Daily, Weekly, or Monthly.
- Retention (Controls Backup Duration):
Set the retention period for your cloud backups, choosing from options such as:
- Keep backups for 6 months
- Keep daily backups for 7 days
- Then, keep weekly backups for the next 6 weeks
- Finally, keep monthly backups until the 6-month limit is reached
You can also reset retention to the default settings at any time.
- Exclusion (Backup Exclusions):
Specify which drives to exclude from the backup to customize your data protection strategy.
- Power Option (Device Sleep Behavior):
Choose one of the following options based on your preference:
- Prevent device from sleeping
- Attempt to wake device if sleeping
- Run plan immediately if missed
- Pre/Post Backup Scripts:
Enable this option to run scripts before and after the backup process for customized automation.
Configuring File/Folder Backup
1. In the policy editor, click Backup > File/Folder.
2. Click on Add File/Folder Plan.
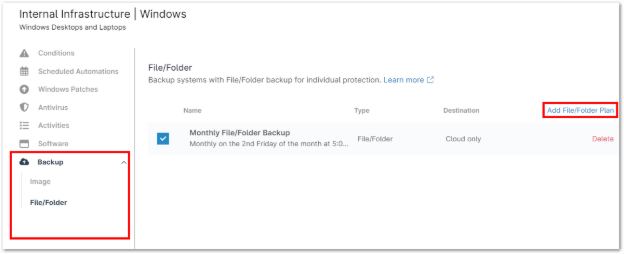
The File Folder Backup Plan configuration page displays in a popup window.
3. Under the Settings tab, assign a name to your new backup plan, set the schedule, and specify the time.
4. Next, choose the appropriate option based on your device’s power settings.
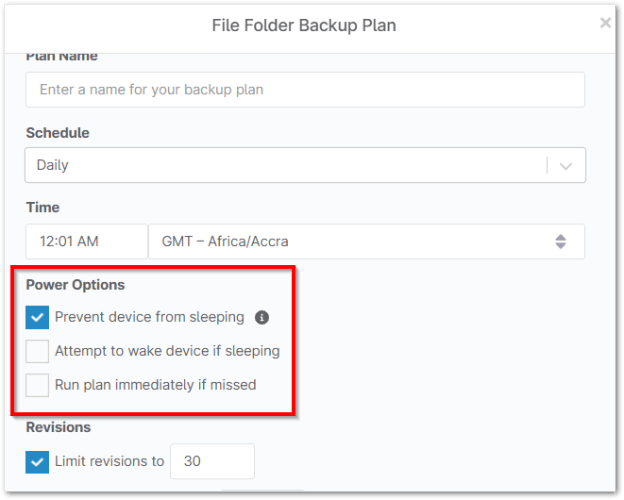
5. Next, choose your revision options. You can limit the number of revisions stored by NinjaOne, set a retention period to trim revisions older than a specified number of days, or choose to trim revisions for files deleted locally after a set period. Additionally, you can opt to retain the latest revision of all locally deleted file.

6. If you’d like to schedule a script to run before or after the backup job (for example, to stop specific applications during the backup or install patches once the backup is complete), use the Add Automation hyperlink under Pre/Post Automation Execution to select an option from the library. In addition to scripts, you can choose to install or run applications. Only one automation can be selected for each point in the backup plan, allowing for a total of two automations.

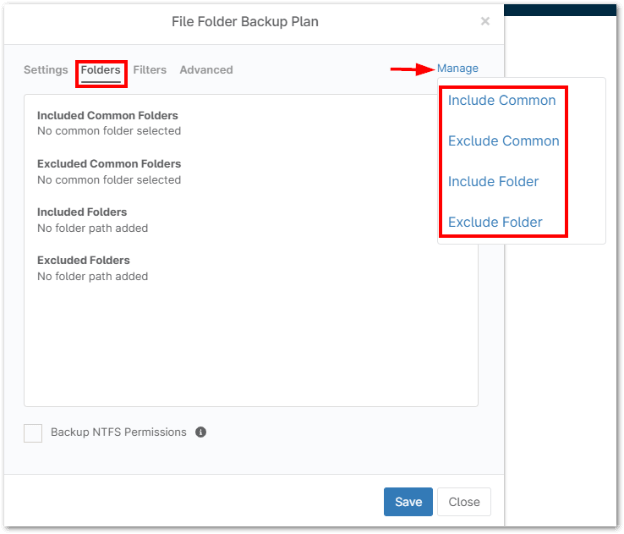
7. Next, set the backup destination to Hybrid. Then, click the Folders tab at the top of the window to select the specific folders you want to include in the backup.
8. Click Manage in the top-right corner. From here, you can choose between Common, Exclude Common, Include Folder, or Exclude Folder.
9. Next, open the Filters tab.
10. Select whether you want to Exclude or Include files from the drop-down list. Then, click Add to define masks (unique identifiers for files or groups of files, based on their extension).
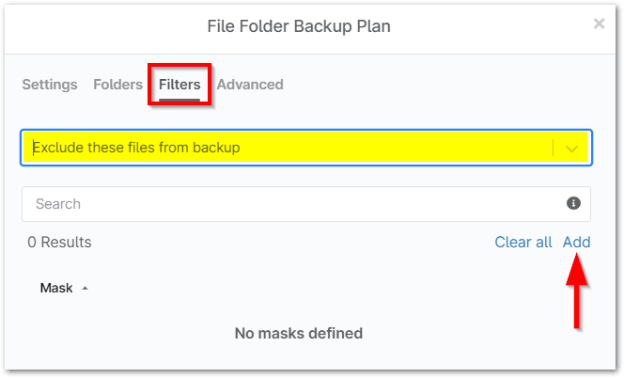
11. Type in the mask and hit enter. After you type in the mask, click Enter on your keyboard to set it; you can add as many masks in this field as you need. Then, click Add.

12. You can add both included and excluded files for the backup. After making your selection to include or exclude files, choose a different option from the drop-down list and click Add again.
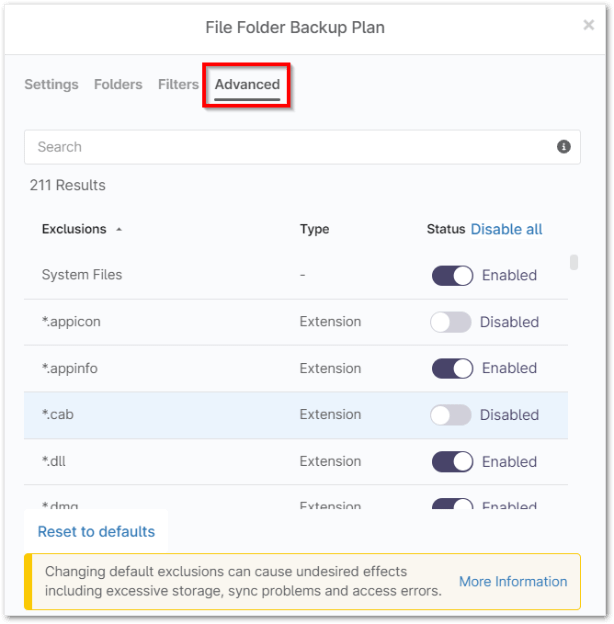
13. Finally, open the Advanced tab.
14. Use the toggle switches to override NinjaOne’s default exclusions, which may vary slightly depending on whether you’re modifying a Windows or Mac plan.
15. Save the plan once it’s configured to your liking. Then, be sure to save the changes to your policy by clicking Save in the top-right corner of the policy editor.
Configure Organization level backup settings
Once the hybrid backup settings are configured, move on to the Organization Editor > Backup to finalize the deployment, throttling, and storage location.
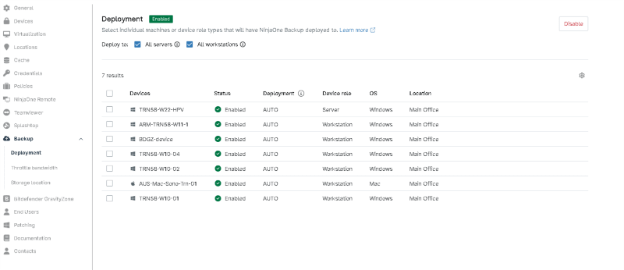
Deployment
- This setting enables you to select individual machines or device role types that will have NinjaOne Backup agent deployed to.
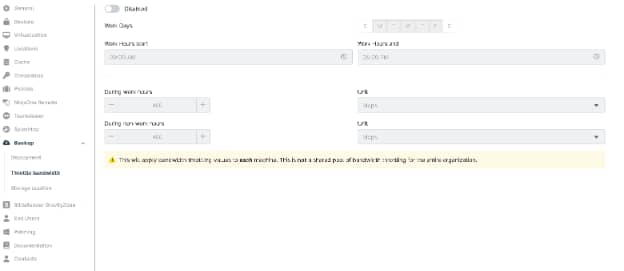
Throttle bandwidth
Set throttling options to control the bandwidth used during backup processes, ensuring minimal impact on network performance. The available options are:
- Work Days: Specify the days when bandwidth throttling will apply (e.g., Monday to Friday).
- Work Hours Start: Set the starting time for work hours. You can select a time using the time picker (e.g., 09:00 AM).
- Work Hours End: Set the end time for work hours. You can select a time using the time picker (e.g., 05:00 PM).
Bandwidth for Work Hours: During the specified work hours, you can set the maximum allowed bandwidth for backups, for example, 400 Mbps.
- Bandwidth for Non-Work Hours: Set the bandwidth for backups during non-work hours (outside the defined work hours). For example, you can set it to 400 Mbps.
These bandwidth settings apply to each individual machine and are not a shared pool for the entire organization.
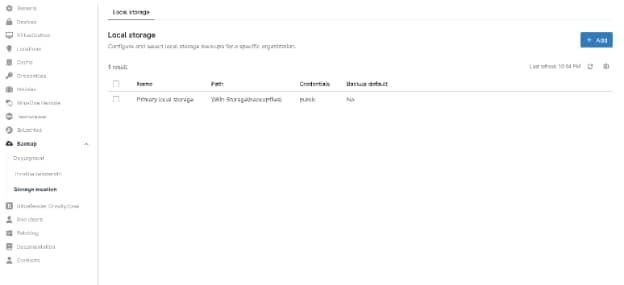
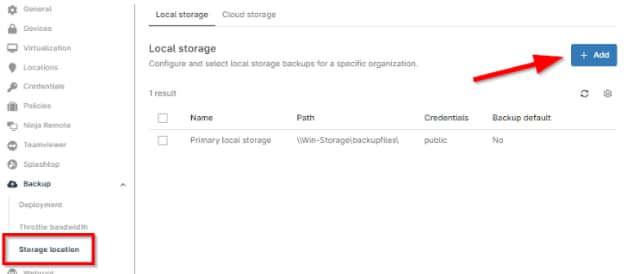
Storage Location (Local Backup Setup)
- Specify the storage location for local backups. Ensure that the Local Backup destination is set appropriately to store backups on-site in addition to the cloud storage.
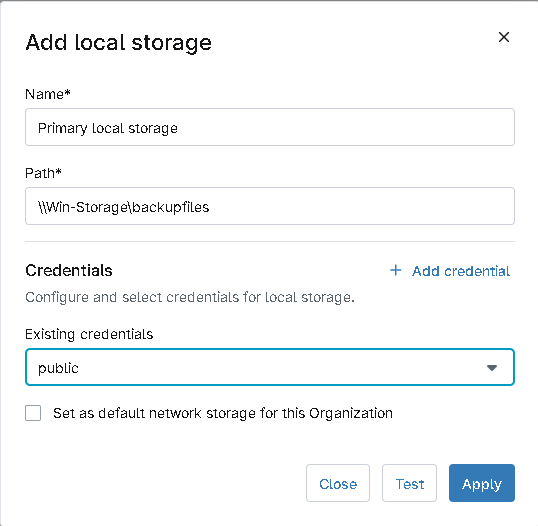
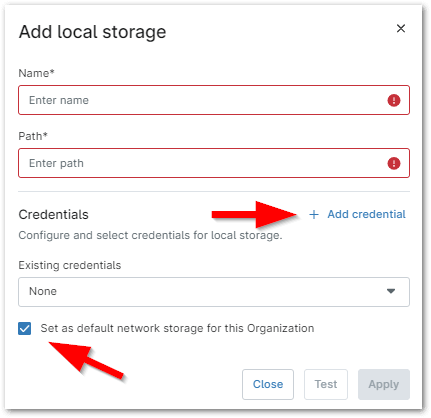
1. Add Local Storage
In the top right corner, click the + Add button to add local storage.
2. Configure Storage Details
a. Name: Enter a name for the network storage.
b. Path: Provide the storage path.
c. Credentials: Select credentials from the organization’s credential store, if applicable, or create new ones.
3. Set as Default Storage (Optional)
If you want this network storage to be the default for the organization, check the box at the bottom of the window. This box will be automatically checked if it’s your first time setting up network storage.
4. Test Accessibility
Click Test to verify the accessibility of the network storage. You’ll be prompted to select an online Windows device under the organization to run the test. Click Start to begin.
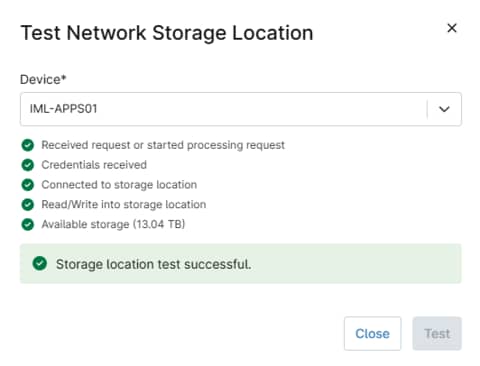
5. Save the Configuration
After the test completes, click Save to finalize the setup. The network storage will now appear in the organization editor.
The Benefits of Using NinjaOne for Hybrid Backups
- Centralized Management: Manage both cloud and local backups from a single, intuitive platform, streamlining backup processes for IT teams.
- Data Security: Protect data with AES 256-bit encryption, ensuring security during both transit and at rest, safeguarding against unauthorized access.
- Flexibility: Tailor your backup strategy by selecting backup destinations (cloud or local), scheduling options, and exclusion rules, providing full control over data protection.
- Efficiency: Incremental backups only save changes from the last backup, reducing storage usage and backup times, while deduplication further optimizes storage.