In this article, you will learn how to set up API OAuth Token with NinjaOne, including efficient tactics and strategies to simplify the integration process for both the developers and users.
What is Oauth Token API?
OAuth2 is a security measure used by NinjaOne to control API access. Applications must obtain an authorization code to interact with NinjaOne’s resources. This protects user data and ensures only trusted applications can access sensitive information. OAuth2 offers a more secure and user-friendly login experience compared to traditional methods. It allows users to grant specific permissions to applications, reducing the risk of unauthorized access. Additionally, OAuth2 simplifies the integration process for developers and enhances the overall user experience.
How to Enable Oauth Token API
Configuration of OAuth
Start using the OAuth protocol for your app’s authentication with NinjaRMM, you must first have an OAuth app credential from the NinjaRMM system. The OAuth app will have an authorization grant set up for you. OAuth 2.0 supports various grant types. However, NinjaRMM Public API supports authorization code and implicit grant types.
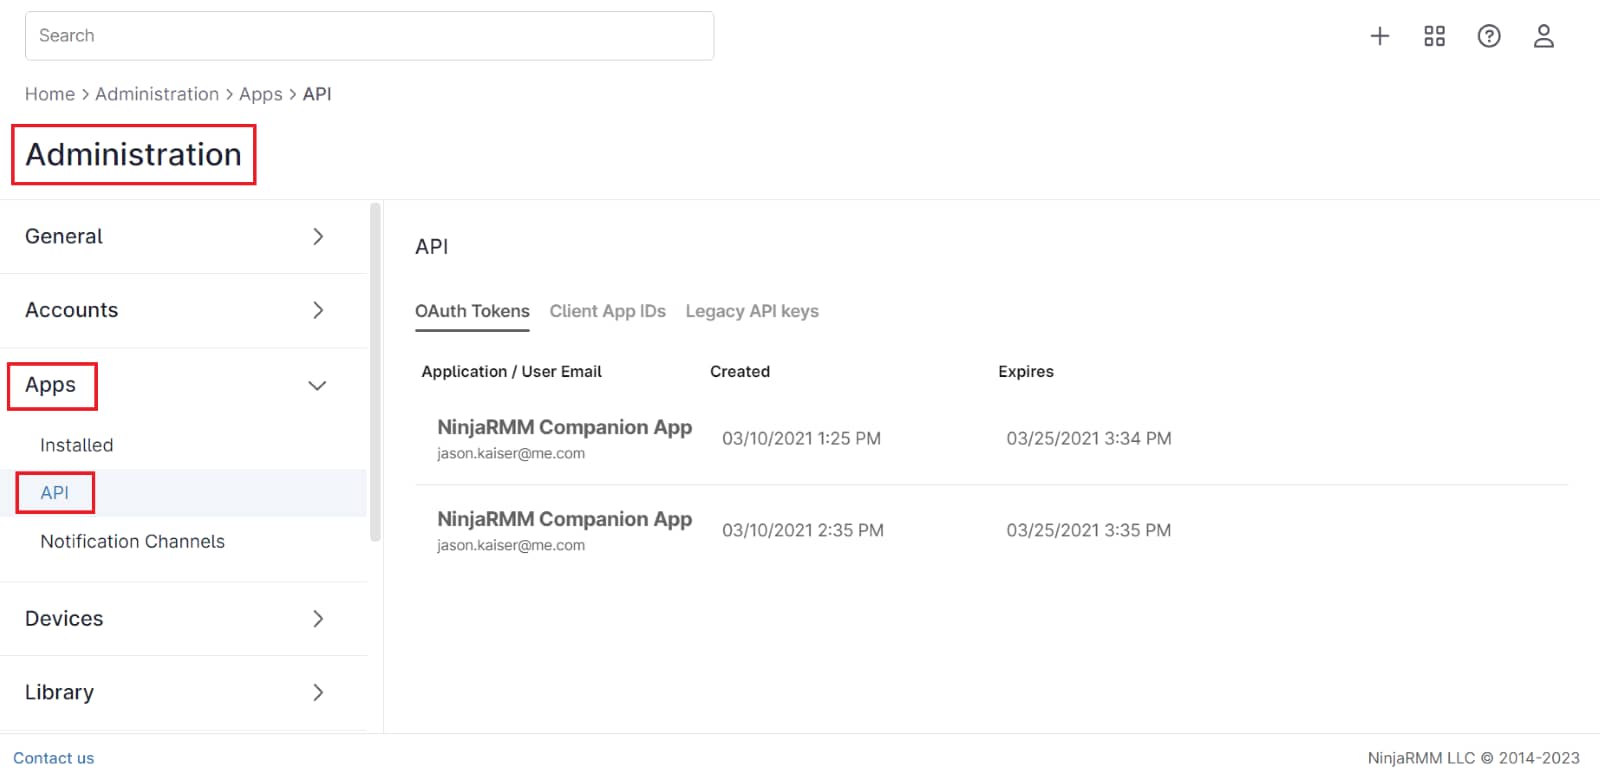
API settings can be found under Administration > Apps > API.

Documentation on API versions and how they work can be found under Legacy API Keys.

Generate an OAuth Client Application:
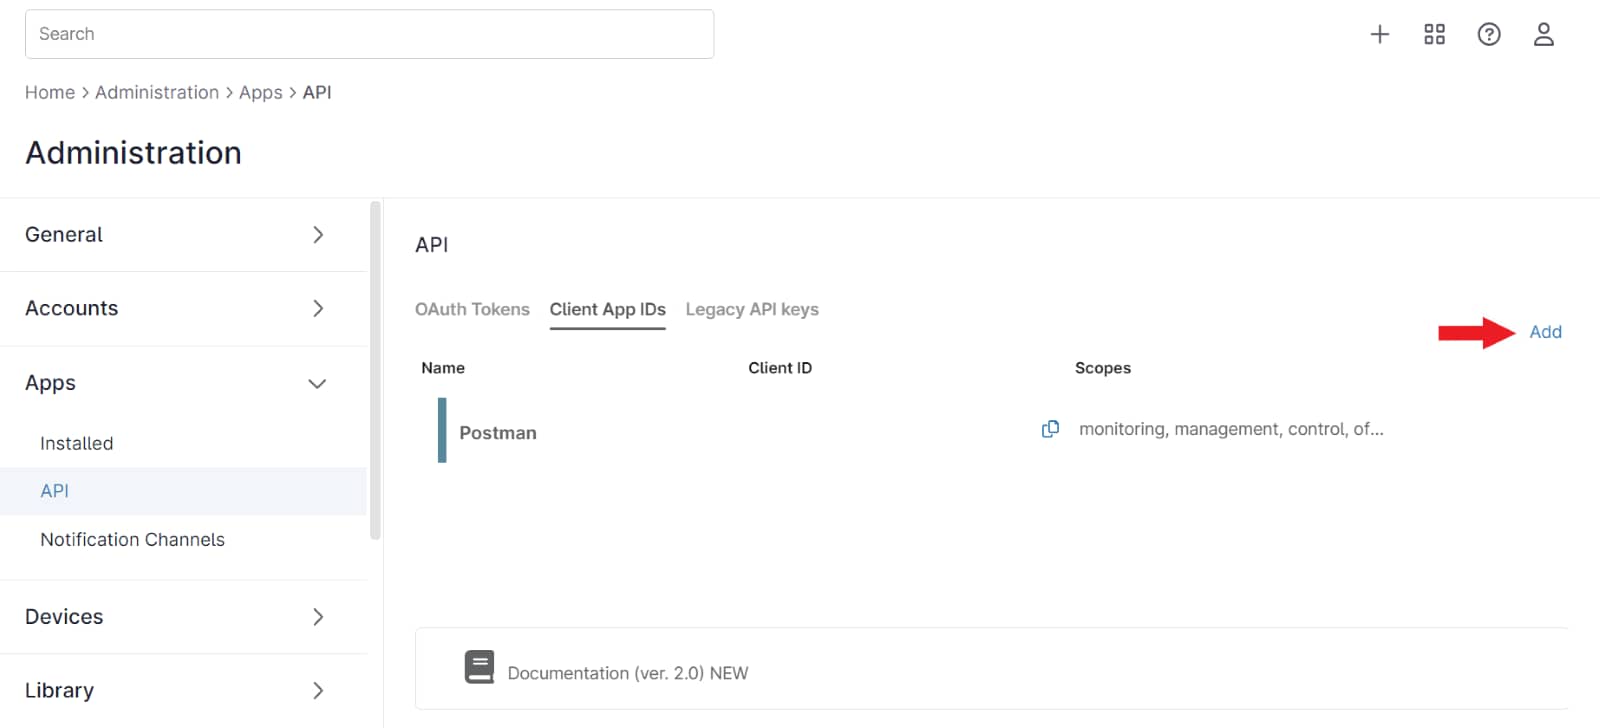
- Click Client App IDs.
2. To open the Application Configuration, click Add.
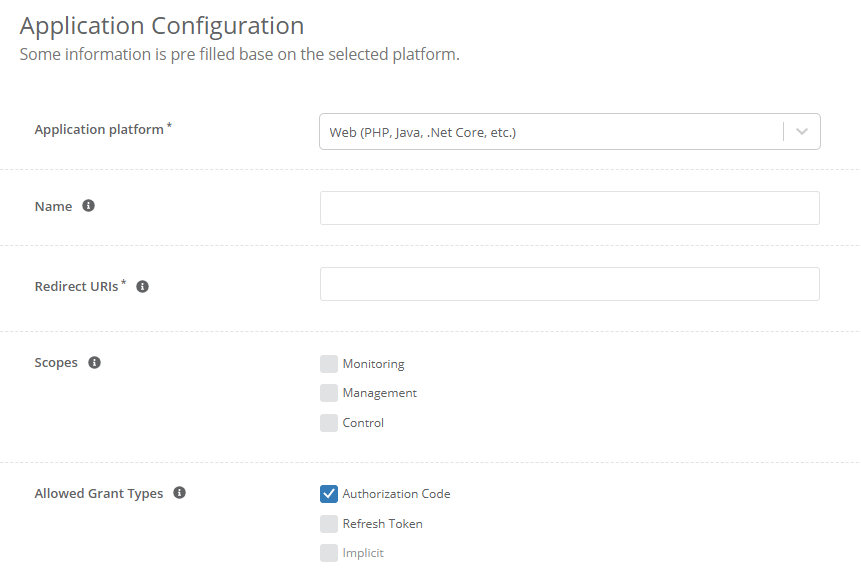
3. The Application Platform drop-down list has three options for OAuth Application creation.
4. The Application Configuration options are the same across all three options:
Name: This will be displayed as the client application name on the consent screen. This name will show up under the Administration > Apps > API > OAuth Tokens.
Redirect URIs: URI(s) where Ninja will send OAuth responses.
- This is not configurable when using the Native Application Platform:
- This will use a local host.
Scopes: Scopes all access to all Public API Resources of a certain type: Monitoring, Management, Control. Check the checkbox next to the type to allow that type.
- Monitoring: Grants read-only access to monitoring data and organization structure.
- Management: Allows modification of device and organization information; including creating new organizations, adding new devices, running scripts, etc.
- Control: Enables remote access via API.
Allowed Grant Types: OAuth 2.0 grant types used for the client application acting on behalf of a user. Limit the allowed grant types to minimize security risks these types are explained below:
- Authorization Code: The Authorization Code is a temporary code that the client will exchange for an access token. The code itself is obtained for the authorization server where the users get a chance to see what information the client is requesting and approve or deny the request.
- Refresh Token: The presence of the Refresh Token means that when the access token expires, you’ll be able to get a new one without the user’s interaction.
- Implicit: An alternative to Authorization Code, Implicit Flow bypasses the code exchange step, and instead the access token is returned in the query string fragment to the client immediately.
Per Application Platform, some grant types may not be accessible.
- Native: Authorization Code, Refresh Token, Implicit
- Single Page: Authorization Code, Implicit
- Web: Authorization Code, Refresh Token, Implicit
5. After configuration is complete, click Save.
6. After Saving the Application, you will be given a Client ID that can be copied and used when the app interacts with NinjaOne.
Important Note: Any questions about API configuration, documentation, or OAuth Tokens can be addressed by reaching out to our API Team at [email protected].
The Benefits of Using NinjaOne with an API OAuth Token
Enhanced Security: OAuth2 protects user credentials by avoiding direct sharing of sensitive information.
Granular Permission Control: Allows users to grant specific permissions to applications, limiting data access.
Simplified Integration: Provides a standardized way for developers to integrate with NinjaOne’s API.
Improved User Experience: Offers a more secure and convenient authentication process for users.
Strategies for using API OAuth Token with NinjaOne
Management: Carefully define the permissions your application needs. Avoid asking for unnecessary permissions to reduce security risks. Use refresh tokens to maintain access without requiring users to log in again.
Error Handling: Implement error handling mechanisms to gracefully deal with authentication failures. Tracking API usage and identifying potential issues.
Security: Ensuring API security, store client secrets carefully and limit request rates. Monitoring API usage, you can identify and prevent potential abuse.


