

Many Windows users are familiar with the Snipping Tool, which captures snapshots of their screen in real-time. However, fewer users are aware that the Windows 11 Snipping Tool has evolved to include a screen recording feature with the capability to capture system audio. This enhancement is intended to help users who need to create demonstrations or tutorials that require both visual and auditory information.
However, in enterprise environments, the Snipping Tool screen record with audio feature can raise concerns related to privacy, compliance, and resource utilization. In this guide, we list the necessary steps for enabling or disabling this feature to ensure your organization’s adherence to various IT compliance policies and maintain optimal system performance.
How to enable or disable the Snipping Tool with audio
Before proceeding, make sure you meet the following technical requirements:
- Have the most updated Snipping Tool version: Ensure that the application is updated to version 11.2306.43.0 or later, as earlier versions do not support system audio recording.
- Have the most updated operating system: The device must run Windows 11, version 22H2 or newer, to support the latest features of the Snipping Tool.
- Have administrative privileges: If you’re working in a managed environment, you may need to ask your IT admin to apply these changes for you.
- Have compatible hardware: Make sure your device has compatible (and functional) audio drivers.
Method 1: Using the Snipping Tool (GUI)
This method is ideal for individual users or scenarios where manual configuration is possible.
- Launch the Snipping Tool by typing “Snipping Tool” in the Start menu.
- (Optional) Click the Record icon to switch to screen recording mode.

- Click the three-dot symbol on the left side and select Settings.

- Look for Include microphone input by default when a screen recording starts. Toggle this On or Off as needed.

This setting is preferred across sessions, allowing users to maintain their preferred configuration.
Method 2: Using App Permissions
This method is for IT admins who want to prevent the Snipping Tool from recording audio without removing the app entirely by adjusting the app’s access to audio devices via Settings.
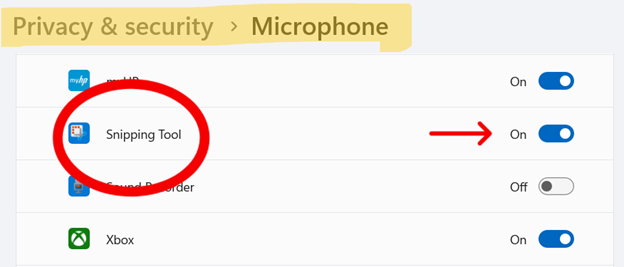
- Open Settings and navigate to Privacy & security.
- Scroll down and click Microphone under the App permissions section.
- Find the Snipping Tool and toggle this Off. If it’s not individually listed, you can turn off microphone access for all desktop apps, depending on your organization’s policy.
Once turned off, your computer will block Snipping Tool from accessing input and output audio devices.
Method 3: Using PowerShell
💡 Sign up for this free crash course on PowerShell for IT Ninjas.
- Open PowerShell as an Administrator.
- Run the following command and press Enter.
Get-AppxPackage *Microsoft.ScreenSketch* | Remove-AppxPackage
This command uninstalls the Snipping Tool from your device, removing all screenshot and recording capabilities.
- If you need to bring back the Snipping Tool later, you can reinstall it from the Microsoft Store.
Method 4: Using Group Policy
This method is suitable for enterprise-level management.
- Press Win + R, type gpedit.msc, and click Enter.
- Go to the following path: Computer Configuration > Administrative Templates > Windows Components > App Privacy
- Configure the “Let Windows apps access the microphone” setting to restrict access.
Method 5: Using AppLocker or Software Restriction Policies
If you want to completely prevent the Snipping Tool from launching, regardless of how it’s installed, you can enforce application-level restrictions by using AppLocker (Windows Enterprise/Education) or Software Restriction Policies (available in Pro, Enterprise, and Education editions).
Option A: AppLocker (recommended for Enterprise)
First, make sure that the Application Identity service is running. This service is responsible for enforcing the AppLocker policies. To do this:
- Open an elevated Command Prompt.
- Execute this command:
C:\Windows\system32>sc config “AppIDvc” start-auto & net start“AppIDScv”
- You should see the following statuses. This shows that your command is successful.
[SC] ChangeServiceConfig SUCCESS
The Application Identity service is starting.
The Application Identity service was started successfully.
- Close Command Prompt.
Now, let’s open the Local Security Policy Editor and make some changes.
- Press Win + R, type secpol.msc, and click Enter.
- In the left pane, expand Application Control Policies, and then AppLocker.
- Click on AppLocker and select Configure Rule Enforcement on the right.
- From the AppLocker properties window, click the tab Enforcement and find the box beside Configured under Executable rules. Click on the box and then Ok.
- Go back to the Local Security Policy editor and click Packaged App Rules under AppLocker on the left pane.
- Right-click Packaged App Rules and select Create default rules.
✅ This step sets the default rules for all apps. From here, we will need to apply the rule for the Snipping Tool.
- Right-click on Executable Rules in the left pane and select Create default rules. Failure to perform this step automatically blocks all applications from running, except for those that are explicitly allowed.
- Right-click on Executable Rules again and click Create New Rules.
You will now be directed to a wizard. Let’s configure it.
- Click Next on the intro screen.
- Select Deny, then Select to choose a user or group to which you will apply the rule. Once selected, click Next.
- Click Path, then Next. Depending on where the Snipping Tool is located, select either Browse File or Browse Folder. This can be tricky, so you can use:%ProgramFiles%\WindowsApps\Microsoft.ScreenSketch_*
- Complete the wizard to create the rule.
Option B: Software Restriction Policies (SRP)
💡 It’s worth noting that SRP is deprecated in favor of AppLocker, so its functionality may be limited in newer Windows versions.
- Press Win + R, type secpol.msc, and click Enter.
- In the left pane, expand Security Settings.
- If Software Restriction Policies is not listed, right-click on Security Settings and select New Software Restriction Policies.
- Under Software Restriction Policies, click on Additional Rules.
- Right-click in the right pane and select New Path Rule.
- In the Path field, enter the path to the Snipping Tool executable:
%ProgramFiles%\WindowsApps\Microsoft.ScreenSketch_*\SnippingTool.exe
- Set the Security level to Disallowed.
- Click Ok to create the rule.
Additional considerations when configuring the Snipping Tool screen record with audio
- Audio driver support: Ensure that the Windows Audio Service is running and that audio drivers are up to date.
- Compliance requirements: Organizations handling sensitive information must evaluate the implications of having an audio recording feature in their devices and consider implementing controls to maintain compliance with data protection regulations.
- Alternative tools: For advanced recording needs, you can use other tools to screen record with sound. Some applications worth considering are OBS Studio, Xbox Game Bar, or enterprise-grade solutions like TechSmith Camtasia, which offer enhanced control and features.
- Feature updates: You can keep yourself informed about the latest updates to Snipping Tool via the Microsoft Store. New versions may introduce changes to recording functionalities.
Turning off the screen record with audio function in the Snipping Tool
The Snipping Tool is a convenient and simple tool to capture screenshots of your device. With its latest screen recording function, you can now record videos with audio. However, in managed environments, it may be necessary to disable this function to safeguard sensitive information and comply with organizational policies.
Related topics:

 and Port Address Translation (PAT) Differ")


