

Key Points
- Choose the Right Method: Enable or disable audio output devices in Windows 11 via Windows Settings, Device Manager, Sound Control Panel, or PowerShell.
- Quick User-Level Change: Go to Settings > System > Sound, select your output device, and toggle its permission under the General > Audio section.
- System-Wide Control: Open Device Manager and head to “Audio inputs and outputs” to disable or enable an audio output device by deactivating its driver.
- Granular Playback Management: Open the Sound Control Panel (mmsys.cpl) to enable or disable playback devices without uninstalling drivers.
- PowerShell Automation: Use “Disable-PnpDevice” and “Enable-PnpDevice” to script or remotely manage Windows 11 audio devices at scale.
- Enterprise Enforcement: Standardize and restrict audio routing using Group Policy, Intune, or MDM solutions.
Windows 11 allows the simultaneous connection of multiple audio output devices, such as speakers, monitors with built-in speakers, and headphones. Additionally, users are provided with built-in audio management tools, helping them easily redirect sound output to their preferred audio device.
When managing a computer with multiple sound output devices installed, a single device malfunction can cause audio problems. However, this issue can be easily resolved by isolating and disabling problematic outputs. You can also streamline the audio outputs of shared environments by disabling all non-essential and unpredictable output devices, ensuring consistent sound settings for all users.
If you’re having issues with audio drivers or want to know how to enable a disabled audio device, then you’re in the right place. This guide will show you ways to enable or disable audio devices in Windows 11 and highlight additional considerations to keep in mind before making any changes.
For a visual guide, watch our video on “How to Enable or Disable a Sound Output Device in Windows 11“.
Different methods to disable output sound devices in Windows 11
Before proceeding, verify if you have the following prerequisites to ensure a smooth disabling process of your audio output device:
- Administrative account. You’ll need administrative privileges to implement your sound device configuration for all users in a system or want to deploy it across an environment. On the other hand, you can get away with a standard user account if you want to implement this change only for the current account you’re managing.
- Connected devices. To successfully disable an output sound device, you must first ensure that it’s connected to and recognized by your system. You can verify this by pressing Win + Ctrl + V and checking if your target sound device to disable is listed under Output device. Alternatively, go to Settings > System > Sound or right-click the speaker icon in the taskbar and select Sound settings to confirm this.
- Device restart. Some methods outlined in this guide require a reboot to apply. It’s recommended to first save any unfinished work before proceeding.
Method 1: Enable or disable sound output devices via Windows Settings
The easiest way for everyday users to route their sound is by configuring their sound output device using the Windows Settings app. In addition to that, the app provides a user-friendly GUI to disable or enable sound output devices.
- Press Win + I to open Settings, and on the right pane, select Sound.
- Under Output, find and click the target Output Device.
- If you want to route your output to another device, tick the dot beside it.
- Find Audio under General and use the toggle or Don’t allow option (depending on your Windows 11 build)
- To enable the device again, press the toggle button once more or set it to Allow.
- This change takes effect immediately, so you can exit the Settings app when you’re done.
📝 Take note: Configuring your sound output devices using this method only applies on a per-user basis.
Method 2: Use Device Manager to disable an audio output device
If you’re looking to implement this change system wide, you can disable your target audio device using Device Manager. This method disables the target hardware’s device driver, allowing for a persistent change across reboots. Just keep in mind that major feature updates or driver reinstallation may re-enable previously disabled devices
Administrator rights are required when making this change. You can check if you have the appropriate account elevation by opening the Settings app and going to Accounts > Your info. If your account has admin rights, Administrator will appear under your name.
- Press Win + X and then M to open the Device Manager.
- Select the dropdown beside Audio inputs and outputs.
- Right-click your target sound output device (e.g., Speakers, HDMI Audio).
- Select Disable device to immediately stop the device from working.
- To reactivate the device, right-click it and select Enable.
- You will be prompted to confirm the disabling process; choose Yes.
- Exit Device Manager.
⚠️ Important: It’s advisable to avoid disabling core audio drivers under the Sound, Video, and Game Controllers tab, as this can cause your device to lose all its audio functionality.
Method 3: Disable audio devices via the Windows 11 Sound Control Panel
Suppose you require more granular control over your audio devices, especially those with older devices that don’t appear within the Settings app. In that case, you should use the built-in legacy Sound Control Panel in Windows 11. This control panel enables or disables Windows audio devices quickly without affecting their drivers, providing all users with a non-destructive device management method.
- Press Win + R, type mmsys.cpl, and then hit Enter.
- Under the Playback tab, right-click the target audio output.
- In the resulting pop-up context menu, choose Disable device to deactivate the output.
- To enable it again, right-click and select Enable.
- Click OK to save the changes.
Method 4: Use PowerShell to enable or disable Windows 11 audio devices
Manually configuring sound device outputs for all devices in an environment is a tedious task. Fortunately, you can opt to use PowerShell to automate this task, allowing you to disable your audio devices on Windows 11 devices with a single command.
This method will utilize cmdlets to modify hardware device states at the system level. That said, you’ll need access to an administrator account, as running these commands using a standard user account will result in errors.
- Press Win + R, type powershell, and then press Ctrl + Shift + Enter.
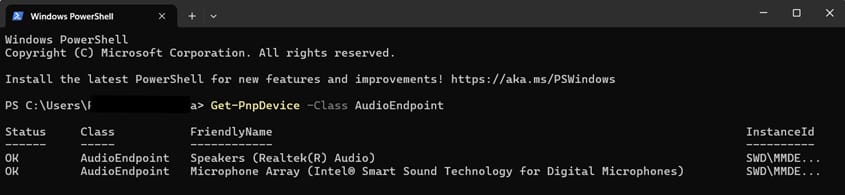
- To list all audio devices in a target device, enter the following command:
Get-PnpDevice -Class AudioEndpoint
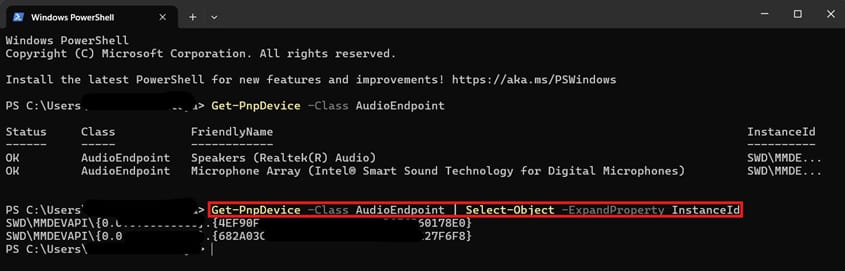
- If your instance ID ends in ellipses, enter the following command to expand it:
Get-PnpDevice -Class AudioEndpoint | Select-Object -ExpandProperty InstanceId
- Find the audio device you’d want to action on and do the following:
- To disable a Windows audio device, enter the following command:
Disable-PnpDevice -InstanceId "DEVICE_ID_HERE" -Confirm:$false
- To enable a Windows audio device, enter the following command:
Enable-PnpDevice -InstanceId "DEVICE_ID_HERE" -Confirm:$false
📝 Note: Replace DEVICE_ID_HERE with your target output’s corresponding Instance ID.
- Close the PowerShell prompt.
💡 Remember: Your Instance ID specifically identifies your device and distinguishes it from other identical devices plugged into the same device or environment.
Disabling Windows audio devices with Group Policy and Mobile Device Management (MDM) solutions
There are multiple ways to deploy an enterprise-level output device configuration for an environment. Depending on your managed environment’s use case, you can utilize the Group Policy Management Console if you’re managing an Active Directory or an MDM solution to deploy PowerShell scripts.
How to disable an audio device in Windows using the Group Policy Management Console
In Windows 11, there is no direct Group Policy option that allows administrators to disable a specific sound output device. The exception is that in Microsoft Intune (Endpoint Manager), administrators can use the Settings Catalog or Device Control policies to manage device installation and restrictions more granularly than traditional GPO alone.
Either way, IT admins can leverage Device Installation Restrictions to block device installation based on their
- hardware IDs,
- instance IDs,
- device class, and
- removable device status.
✅ Prerequisite: Ensure you have access to your domain’s Group Policy Management Console before proceeding.
Here’s how you do it:
- Open Device Manager on an endpoint, right-click the target device and go to Properties > Details.
- Click the dropdown under Property, and find and click Hardware IDs.
- Copy the top line of the target device’s hardware ID under Value.
- On a domain controller, open Group Policy Management.
- Right-click the organizational unit or domain to which you want the policy to apply.
- Choose Create a GPO in this domain, and Link it here… and name the GPO.
- Right-click your newly created GPO, select Edit, and navigate the following path:
Computer Configuration > Administrative Templates > System > Device Installation > Device Installation Restrictions
- Inside Device Installation Restrictions, enable the policy Prevent installation of devices that match any of these device IDs, press Show…, and then paste the Hardware ID you copied from Step 3.
How to disable Windows 11 sound output with an MDM solution
An MDM solution can help administrators standardize audio routing in their environment, providing consistent sound output across different settings within an organization, such as conference rooms, shared desktops, and more. For instance, you can use an MDM to deploy PowerShell scripts that interact with audio devices at the system level, ensuring stable audio routing for all users on a device.
Push scripts across devices to enforce consistent sound output device configurations.
→ Learn how to push PowerShell scripts remotely and at scale by leveraging NinjaOne MDM.
You can combine your MDM script deployment with AppLocker policies to enforce a more persistent lockdown of audio outputs. This will prevent users from reversing your policies by launching tools like the Sound Control Panel and Device Manager.
Additional considerations when disabling Windows audio devices
Before wrapping up, here are some additional but useful things to consider when managing the output behavior of audio devices:
- Multi-user devices: When managing output devices via Windows Settings or Sound Control Panel, the change only applies to the currently logged-in user account. For system-wide changes, you should utilize the Device Manager or PowerShell methods.
- Display audio outputs: Some display devices, especially those compatible with HDMI or DisplayPort audio/video interfaces, can unintentionally route audio to their built-in speakers. Disabling them to prevent duplicate playback routing.
- Default audio device: If you disable your default audio device, Windows will automatically select another detected device in your system. Reconfigure your default device to avoid rerouting audio to an unintended device.
Disable Windows audio devices for effective output routing
Configuring sound output devices in Windows 11 provides a more controlled sound routing in both personal and professional use cases. You can manage this change through
- Windows Settings, Device Manager, or
- the Sound Control Panel to enforce which devices are accessible in a machine.
In addition, you can use PowerShell to automate this process if you’re planning to deploy this change as a script for multiple endpoints. For larger-scale deployments, you can combine this with Group Policy or MDM tools, especially if you want to match an environment’s audio requirement to streamline end-user experience.
Want to learn more about mobile device management? Visit the NinjaOne MDM FAQ to discover how centralized management works and how NinjaOne helps you deploy policies across all endpoints.


