

Key Points
- Always run /Get-DefaultAppAssociations before making changes to audit the current state of your system or image.
- DISM changes apply only to new user profiles; existing profiles are not affected.
- Group Policy reapplies default associations at every logon unless the Suggested=”true” attribute is used in the XML.
- The offline image method (Method 2) is the recommended approach for large-scale enterprise deployments using MDT or SCCM.
- Incrementing the Version attribute in the XML triggers reapplication of updated associations.
- Exporting from a brand-new reference machine too early may produce a truncated XML. Wait 10–30 minutes after setup for delay-install apps to fully register.
- DISM does not merge multiple XML imports. Always consolidate associations into a single file before importing.
A default app is the program that Windows assigns to automatically open a specific file or link type when you access it. In Windows 11, you can import default app associations for new users to ensure uniformity. This feature is helpful in enterprise environments, educational institutions, and similar settings.
This article explains the different ways to export and import custom default app associations for new users in Windows 11 and discusses other useful information you may need to maximize functionality.
Ensure consistent user environments across every Windows device.
Best methods for exporting and importing custom default app associations for new users
You can export and import custom default app associations using DISM (Deployment Image Servicing and Management), Group Policy, Registry configuration, and PowerShell automation. These methods differ in difficulty and use, so there’s one bound to be more apt than the others in specific situations.
📌 Prerequisites:
- Windows 11
- Administrator rights
- Familiarity with system settings, command-line interfaces, and Group Policy is beneficial.
📌 Recommended deployment strategies:
| Click to Choose a Method | 💻 Best for Individual Users | 💻💻💻 Best for Enterprises |
| Method 1: Export, import, and remove using DISM | ✓ | |
| Method 2: Applying to an offline Windows Image | ✓ | |
| Method 3: Configuring via Group Policy | ✓ | |
| Method 4: PowerShell automation | ✓ |
Method 1: Export, import, and remove using DISM
You can use DISM, a command-line tool built into Windows, to export, import, and remove custom default app associations. This method is relatively advanced and requires more know-how, but it’s still the easiest way to manage default apps.
📌 Use Cases: Individual users looking to export, import, and/or remove custom default app associations on their desktops
A note before proceeding:
Before making any changes, it’s good practice to review what default app associations are currently applied to your running system. Run the following command in an elevated Command Prompt:
dism /online /Get-DefaultAppAssociations
This helps you verify the current state before exporting or importing, and is also useful for confirming that a previous import was applied correctly.
Exporting custom default app associations
- Choose your preferred default apps, as they will be the exported apps.
- Press the Windows key, type cmd, and click Run as administrator.
- Click Yes if prompted.
- Copy and paste the command below into the command prompt, then press Enter:
dism /online /Export-DefaultAppAssociations:”
%UserProfile%\Desktop\MyDefaultAppAssociations.xml”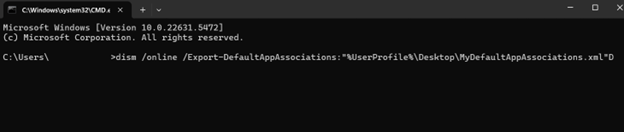
- Go to your desktop. There should be a file there called MyDefaultAppAssociations.xml.
⚠️ Warning: If you’re exporting from a brand-new reference machine, wait 10–30 minutes after Windows Setup completes before running this command. Some apps, such as Photos, Groove, or Paint 3D, are delay-installed and may not have fully registered their associations yet, which can result in a truncated XML file. You can run /Get-DefaultAppAssociations before and after your export to compare outputs and confirm all expected entries are present.
Importing custom default app associations
- Copy the exported MyDefaultAppAssociations.xml file to your desktop.
- Press the Windows key, type cmd, and press Run as administrator.
- Copy and paste the command below into the prompt, then press Enter:
dism /online /Import-DefaultAppAssociations:”
%UserProfile%\Desktop\MyDefaultAppAssociations.xml”
Removing custom default app associations
- Press the Windows key, type cmd, and press Run as administrator.
- Copy and paste the command below into the prompt, then press Enter:
Dism.exe /Online /Remove-DefaultAppAssociations
💡 Notes:
- This removes the custom default app associations you imported. Once removed, the system will use Windows’ default app associations instead of your custom default apps.
- These changes apply to new user profiles created after the import. Existing profiles won’t be affected.
⚠️ Warning: Conflicts with Group Policy could override associations applied with DISM. (For more info, refer to: Things to look out for)
Method 2: Applying to an offline Windows Image
This method is ideal for enterprise imaging workflows using tools like MDT (Microsoft Deployment Toolkit) or SCCM (System Center Configuration Manager), as it ensures that every machine is provisioned with consistent defaults from the first boot.
📌 Use Cases: IT administrators and imaging engineers who build and deploy Windows images at scale.
- Open an elevated Command Prompt.
- Mount the Windows image from a WIM or VHD file by executing this command:
Dism /Mount-Image /ImageFile:C:\test\images\install.wim /Name:"Windows" /MountDir:C:\test\offline
- Before importing, audit what associations are already present in the mounted image:
Dism.exe /Image:C:\test\offline /Get-DefaultAppAssociations
- From there, you need to import your XML file into the mounted image:
Dism.exe /Image:C:\test\offline /Import-DefaultAppAssociations:F:\AppAssociations.xml
- If you need to remove previously applied custom associations from the mounted image:
Dism.exe /Image:C:\test\offline /Remove-DefaultAppAssociations
- Once all changes are complete, unmount the image and commit your changes:
Dism /Unmount-Image /MountDir:C:\test\offline /Commit
💡 Note: Always unmount with /commit to save your changes. Using /discard instead will abandon any modifications made during the session.
⚠️ Warning: On upgrade, Windows may reassign default handlers for some inbox applications specified in your XML file. This can occur due to ApplyOnUpgrade and overwriteIfProgIdIs settings in OEMDefaultAssociations.xml, or because apps from previous Windows versions have gone out of support. Review your XML after major Windows updates to ensure your associations remain accurate.
Method 3: Configuring via Group Policy
IT administrators can use Group Policy to enforce default app associations across multiple machines in a domain. This method is beneficial if you’re looking for uniformity across different endpoints.
📌 Use Cases: IT administrators looking to enforce default app associations across multiple endpoints
- Store the exported XML file in a shared network location accessible by all target machines.
- Open the Group Policy Management Console on a domain controller.
- Navigate to: Computer Configuration > Administrative Templates > Windows Components > File Explorer
- Double-click Set a default associations configuration file.
- Enable the policy and specify the UNC (Universal Naming Convention) path to the XML file (e.g., \\Server\Share\DefaultAppAssociations.xml).
- Apply the policy to the desired machines.
💡 Note: This policy applies the specified default associations at user logon. Users can change their default apps, but the policy will reapply at the next logon unless the “Suggested” attribute is used in the XML.
Method 4: PowerShell automation
You can use PowerShell to automate the configuration of default applications on Windows devices. This method is scalable, consistent, and efficient in managed environments.
📌 Use Cases: IT administrators looking to enforce consistency across devices in an enterprise environment
- Press the Windows key, type PowerShell, right-click the app, and click Run as administrator.
- Copy and paste the script below, then press Enter:
Start-Process -FilePath “dism.exe” -ArgumentList “/online /Import-DefaultAppAssociations:C:\DefaultAppAssociations.xml” -Verb RunAs
⚠️ Things to look out for
Risks | Potential Consequences | Reversals |
| Malformed XML file | Default app associations aren’t applied to new users. | Use XML validators to verify the structure before deployment or test it on a staging machine first. |
| Group Policy conflicts | Imported default app associations are ignored or overwritten. | Review Group Policy settings and deployment order. |
| Forcing defaults against user preferences. | Users won’t be able to use preferred apps as defaults, degrading the user experience. | Use XML’s Suggested=”true” attribute to allow users to override or communicate the changes through documentation. |
| Failure to target new user profiles | Inconsistent experience across profiles or devices. | Use Group Policy to automate and enforce the setting at each login if needed. |
| Exporting too early from a reference machine | Truncated XML with missing associations, leading to “An app default was reset” notifications on first | Wait 10–30 minutes after setup for delay-install apps to finish before exporting. Run /Get-DefaultAppAssociations before and after to compare outputs. |
| Importing multiple XML files, expecting cumulative results | Only the last imported file takes effect; earlier associations are overwritten. | Manually merge all required associations into a single XML file before importing. |
Additional information regarding managing custom default app associations
The following information will help you manage custom default app associations more effectively.
Versioning and Suggested attributes
You can use the Version and Suggestion attributes in the XML file to control how and when associations are applied. Increasing the Version value can reapply associations, while setting Suggested to “true” only applies the association once per version.
Do this when you want to propose defaults without locking them in, allowing for user flexibility.
Refreshing your XML file
Some apps register additional file extensions with each new Windows release. For example, Microsoft Edge registered the .epub extension in Windows 10, version 1703. If you’re using an XML file from an earlier version, that entry will be missing, which can trigger “An app default was reset” notifications on first boot.
When manually editing the XML, avoid simply deleting associations you’re not interested in. Missing entries can also trigger these notifications. If you need to manage associations from multiple sources, manually merge them into a single XML file before importing.
Deployment scenarios
Imaging: You can include the import command in deployment scripts to apply associations during system setup. Do so using tools like MDT (Microsoft Deployment Toolkit), SCCM (System Center Configuration Manager), or third-party imaging software during system provisioning. This method ensures all systems are initialized with consistent default apps.
Intune: You can use configuration profiles to deploy the XML file to managed devices. Do so by using a custom OMA-URI or PowerShell script. You can also copy the XML to a known location and run a script via Intune or NinjaOne.
Leverage the power of NinjaOne’s software deployment to systematically install software on endpoint devices. Read how Ninja’s software deployment system works
User experience
Note that enforcing default app associations can override user preferences. Before implementing these configurations, consider organizational policies and user needs.
Troubleshooting common custom default app association issues
If the custom default app associations aren’t working for new users, you can troubleshoot the issue by referring to the information below.
Associations are not applying
Before diving into deeper troubleshooting, run the following command to audit what associations are currently applied to your system or mounted image:
dism /online /Get-DefaultAppAssociations
This can quickly confirm whether a previous import was successful or whether the expected associations are present at all.
- A common reason default app associations don’t apply properly is a malformed XML file. It’s crucial to verify if the file is structured correctly and doesn’t have missing tags. Use schema tools or XML validators to identify and correct formatting issues before deployment.
- Similarly, a failure in the DISM process may result in unapplied associations. Try to execute the command with administrator privileges first. If that doesn’t work, check the DISM log located at C:\Windows\Logs\DISM\ to get a detailed insight into the errors.
- File accessibility also plays a key part in the exporting and importing process. The XML file should be accessible on the local system. Network paths can be problematic if they’re improperly mapped or user permissions are insufficient.
- Lastly, conflicts with Group Policy could override associations applied with DISM. Review and adjust these policies if needed to prevent them from negating custom configurations.
Users are unable to change defaults
- Review Group Policy settings to determine if user changes are being overridden at logon.
- Consider using the Suggested attribute to allow user customization after initial application.
Deploy and manage app configurations across endpoints from one platform.
Ensure consistency by customizing default app associations for new users in Windows 11
Managing default app associations in Windows 11 provides a consistent user experience and aligns with organizational standards. Utilize DISM, Group Policies, and PowerShell to efficiently configure and deploy custom default app associations across multiple devices.
Related articles:


