

Key Points
- Windows search indexing maintains a catalog of file names, locations, metadata, and content so searches return results instantly.
- Search indexing can be enabled, disabled, or paused in Windows 10 and Windows 11 using three methods: Windows Settings, the Services Manager (services.msc), or Local Group Policy.
- Disabling Windows search indexing works best for gaming PCs, dedicated workstations where search is unnecessary, or privacy-sensitive environments where sensitive data should not be duplicated into an index database.
- Rather than disabling indexing entirely, administrators can optimize performance by adjusting indexer backoff settings, specifying which directories and file types are indexed, and relocating the index database to a faster drive.
- Disabling the Windows Search service via services.msc stops indexing permanently across restarts, but also impacts Start menu search, File Explorer search, and applications that rely on Windows Search.
- For enterprise environments, managing search indexing across fleets of Windows devices requires a centralized MDM solution to monitor performance, push configuration updates, and avoid time-consuming manual remediation.
This article explains how to enable and disable search indexing in Windows 10 or Windows 11. It defines what Windows search indexing is, how it affects your PC’s performance, and how to turn search indexing on and off using Windows Settings, the Services Manager, and using Local Group Policy.
It also includes details about optimizing Windows search performance, including enabling and disabling advanced search options, specifying which directories and files to index, and configuring settings such as indexing backoff.
Optimize workflows and performance across your remote workforce.
👉 Find out how NinjaOne keeps pace with dynamic IT infrastructures
If you prefer a visual guide, watch How to Enable & Disable Search Indexing in Windows 10/11.
How to disable search indexing in Windows 10 and Windows 11
There are several ways you can configure search indexing in Windows. Note that all of these methods require that you be logged in as an administrator. You should also make a backup of your system before you begin so you can safely roll back any changes.
Method 1: Pausing search indexing in Windows Settings
You can temporarily disable search indexing in Windows 10 or Windows 11 by following these steps:
- Right-click on the Start button and open the Settings app
- Navigate to Privacy & security > Searching Windows if you’re running Windows 11 or Search > Searching Windows if you’re using Windows 10
- Scroll down and click on Advanced indexing options (Windows 11) or Advanced Search Indexer Settings (Windows 10)
- Click the Pause button to temporarily stop search indexing
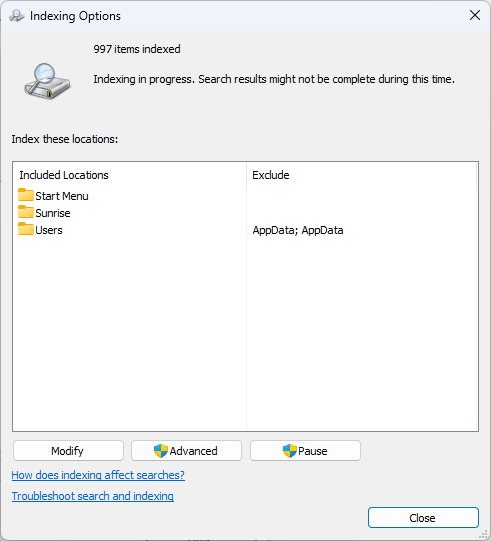
Note that the Pause button may only be available if indexing is in progress. This allows you to turn search indexing off if it is affecting performance without having to worry about re-enabling it when you have finished using your PC.
Method 2: Disabling Windows Search using services.msc
You can permanently stop Windows search indexing by disabling the Windows Search service, which performs the task:
- Right-click on the Start button and select Run
- Enter services.msc in the run dialog and press OK to open the Windows Services Manager
- Scroll through the list of services and locate the Windows Search service
- Right-click the Windows Search service and click Stop
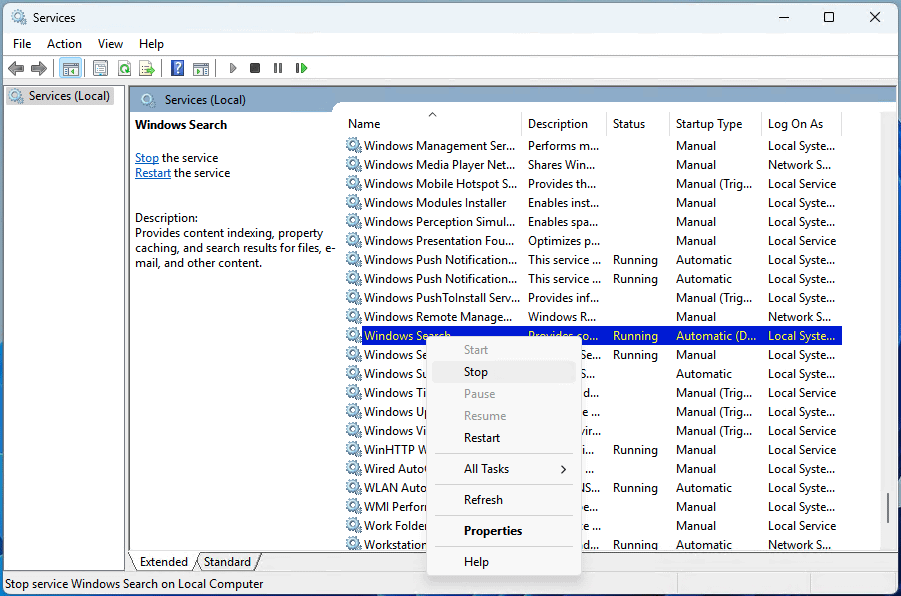
This will stop the service (and indexing) until your device restarts.
To permanently disable search indexing, repeat the steps above and then:
- Right-click the Windows Search service and select Properties
- Change the value of Startup Type: to Disabled
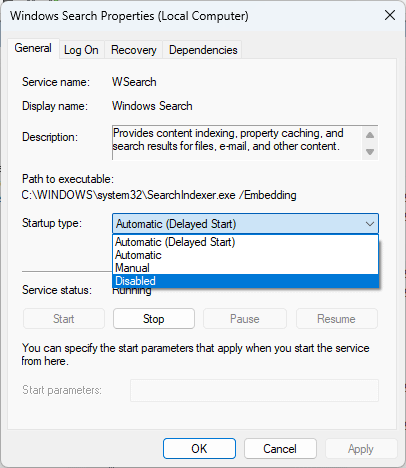
This will disable the indexing service completely, even after your PC has restarted.
Note that disabling Windows Search affects the following:
- Searching from the Start menu and taskbar
- Searching in Windows Explorer
- In some cases, using the search feature within applications that rely on the Windows Search service, such as Microsoft Outlook
How to enable search indexing in Windows 10 and Windows 11
You can re-enable search indexing (the default behavior) using the same tools and processes used to disable it.
Method 1: Using the Windows Settings app
If you have paused indexing from the Windows Settings app, it will automatically resume in 15 minutes — there’s no need to take any action.
Method 2: Re-enabling the Windows Search service
To re-enable the Windows Search service and search indexing, follow the steps to disable it (as shown above), and restore the value of Startup Type: for the service to Automatic (Delayed start). Then, right-click on the service and select Start to turn on Windows search indexing.
Search indexing in Windows explained
Windows search does exactly what it says: It lets you search your PC for files, even if they are stored in different locations or on different drives. To make this possible, the Windows search maintains an index of your files.
This is a catalog of information about files, including where they are located, their names and creation/modification dates, metadata such as their author, and in some cases even data extracted from the contents of the files. This information is stored in a database on your device’s hard disk.
Whenever a file is created, updated, or deleted, the search index needs to be updated to reflect these changes so that search results are accurate and files can be searched for quickly (as the index can be searched from a central location, the files themselves do not need to be located and inspected for each search).
Not all files are indexed by Windows search by default and are limited to specific folders, including your user profile. This is done to optimize performance by reducing the number of files that need to be indexed, so the system spends less time indexing and has a smaller database to search.
Limiting the locations that are indexed also omits many files that you will likely never need to search or access (like those that make up the Windows operating system, apps, and other configuration files), which could clog up search results and make your files harder to find.
While it is running, the indexing process uses some system resources: it needs to access your storage devices to gather information about the files on them and uses some CPU and RAM to process files and build the index.
Why would you disable (or re-enable) Windows search indexing?
For most users, Windows search works just fine with its default behavior, indexing the files they are most likely to search for. As search indexing is configured to only run when a computer isn’t being actively used (or is under high load), it shouldn’t affect performance when your PC is in use. Disabling Windows search indexing can also make your PC feel slower to use, as it will take longer to search for unindexed files.
However, there are some scenarios where it may be appropriate to disable Windows Search:
- On gaming PCs where file search is never used – to fully optimize for performance
- On other dedicated workstations that are used for a purpose where file search isn’t a necessity (e.g., media rendering workstations)
- In environments where privacy is a concern, so that sensitive data is not duplicated into the index and remains only in the original files where it can be properly managed
You can also optimize how Windows search behaves for your specific use case rather than disabling it entirely. This includes managing the indexer backoff (so files can be indexed while your PC is in use), configuring which files and directories are indexed, and choosing where the index database is stored. These options are detailed later in this article.
Optimizing Windows search indexing performance
There are two performance aspects to consider when configuring search indexing: The performance of search, and the overall performance of your PC itself. You will need to decide which is a priority and optimize your settings based on this.
If you want to make search as performant as possible (ensuring that searching for files is as fast and accurate as possible), leave the Windows Search service and indexing enabled, and consider disabling indexer backoff (the function that pauses indexing while your device is active) so that indexing continues while your PC is in use. You may also want to specify additional directories and files to index in the advanced indexing options to further improve search results.
However, if you rarely use Windows search functionality, but do not want to disable it entirely, you may want to be more specific about the paths and file types that are indexed.
Maintain visibility over your IT fleet with a single console.
→ Make timely IT deployments with NinjaOne Endpoint Management®
How to exclude specific files or drives from search indexing
- Right-click on the Start button and click on Settings
- Navigate to Privacy & security > Searching Windows on Windows 11 or Search > Searching Windows if you’re running Windows 10
- Scroll down and click on Advanced indexing options (Windows 11) or Advanced Search Indexer Settings (Windows 10)
- Click on Modify to change which locations on your PC are indexed
- Click on Advanced and then click on the File Types tab to specify which file types should be indexed
You can also change where the Windows search index is stored from here by changing the Index location in the advanced indexing options.
You also have the option to reset and rebuild the search index. This will start the indexing process from scratch and can help resolve issues like slow search performance and inaccurate/incomplete search results. You can watch this video guide on how to reset and rebuild the search index.
Find the right balance between speed and efficiency. Watch How To Manage Windows Search Indexing.
Configuring search indexing for Windows 10/11 in enterprise
Troubleshooting and configuring search indexing for fleets of Windows devices is a cumbersome manual process, especially when managing mobile devices and remote employees. Mobile device management (MDM) by NinjaOne gives you a single view into your entire IT infrastructure, allowing you to monitor for performance and reliability issues before they affect end-users, and quickly resolve them by deploying targeted configuration updates. You can also offer direct support to users with built-in remote access tools.

 and Port Address Translation (PAT) Differ")


