

Key points
- Enable Faster Threat Response: Creating a Windows Security desktop shortcut provides one-click access to Microsoft Defender and security settings.
- Create a Shortcut in Seconds: Manually create a Windows Security shortcut by adding the ms-settings:windowsdefender URI to a desktop shortcut.
- Automate Shortcut Creation: PowerShell scripts allow IT administrators to deploy Windows Security shortcuts consistently across multiple endpoints.
- Deploy Shortcuts at Scale Using Group Policy: Group Policy Preferences enable centralized deployment of Windows Security shortcuts across organizational units.
- Troubleshoot Shortcut Issues Quickly: Most shortcut failures stem from incorrect URIs, restricted Settings access, or missing icon paths.
According to the 2025 Microsoft Digital Defense Report (MDDR), millions of new malware samples are detected each day, with attackers increasingly using
- ransomware,
- fileless malware, and
- credential theft techniques.
Without sufficient protection, devices become vulnerable to these viruses, which steal sensitive information, slow down systems, or even encrypt files for ransom.
One effective way to safeguard devices from this threat is to use Microsoft’s built-in Windows Security tools. Although these tools work in the background, accessing them requires navigating multiple menus, which can affect mean time to repair (MTTR), especially when swift action is needed to combat potential threats.
Creating a Windows Security shortcut on your desktop gives you direct, targeted access to crucial security tools without needing to open the Settings app. This not only saves time by providing faster access to these tools but also helps protect broad system settings in security-sensitive environments. Additionally, leveraging shortcuts can simplify workflows for IT support and help desk tasks, ultimately improving your response against malware.
Read along if you want stronger protection against threats by making the most of Windows Security. By the end, you’ll know how to
- create shortcuts to Windows Security,
- get answers to common questions, and
- fix typical issues that may come up along the way.
Identify and resolve security threats to your Windows systems.
How to create a Windows Security shortcut using 3 easy methods
The Windows Security suite comes built into Settings and is enabled by default, providing users with the capacity to scan for malware, viruses, and other threats while offering ample protection.
Normally, if you want to change how Windows Security behaves in your system, you’ll have to press Win + I, go to Update & Security, and click Windows Security. To make accessing Windows Security more streamlined, you can create a one-click shortcut to this feature.
⚠️ IMPORTANT: Before going any further, ensure you’re running Windows 10 version 1703 or later. If you want to make this shortcut through PowerShell scripting or deploy it via Group Policy Preferences, verify that you have the right administrative permissions to do so. While familiarity with shortcut creation and URI schemes is helpful, it’s not required.
Method 1: Manually create a shortcut to Windows Security in Settings
- Press Win + D and go to your desktop screen.
- Right-click on the desktop to open the context menu; then click New > Shortcut.
- Inside the location field, type ms-settings:windowsdefender and press Enter.
- Name the new shortcut (e.g., Windows Security) and then select Finish.
- If you want to assign it a new icon, right-click the shortcut and tap Properties.
- Click Change Icon and left-click the icon you prefer.
- Optionally, you can enter the path %ProgramFiles%\Windows Defender\EppManifest.dll to browse for a new icon.
- Once you’ve selected a new icon, press OK and then Apply in Properties.
Method 2: Create a shortcut via PowerShell Script
Although it’s easy to create a Windows Security shortcut manually, doing this for multiple devices can be a tedious task. Fortunately, you can use PowerShell to automate tasks, including shortcut creation.
- Press Win + R to open Run.
- Type PowerShell and then select Enter.
- Inside PowerShell, paste the following script:
$ShortcutPath = “$env:USERPROFILE\Desktop\Windows Security.lnk” $WshShell = New-Object -ComObject WScript.Shell
$Shortcut = $WshShell.CreateShortcut($ShortcutPath)
$Shortcut.TargetPath = “explorer.exe”
$Shortcut.Arguments = “ms-settings:windowsdefender”
$Shortcut.IconLocation = “$env:ProgramFiles\Windows Defender\EppManifest.dll”
$Shortcut.Save()
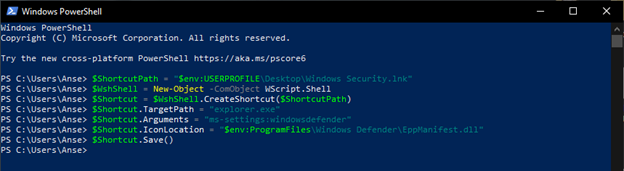 The script above creates a desktop shortcut that directs you to Windows Security in Settings.
- Inside the $ShortcutPath command line, you can change the following according to preference:
- USERPROFILE\Desktop: Changes the shortcut’s save path.
- Windows Security: Changes the shortcut’s name.
- Close PowerShell after the shortcut is created.
Method 3: Deploy shortcut via Group Policy Preferences
⚠️REMEMBER: Making changes via Group Policy Preferences implements changes for all devices in an organizational unit (OU) or Active Directory. Due to the sheer scale of this operation, a small mistake can cause problems for the environment you’re managing. With that said, we recommend backing up your GPOs before proceeding to ensure fast recovery in case something goes wrong.
- Press Win + R to launch Run, type gpedit.msc, and press Ctrl + Shift + Enter.
- Navigate to User Configuration > Preferences > Windows Settings > Shortcuts.
- Hover your cursor over Shortcuts, right-click it, and select New > Shortcut.
- Configure the shortcut with the following settings:
Setting
Value
Action Create Name Windows Security Target Type File System Object Location Desktop Target Path explorer.exe Arguments ms-settings:windowsdefender Icon File Path %SystemRoot%\System32\SecurityHealthSystray.exe Icon Index 0 Run Normal Window - The Location setting can be the Start Menu or anywhere you prefer.
- Icon File Path and Icon Index indicate the icon’s location and the icon you’ll use , respectively; feel free to change them to match your preference.
- Once done, press OK to finalize the new shortcut policy.
- Link the Group Policy Objective (GPO) to the appropriate Organizational Unit (OU).
- Find and right-click the OU you want to apply the GPO to (e.g., Sales, etc,).
- Click Link an Existing GPO, then select the GPO containing the shortcut policy.
- Select OK.
- Optionally, you can force-update the Group Policy to refresh the settings.
- Open an elevated cmd and type gpupdate /force.
Common issues related to Windows Security shortcut creation
Issue: Shortcut doesn’t open the Settings page
If the shortcut you created doesn’t work as intended, ensure you’re using the correct URI format, such as ms-settings:windowsdefender, in the shortcut’s location field or as an argument in a script or Group Policy. Additionally, confirm you’re running Windows version 1703 or later by pressing Win + R and entering WinVer.
Lastly, check for policies that are blocking your Settings access, as this can prevent the shortcut from opening Windows Security. For instance, check if the policy Prohibit access to Control Panel and PC Settings is Enabled. This can be done by launching the Local Group Policy Editor, going to User Configuration > Administrative Templates > Control Panel, double-clicking the mentioned policy, and configuring it to Disabled.
Issue: Icon isn’t displaying properly
Ensure that the icon path you’re entering is accurate and that the target .dll file exists in your system. Missing or moved icon files can lead to the icon not displaying correctly on a shortcut.
Optionally, you can choose a built-in icon for Windows Security by right-clicking the shortcut, selecting Properties > Change Icon, and entering %ProgramFiles%\Windows Defender\EppManifest.dll inside the Change Icon location field. However, if you want to use a custom icon, make sure it’s a properly formatted.ico file, ideally 256×256 pixels and around 500kb in size, for the best compatibility and appearance.
Issue: Shortcut fails via Group Policy
If the shortcut you’ve deployed via Group Policy doesn’t work as intended, double-check the path you’re using and ensure it exists on the target system. To do this, open a Command Prompt window on the target device via remote access and enter this command: start ms-settings:windowsdefender. If the system launches Windows Security, then it’s accessible on the device.
Additionally, check if the user permissions or policies in your environment are restricting access to Settings, effectively preventing Windows Security from launching. For example, Windows Security may be restricted in systems where policies such as Hide the Virus and Threat Protection Area, Hide the App and Browser Area, and Hide the Firewall and Network Protection Area are configured as Enabled.
Improve threat response time and protect critical data wth NinjaOne.
Expedite threat MTTR by creating a Windows Security shortcut
Overall, you can improve your environment’s threat response time by placing a Windows Security shortcut on your desktop. This allows for quick access to security settings, eliminating the need to manually navigate the Settings menu when remediating threats, ultimately supporting endpoint management workflows in user-focused or managed environments.
Users can easily create a shortcut that goes directly to Windows Security by typing its built-in URI, ms-settings:windowsdefender, in the shortcut creation window’s location field. Additionally, administrators can leverage PowerShell scripts and Group Policy Preferences to create a Windows Security shortcut for multiple devices or an Active Directory.
Quick-Start Guide
Here’s what you can do in NinjaOne:
- Use the “Create Desktop Shortcut – URL” script
- Set the URL to
ms-settings:windowsdefender - Choose to create the shortcut for all users or existing users


