

Key Points
- Check File System & Size Limits: Confirm the drive uses NTFS and verify no files exceed FAT32’s 4 GB file limit or 2 TB partition limit before converting.
- Back Up Your Data: Always copy important files to a separate physical device to protect against unexpected conversion errors or interruptions.
- Choose the Right Conversion Method: Use a trusted third-party NTFS-to-FAT32 converter for non-destructive conversion, or Windows formatting tools if you can temporarily move data.
- Understand Compatibility Trade-offs: FAT32 improves support for older devices and non-Windows systems but removes NTFS features like permissions, encryption, and journaling.
- Consider ExFAT as an Alternative: If cross-platform compatibility is needed without file size limits, ExFAT may be a better choice than FAT32.
- Verify After Conversion: Check the file system in drive properties after completion and confirm all data is accessible and intact.
This tutorial demonstrates how to convert NTFS to FAT32 without data loss in Windows 10 and Windows 11. Changing from NTFS to FAT32 can make disks and partitions compatible with older devices and software, and it works for both internal and external storage devices.
💡 You can keep reading, or jump to How to Convert NTFS to FAT32 without Data Loss in Windows for a visual walkthrough.
Understanding NTFS and FAT32
New Technology File System (NTFS) and File Allocation Table 32-bit (FAT32) are file systems developed by Microsoft for use with the Windows family of operating systems. A file system specifies the way files are kept on a physical storage device, such as a hard drive or USB stick, and tracks where files are kept on the physical device (for example, the location of a file’s data on a disk platter). Alongside file data itself, the file system stores information used for permissions, encryption, compression, and file recovery.
NTFS is the file system used by modern Windows operating systems, including Windows 10, Windows 11, and Windows Server. It provides many advantages over the legacy FAT32 file system that was the default in Windows from Windows 95 OSR2 until Windows 2000, but these features come at the cost of compatibility with some devices.
| Feature | NTFS | FAT32 |
| Maximum file size | 16 TB | 4 GB |
| Maximum partition size | 8 PB | 2 TB |
| Compatibility | Modern Windows, macOS, and Linux (read-only; additional third-party software may be required to write data) | All versions of Windows, macOS, Linux, and other devices like game consoles, mobile devices, and embedded systems |
| Journaling (reduced risk of data corruption) | Yes | No |
| File permissions and security | Yes (access control lists, encryption) | No |
| Compression | Yes | No |
| Reliability | More stable with improved error recovery | Prone to data loss or corruption from crashes, power loss |
| Ideal use cases | Internal hard disks, SSDs, system partitions, Windows installations, large external hard disks | Small external USB drives, USB sticks, MMC cards, storage for use with devices that don’t run Windows |
NTFS is ideal for use on system drives, as well as internal and external drives that will only be used with Windows PCs. FAT32 is best used where support for older devices is required or the drive will be used with other operating systems (including macOS and Linux, which have limited NTFS support).
If compatibility with macOS and Linux is the goal, you should also consider ExFAT, which has broad compatibility but does not have the file size limitations of FAT32.
Protect critical business data with a cloud-first backup made for enterprise IT.
💡 Discover flexible backup solutions by NinjaOne Backup®
Preparing for the conversion from NTFS to FAT32
Before you attempt any file system conversion (or other maintenance or partitioning) on a storage device with data you want to keep, you should back up all of the data on it to a separate physical storage device. Before you convert from NTFS to FAT32, you should also check that the data you wish to retain is compatible: FAT32 only supports files up to 4 GB in size, and partitions can only be up to 2 TB in size.
You can check the drive’s file system (both before checking if conversion is necessary and after to confirm a successful conversion from NTFS to FAT32) by following these steps:
- Opening the Windows File Explorer
- Click on My PC in the navigation sidebar
- Right-click on a drive and select Properties
- The current file system will be displayed in the Properties dialog

The methods described below work on both internal and external hard drives.
How to convert NTFS to FAT32 with no data loss
While the process is intended to convert from NTFS to FAT32 with no data loss, if the process is interrupted or an error occurs, data loss or corruption may still happen. Again, your data must be backed up to a separate device before you attempt this.
Generally, it is more reliable to move your data to another device and re-partition/re-format your NTFS drive to FAT32 using built-in Windows tools, then copy the data back.
- Download and install AOMEI NTFS to FAT32 Converter. Be sure to choose the standard edition, skip the installation of the paid Pro edition, and opt out of the user experience improvement program.
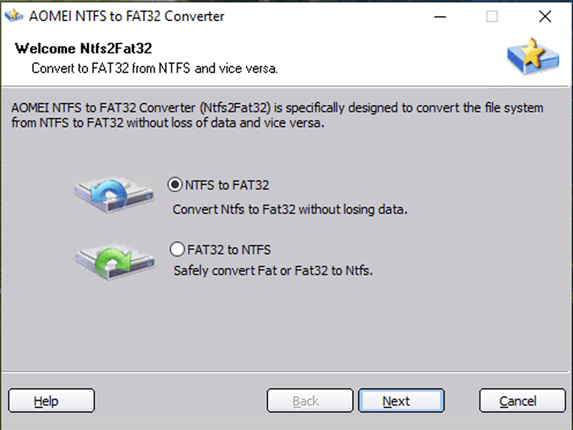
- Open the NTFS to FAT32 Converter tool using the desktop shortcut or from the Start menu.
- Click the Convert button and then Convert NTFS/FAT32.

- In the conversion window that appears, select NTFS to FAT32 and click Next.
- Select the NTFS partition to convert and click Next.
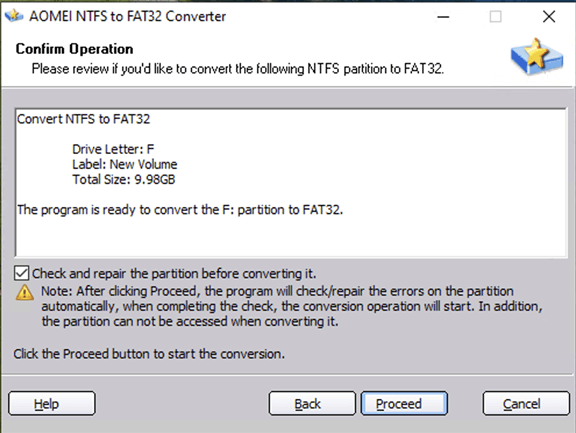
- The tool will check if the partition is compatible. If it is, review the changes that will be made and confirm by pressing Proceed.
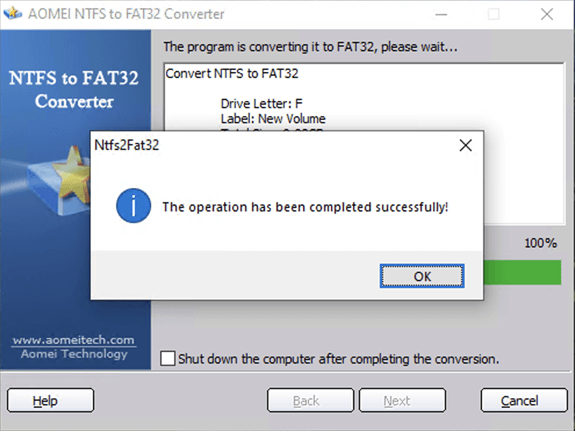
When completed, a success message will be displayed by the NTFS to FAT32 tool.
Manage endpoint, server, and SaaS backups under one unified console.
How to convert NTFS to FAT32 with built-in Windows tools
This process will completely wipe the data stored on the drive being converted from NTFS to FAT32. It is, however, the preferred conversion method if you are able to temporarily move your data to another, device as it does not require third-party tools and is less likely to result in data loss if the process is interrupted (as you can just restart the copy process).
- Copy your data from the drive you wish to convert from NTFS to FAT32 to another physical storage device.
- Re-format your storage device or partition, choosing the FAT32 file system.
- Copy your data back to the drive.
Managing file storage and avoiding data loss in enterprise environments
Safely converting from NTFS to FAT32 comes with risks. It’s best to assess your compatibility requirements before you begin using a storage device so that it can be correctly configured for use with both Windows 10 and Windows 11, as well as older devices.
Relying on external drives for critical data in business and enterprise environments presents additional risks: portable USB devices can be lost, damaged, or stolen, and must be physically moved if files need to be transferred or shared. Setting up network shares that are centrally managed, backed up, and accessible over local networks and secure VPNs provides convenient and reliable storage for core business data.
Before making any file system changes, protecting your data should always come first. Whether you’re converting NTFS to FAT32 for compatibility or managing storage across multiple endpoints, NinjaOne Backup helps ensure your data is always safe, recoverable, and centrally managed.
With automated backups for endpoints, servers, and SaaS data—all from a single dashboard—you can make system changes with confidence. Learn how NinjaOne Backup simplifies data protection for modern IT teams.


