

Key Points
- System Protection creates restore points in Windows 11: Windows System Protection saves snapshots of system files, drivers, installed apps, and registry settings for recovery.
- Restore points do not protect personal files: System Protection restores system state only and should be paired with regular file backups.
- System Protection is disabled by default: Administrators must manually enable it, typically on system drives like C:.
- Only NTFS drives support System Protection: FAT32 and exFAT volumes cannot use restore points.
- Restore points are space-managed automatically: Windows deletes older restore points based on disk usage limits and availability.
System Protection is a feature of Windows 11 that creates restore points containing system files, installed apps, and Windows settings from a specific point in time. Using these restore points, you can recover your system in case of a misconfiguration, misuse, or malware. This tutorial demonstrates how to turn system protection on in Windows 11, as well as how to disable it.
What is System Protection in Windows 11
System Protection creates restore points periodically. These snapshots contain the Windows system files, drivers, installed programs, and configuration (including the Registry) at that moment, allowing you to restore your system to that state. System Protection does not affect your personal files in your user folder, such as your downloads and documents. However, you should maintain regular backups to ensure that your files are protected in case System Restore needs to be used and files are stored in an unexpected location.
Restore points created by Windows System Protection are automatically managed, and are purged based on available space, the size of restore points, and your settings. Restore points are stored on the drive that System Protection is enabled for.
Should I turn on System Protection in Windows 11?
System Protection is not enabled by default, but it is recommended to enable it for drives containing system files and programs (such as your C:\ drive). As restore points are created automatically when key changes are made to the system (such as Windows Updates, and changes to drivers and software), it adds a robust layer of protection.
What you need to enable or disable System Protection
You’ll need the following to enable or disable System Protection in Windows 11:
- Administrative privileges on the target device
- Enough free space on the drive for the creation of restore points
- System Protection can only be enabled on NTFS-formatted drives
Note that System Protection cannot be turned on or off while Windows 11 is running in safe mode.
Option 1: Use the System Properties interface
To enable System Protection on Windows 11, follow these steps:
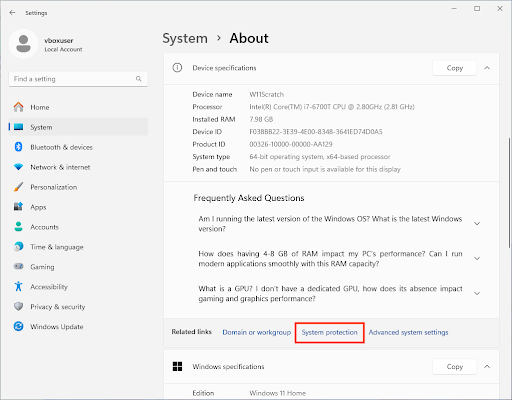
- Right-click on the Start button and click System
- Scroll down to Related links in the Device specifications section and click System protection
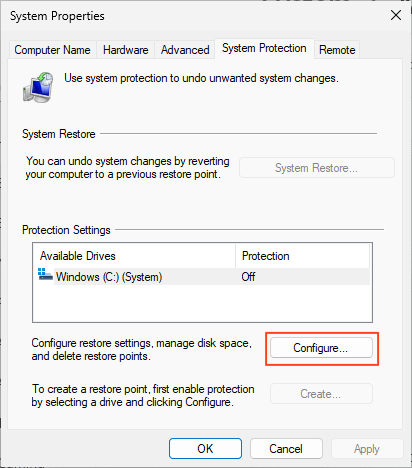
- Under Protection Settings, select from the Available Drives list the drive you want to enable or disable system protection for, then click Configure
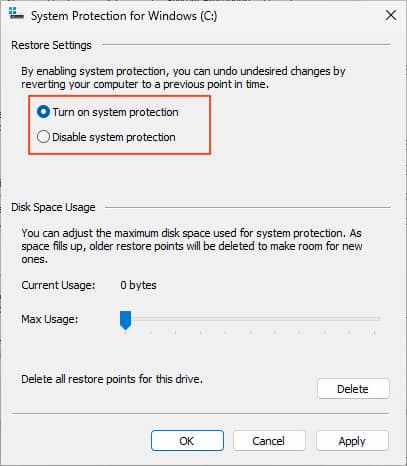
- Click Turn on system protection
- Press OK to save the change and close the window
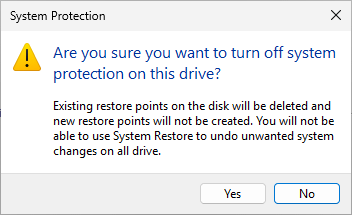
To disable System Protection, follow the same steps, but instead select Disable system protection in the System Protection dialog. You’ll be prompted before disabling, as all existing restore points will be removed.
Option 2: Enable or disable System Protection via PowerShell
You can also turn Windows System Protection on or off from PowerShell:
- Open PowerShell as an Administrator
- Enable System Protection on a drive (in this example, the C:\ drive) by running Enable-ComputerRestore -Drive “C:\”
- Disable System Protection on a drive by running Disable-ComputerRestore -Drive “C:\” (note that you won’t be warned about deleting existing restore points when doing this via PowerShell)
Scripts using these commands can be automatically deployed to configure System Protection for multiple machines using remote monitoring and management (RMM) or mobile device management (MDM) tools.
Manually create a restore point
You can manually create a restore point from the System Protection Properties dialog, or using the command Checkpoint-Computer -Description “YourRestorePointName”. You can list drives with System Protection enabled with the command Get-ComputerRestorePoint. Restore points can be manually deleted using Disk Cleanup.
How to Adjust Windows System Protection Disk Usage
You can adjust the amount of disk space System Protection uses to store restore points in the System Protection dialog used to enable the feature. This is configured as a percentage of the total disk space of the drive.
After adjusting these settings, ensure System Protection is working as intended by creating a restore point manually. While creating restore points won’t have a major performance hit on SSDs and NVMe drives, it may cause noticeable slowdown on spinning disks.
Troubleshooting Windows System Protection
If you are unable to make changes in the System Protection properties dialog, check that you have permission and are not restricted by Group Policy. If restore points are not being created as expected, check your disk space, how much space is allowed in System Protection, and configure your restore point creation frequency.
NinjaOne gives system administrators the tools to protect any device, wherever it is
The full suite of RMM and MDM tools provided by NinjaOne centralizes the management and deployment of Windows settings, including enabling System Protection using policies or scripts.
NinjaOne takes the protection of your enterprise device fleet further with cross-platform backup that backs up Windows and macOS devices over the internet, wherever they are located. Restore a single file or a whole system with file-level, image-based, or full-metal backups.


")


