Key Points
- EFS Encrypts Files Using User-Specific Certificates: Access to EFS-encrypted data requires the original user’s certificate or a designated recovery agent key.
- NTFS Compatibility Is Mandatory for EFS Protection: Moving encrypted files outside NTFS removes encryption and creates compliance risks.
- Secure Restoration Requires Certificate Export, Import, and Validation: Proper handling of .PFX keys and verification ensure files remain accessible and protected.
- EFS-Aware Tools Preserve Encryption During Transfers: Copy utilities like RoboCopy maintain EFS attributes and prevent accidental data exposure.
- Post-Restore Validation and Documentation Ensure Compliance: Verifying access, adjusting permissions, and documenting changes support audit and regulatory requirements.
EFS (Encrypting File System) is a feature of the Windows operating system that protects individual files. This tutorial explains how to access and restore EFS-encrypted files to a new location in a safe and verifiable manner.
What is EFS?
EFS encrypts files using a key that is protected by a certificate associated with a specific user account. Without the account and matching certificate, the encrypted files cannot be read. This is different from BitLocker, the built-in Windows tool that is used to encrypt entire drives. EFS is only compatible with the Windows Server, enterprise, educational, and professional editions, which use NTFS-formatted storage devices.
It is often necessary for IT administrators to restore EFS-encrypted files on new machines, or make them accessible to users other than the one who originally encrypted them.
Why is it important not to move files encrypted with EFS to a non-NTFS partition?
EFS is only supported on NTFS-formatted drives. Moving/copying them to another drive that is not formatted with NTFS will cause them to lose their encryption. This may have compliance implications if you are obligated to protect sensitive data by keeping it encrypted.
How to recover EFS-encrypted files
EFS encrypted files can only be recovered using the certificate of the encrypting user, or a data recovery agent (DRA) – a user that is able to decrypt data encrypted by other users. Maintaining DRA users is essential in the enterprise, in case the original certificate is lost or deleted.
The key thing to remember when moving encrypted data is to ensure that it is readable on the destination before you remove it from the source.
What you need in order to restore EFS-encrypted files safely and verifiably
To recover EFS-encrypted files you’ll need the following:
- Authorization to access protected data (either from the owner, or as the result of a defined policy, for example a data recovery action plan)
- The user’s EFS certificate/private key or a configured EFS Recovery Agent key (these will usually be a .PFX file with a password)
- Administrator privileges on source and target machines, plus a test file for validation
- EFS-aware copy tools (e.g., robocopy) and access to the command line (PowerShell/CLI)
It is critical that you maintain backups of all EFS-encrypted data, as well as certificates that can be used to restore them.
Step 1: Identify files to recover and decide whether to preserve encryption
Decide whether you will keep the files encrypted throughout the process: you can either move the files and then import the certificate required to access them for the new user, or decrypt them and then re-encrypt them on their destination. This will depend on your operating environment: whether there’s a secure way to transfer the unencrypted file to its new location, whether it needs to be re-encrypted, and whether compliance requires that it remain encrypted throughout the recovery/restoration process.
You can see who has access to an EFS-encrypted file or folder by:
- Right-clicking on the file or folder and clicking Properties
- Clicking Advanced… in the General tab
- Clicking Details under the Compress or Encrypt attributes section (Encrypt contents to secure data must have been previously checked)
- Viewing the list of users and certificate thumbprints
Step 2: Export/import EFS certificates and keys, and validate EFS recovery
To restore EFS-encrypted files, you will need to identify who owns the file, who needs to access it, and whether a DRA is required. Then, you can export the required .PFX file for the user who will need future access to the file.
Export a user’s EFS certificate and private key using the following steps:
- Open the Certificates MMC console as the user who performed the encryption by running certmgr.msc from the Run dialog
- Navigate to Certificates (Current user)\Personal\Certificates in the navigation tree
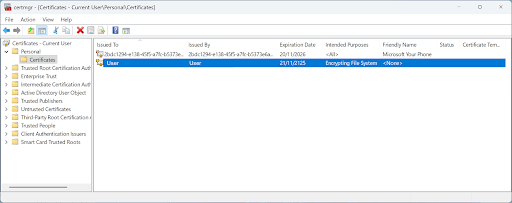
- Right-click on the relevant certificate (it will have the Intended Purposes value of Encrypting File System) and click All Tasks > Export
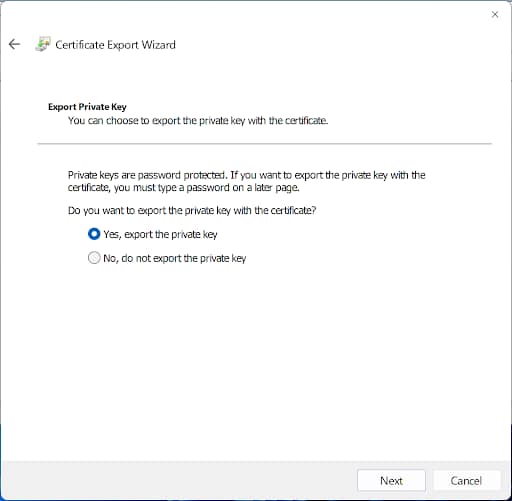
- In the Certificate Export Wizard, select Yes, export the private key
- Then, select the .PFX format as the Export File Format and check Include all certificates in the certification path if possible
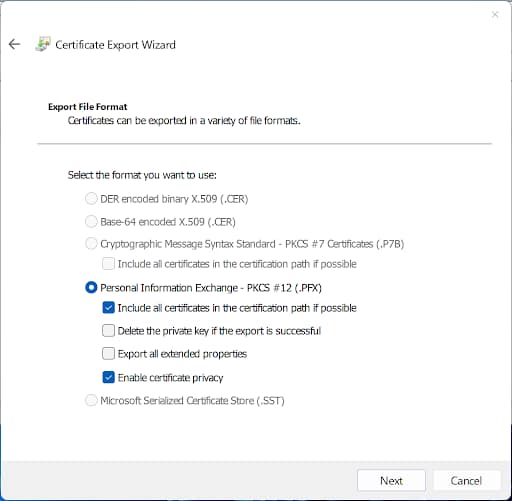
- Next, create a Password for the .PFX file so that it is secured if misplaced
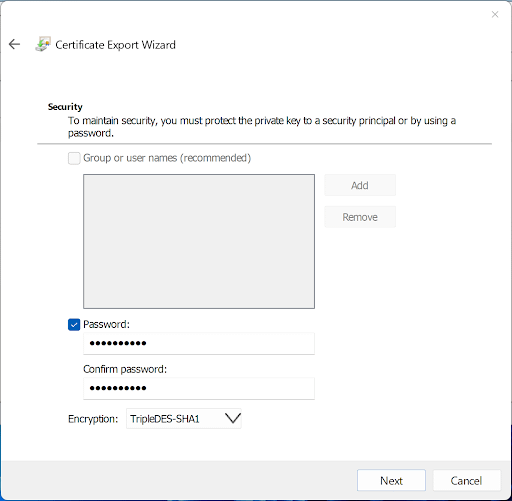
- Type or browse for a File name for the exported certificate
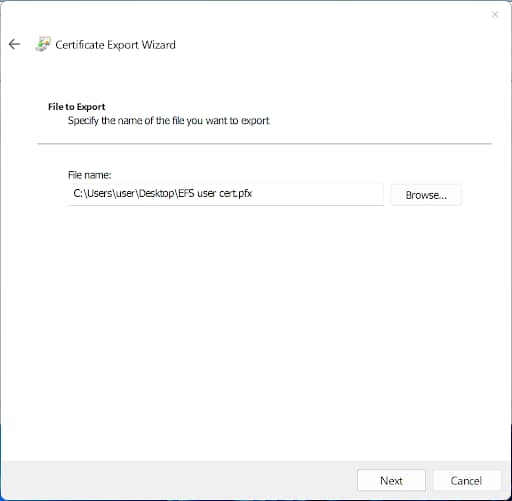
- Click Finish to complete the process
Import the certificate and private key on the target user account and device using the following steps:
- Double-click on the exported certificate from the steps above
- Select the Store Location as the Current User
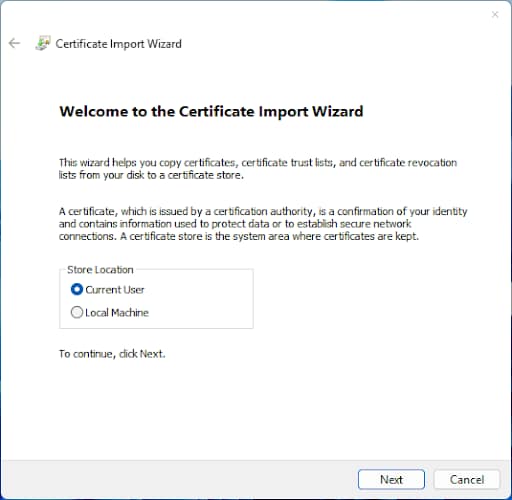
- Confirm the File Name of the certificate being imported
- Enter the Password of the exported certificate as set in the steps above
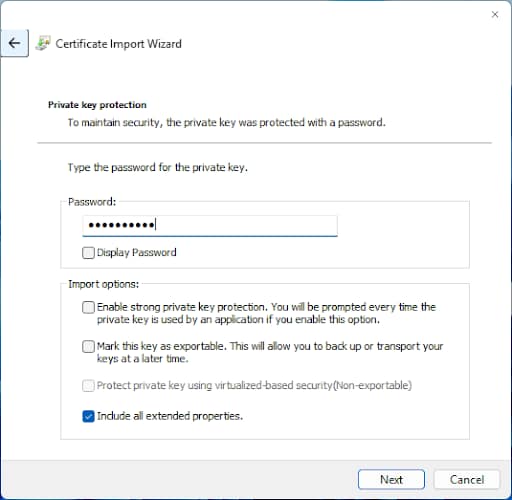
- Leave the option to automatically select the certificate store enabled and complete the wizard, and finish the import process
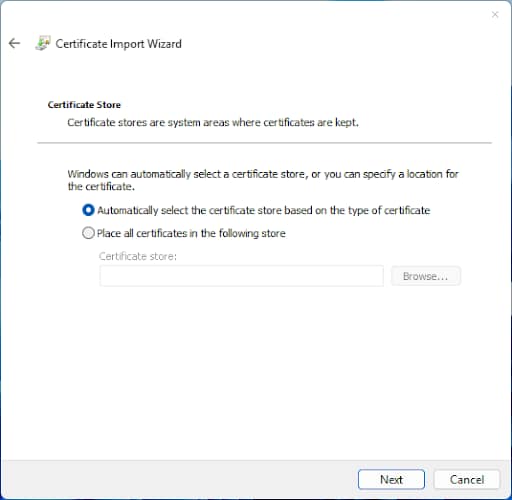
Then, you should verify that you can decrypt a sample file that was encrypted using EFS by the original user. You can open the file, or use the command cipher /c encrypted_file_path to confirm the certificates that can be used to decrypt.
Step 3: Export/back up Recovery Agent key (if applicable)
If you are in an enterprise environment, consider creating a DRA for future EFS restoration tasks. If your DRA is local to the device using EFS, export its keys in place of, or in addition to, the owners. Make sure DRA keys are protected – store them in a secure location and do not transfer them in plaintext.
Step 4: Transfer the data safely
To successfully restore or move EFS-protected files, you need to use a file copy method that supports EFS. RoboCopy is a popular option for this.
If you are transferring to a non-NTFS destination, you may need to decrypt first using the command cipher /d /s:directory_path and re-encrypt the data using a compatible solution once the decrypted copy has been transferred. You should protect data in transit as well as at rest, especially if it is decrypted at any stage.
Step 5: Fix ownership and access
Now that the certificate/private key and EFS-encrypted files have been transferred and files are accessible on the target, you can redefine access controls if necessary to ensure only authorized users can access the restored data.
Step 6: Validate functionality and indexing
Once you have successfully restored your EFS-encrypted data to a new location, check that the intended users can access all files. A spot check is usually sufficient for this. You can also use the cipher /c command to show the expected certificate thumbprint for a file to verify that the correct certificate has access.
If the files need to be searchable (and this falls within compliance and policies), check the Allow files in this folder to have contents indexed box in the file properties.
Step 7: Clean up and document to prove compliance
Once you have completed recovering, restoring, or moving your EFS-encrypted files, you should ensure that you clean up any exported certificates or other staging files that are no longer required. If required for compliance, record what data was moved, and which user accounts/certificates were granted access to the files’ new location. You can optionally record the thumbprint for these to confirm the specific certificate used.
These details can be stored in your documentation platform.
NinjaOne provides end-to-end oversight of your data protection measures and centralizes management
The protection of sensitive data – for business continuity, keeping proprietary data in-house, and remaining compliant with data privacy laws – is a key role for IT administrators and managed service providers (MSPs), where failure can have severe business impacts.
NinjaOne provides a unified suite of IT administration and management tools, including remote monitoring and management (RMM), mobile device management (MDM), backup, remote access, helpdesk, and more. All of these tools are tightly integrated and can be automated, and can help you ensure the end-to-end encryption of devices and data. If you require EFS, you can script workflows to restore, validate, and move data securely, apply ACLs, and generate reports for compliance audits. NinjaOne supports Windows, macOS, and Linux, so you can also deploy cross-platform data protection tools and enforce policies across environments.