

Key Points
- You can allow specific apps to bypass Do Not Disturb: Use Settings > System > Notifications > Set priority notifications to add or remove apps that can show alerts.
- Do Not Disturb can be turned on manually or automatically: You can toggle it from the notification center, or configure automatic rules in Settings.
- Focus sessions use the same priority rules: When Focus turns on Do Not Disturb, only apps in the priority list can send notifications.
- All settings apply per user: No administrator rights are required unless the device is managed by policy.
- PowerShell can automate notification behavior: You can script registry changes under HKCU to enable or disable Do Not DIsturb across multiple devices.
Do not disturb mode prevents notifications from being displayed while you’re using your Windows 11 device. However, there are situations where you may want notifications only from specific apps. This tutorial explains how set priority notifications for Do Not Disturb in Windows 11 for certain apps.
How priority notifications works, and what you need to configure them
Do not disturb can be toggled in Windows 11 to turn off notifications. Focus sessions may also be configured to automatically enable do not disturb, disabling notifications while the focus session is active. This is usually done to help you concentrate while trying to be productive, or to prevent unexpected notifications from interrupting meetings, presentations, screencasts, or gaming sessions.
Priority notifications can ‘break through’ the setting (whether enabled manually or via focus mode), allowing you to specify applications that will always display notifications. You can also prioritize the order in which notifications are displayed.
Do not disturb, priority mode, and focus sessions are available on all Windows 11 devices, and are configured per-user account. As such, they do not require administrative privileges, unless they have been intentionally disabled in an enterprise environment.
How to allow notifications from certain apps when using ‘do not disturb’ in Windows 11
To configure what apps are treated as priority notifications (and thus aren’t affected by ‘do not disturb’), follow these steps:
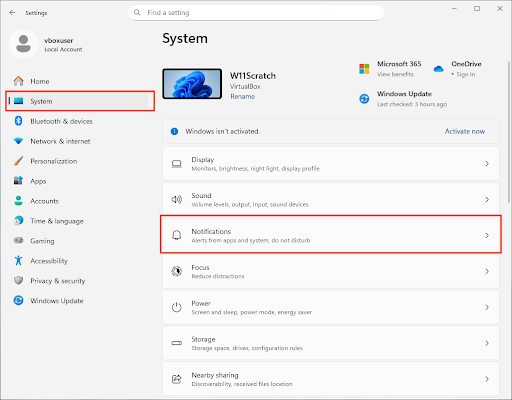
- Right-click on the Start button and click Settings
- Click System in the sidebar
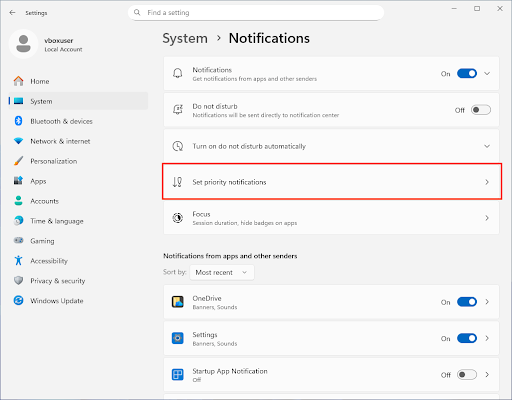
- Click Notifications
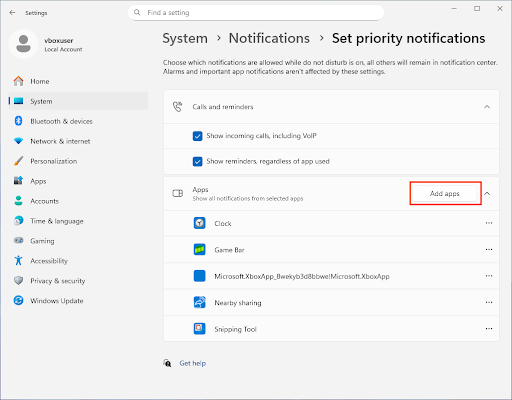
- Click Set priority notifications
- Click Add apps to add apps to the priority notifications list (notifications from any app shown in this list will be treated as a priority, and will ignore ‘do not disturb’)
How to turn off priority notifications
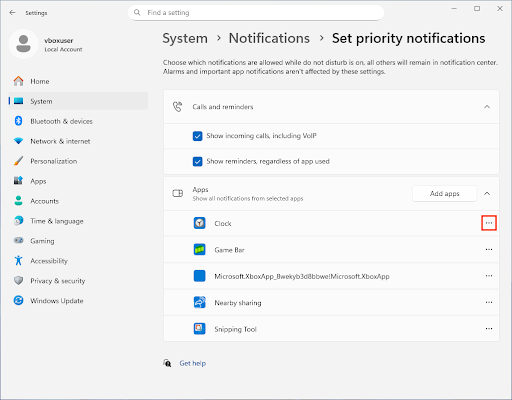
To remove an app from priority notifications (so that it is again affected by ‘do not disturb’), follow the steps above, and click the three dots (…) next to the app to remove it from the list of Apps in the Set priority notifications settings.
To disable all priority notifications, remove all apps and uncheck Show incoming calls, including VOIP and Show reminders, regardless of app used.
How to manually enable or disable ‘do not disturb’ in Windows 11
To test the above, you’ll need to enable ‘do not disturb’ on Windows 11 by following these steps:
- Click the time/date displayed to the right of the Windows taskbar
- Click on the bell icon in the top-right corner of the notification area to toggle do not disturb
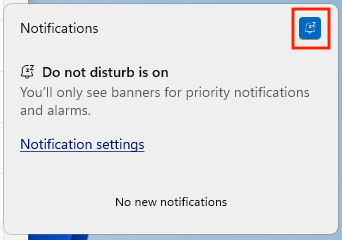
- The bell icon will change to blue and show a message when ‘do not disturb’ is enabled
- Click the bell again when ‘do not disturb’ is enabled to disable it and return notifications to their usual behavior
How to automatically enable or disable ‘do not disturb’
You can configure ‘do not disturb’ to activate automatically by following these steps:
- Right-click on the Start menu and click Settings
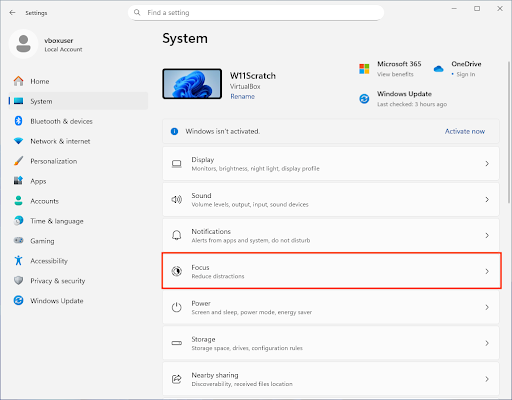
- Click System in the sidebar
- Click Notifications
- Click Turn on do not disturb automatically
- Configure the conditions for automatically enabling/disabling do not disturb

Set the notification priority for different apps within the Windows notification center
In the notifications settings, scroll down to Notifications from apps and other senders, tap on the app you need to configure, and set its notification category (top, high, or normal).
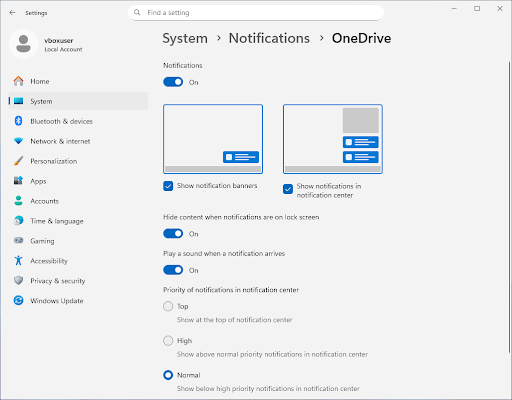
Some apps may have additional notification settings you can also configure here.
Configure priority notifications for focus sessions
Focus sessions can be configured to automatically enable ‘do not disturb’, with the same priority notifications.
To ensure that ‘do not disturb’ is enabled while in a Focus session, follow these steps:
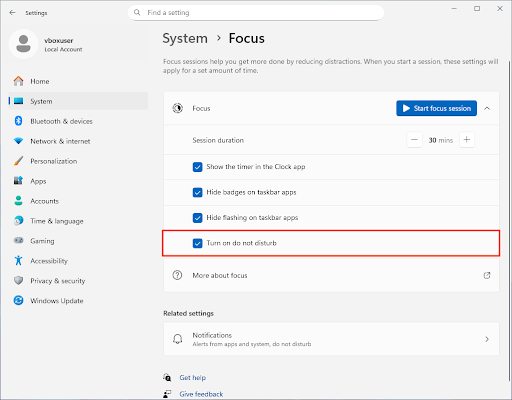
- Open the Windows Settings app
- Click System, then Focus
- Check Turn on do not disturb in Focus settings
Automate priority notification configuration using PowerShell
If you manage multiple devices, you can script notification settings by modifying the Windows registry. This still applies per-user, so you’ll need to run any scripts that modify priority notification behavior at logon.
The PowerShell commands you’ll need to enable or disable do not disturb are:
Enable ‘do not disturb’:
New-ItemProperty -Path “HKCU:\Software\Microsoft\Windows\CurrentVersion\Notifications\Settings” -Name “NOC_GLOBAL_SETTING_TOASTS_ENABLED” -Value 1 -PropertyType DWord -Force
Disable ‘do not disturb’:
New-ItemProperty -Path “HKCU:\Software\Microsoft\Windows\CurrentVersion\Notifications\Settings” -Name NOC_GLOBAL_SETTING_TOASTS_ENABLED” -Value 0 -PropertyType DWord -Force
You can programmatically configure other notification settings by modifying the HKCU:\Software\Microsoft\Windows\CurrentVersion\Notifications\Settings\<App ID> keys – each application will have its own unique AppID and settings in this location.
Make sure you test any scripts in a sandbox environment before deploying them in production.
Troubleshooting and additional considerations when configuring Windows 11 notifications
If you are unable to configure ‘do not disturb’ and priority notifications, check that your device isn’t enrolled in mobile device management (MDM) or part of a corporate network that may restrict these settings. Notification badges will continue to update in the background even when ‘do not disturb’ is enabled, unless they are separately disabled.
Note that ‘do not disturb’ and priority notifications only apply to notifications sent through the Windows notification center – some apps have their own notification systems that display pop-ups and other alerts that will not be affected by the built-in Windows 11 do not disturb feature.
NinjaOne lets you deploy consistent notification settings across Windows 11 devices
With its scriptable remote monitoring and management (RMM) platform, NinjaOne gives you the tools to automate the deployment and enforcement of notification settings. This includes Windows 11 notification center alerts, as well as notification settings for third-party software. By enforcing consistent configurations across devices, troubleshooting using NinjaOne Helpdesk and Remote Access is streamlined, and users can expect a predictable experience across devices.


