Key Points
- Remove the ‘Photos’ context menu option in Windows 11 by uninstalling the Microsoft Photos app or blocking its CLSID in the Registry, then restarting Explorer.exe.
- Hide ‘Edit with Photos’ without uninstalling the app by creating a String Value for the Photos CLSID in the Shell Extensions\Blocked key, or automate removal/redeployment.
- For enterprise deployment, use HKLM registry changes, scripting, or RMM tools to remove Photos from the Windows 11 right-click context menu for all users.
The context menu in Windows 11 can get quite crowded, showing tools you rarely use, including the default Windows Photos app. This tutorial provides step-by-step instructions for removing ‘Photos’ from the context menu in Windows 11.
Why remove the ‘Photos’ context menu option?
The Photos app is installed on Windows 11 by default, though it can be removed if you don’t need it. When it is installed, it appears in the context menu (the menu that appears when you right-click on a file) for supported image files.
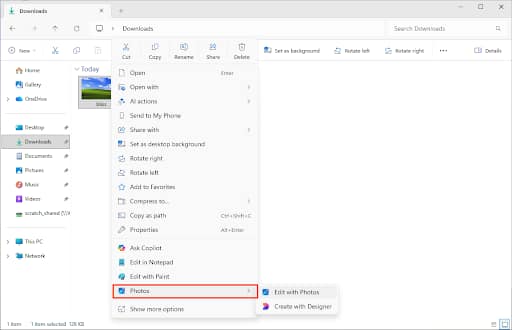
You may wish to remove it from the context menu if you use a different image editor, such as the legacy Photo Viewer, Microsoft Paint, or Irfanview. IT administrators may wish to remove the option in enterprise or education environments to hide it from users who do not need the Photos app for their day-to-day responsibilities.
What you need to remove context menu items in Windows 11
To remove context menu items in Windows 11, you’ll need an administrator account that can access the Windows Registry Editor. If you’re planning on uninstalling the Photos app, an alternative image viewer should be installed. Alternatively, you can open many image formats in your web browser.
Before making changes to the Windows Registry, it’s recommended that you perform a backup in case you make a mistake.
Method 1: Uninstall the Photos app to remove it from the context menu
If you don’t plan to use the Microsoft Photos app at all, you can just uninstall it from the Windows Settings (under Settings > Apps > Installed apps), which will also remove it from the right-click context menu.
Note that this will only affect the current user.
Method 2: Remove ‘Edit with Photos’ from the context menu via the Registry Editor
If you wish to keep the Photos app installed, but remove the context menu item, you’ll need to use the Windows Registry Editor:
- Right-click on the Start button and press Run
- Type the command regedit.exe and click OK to launch the Registry Editor
- Access the key located at Computer\HKEY_LOCAL_MACHINE\SOFTWARE\Microsoft\Windows\CurrentVersion\Shell Extensions\Blocked (You can copy and paste this path into the Registry Editor)
- If the Blocked key doesn’t exist, right-click on the Shell Extensions key and create it by selecting New > Key
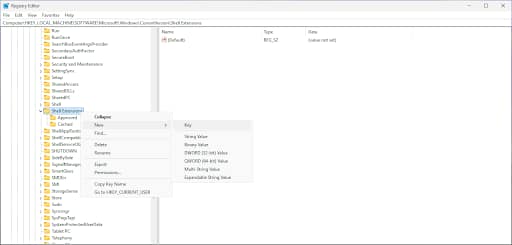
- With the Blocked key selected, select Edit > New > String Value in the toolbar
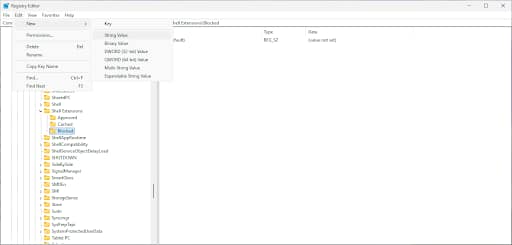
- Name the new String Value to the CLSID (class identifier) of the Photos context menu item, which is {BFE0E2A4-C70C-4AD7-AC3D-10D1ECEBB5B4} (you can also optionally set its value to Photos context menu so it’s easy to find again later)
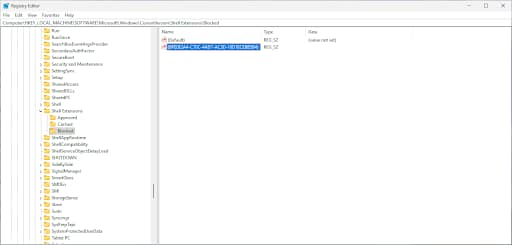
- Close the Registry Editor and restart the Explorer process to apply the change
Method 3: Restore the ‘Edit with Photos’ context menu item by removing blocked CLSID
To undo the change made above, navigate back to the same location in the Windows Registry and delete the String Value that was created. Restart the Explorer process to apply the change.
Method 4: Add or remove the Photos context menu entries using PowerShell
You can automate creating and destroying the Windows Registry entries using PowerShell with the following commands.
Remove the Photos context menu item in Windows 11with the following PowerShell command to create the relevant Registry values:
New-Item -Path “HKLM:\SOFTWARE\Microsoft\Windows\CurrentVersion\Shell Extensions\Blocked” -Force New-ItemProperty -Path “HKLM:\SOFTWARE\Microsoft\Windows\CurrentVersion\Shell Extensions\Blocked” -Name “{BFE0E2A4-C70C-4AD7-AC3D-10D1ECEBB5B4}” -Value “” -PropertyType String -Force
Re-add it by removing the Registry entries with the command:
Remove-ItemProperty -Path “HKLM:\SOFTWARE\Microsoft\Windows\CurrentVersion\Shell Extensions\Blocked” -Name “{BFE0E2A4-C70C-4AD7-AC3D-10D1ECEBB5B4}” -Force
Restart Explorer to apply the change by running:
Stop-Process -Name explorer -Force
These commands can be added to scripts that can be scheduled to ensure the context menu remains hidden, or deployed to multiple Windows 11 PCs using remote monitoring and management (RMM) tools.
Method 5: Modify ‘Open With’ behavior without removing the Photos app
You can also assign a different app as the default image editor in Windows:
- Right-click on an image file
- Select Open with > Choose another app
- Select an app from the list — if you have a photo viewer installed that isn’t listed, select Choose an app on your PC and browse for it
- Click Always to set this app as the default app for opening the selected file type
Additional considerations and troubleshooting
To test whether your chosen method was successful, right-click an image file (e.g. JPG or PNG, which are compatible with the Photos app) and check that the context menu item has been hidden.
Removing the context menu item does not prevent access to the Photos app. If the menu item reappears, it’s possible that this occurred due to Windows Update or the Photos app CLSID changing.
Automate the deployment of menu configurations and default apps with NinjaOne
The NinjaOne RMM platform streamlines the deployment and enforcement of configurations across enterprise and education fleets of Windows 11 devices. Deploy app stacks, remove default software, and tailor devices to maximise productivity. NinjaOne also includes mobile device management (MDM) that covers Windows, MacOS, Linux, and mobile devices, providing you with centralized control over your entire IT infrastructure and end-user experience.