

Windows’ Do Not Disturb for notifications are designed to help users stay focused on their tasks for a predetermined time. This Windows 11 feature evolved from the legacy Focus Assist functionality and enables far greater flexibility in managing when and how notifications appear. Because of this, the Do Not Disturb feature helps support users during critical work periods, essentially controlling notification behavior.
Effectively managing Do Not Disturb settings helps support user experience, especially in standardized environments in enterprise and educational deployments. In this guide, we offer clear, step-by-step guidance on how to enable, disable, schedule, and enforce Windows 11’s Do Not Disturb notifications setting across different user scenarios.
If you want a visual guide, watch our video on “How to Turn On or Off Do Not Disturb for Notifications in Windows 11“.
Configuring Windows Do Not Disturb notification settings
Before proceeding, take note of the following:
- Be cautious when implementing changes. If you are not confident in applying any changes, you can ask your IT admin to perform these actions for you.
- Take note that the Do Not Disturb feature is available in Windows 11 version 22H2 and later.
- The methods listed below apply settings per user profile unless otherwise enforced via scripts or policies.
Method 1: Using Settings (GUI)
- Press Win + I to open the Settings app. Alternatively, you can search for “Settings” in the Start menu.
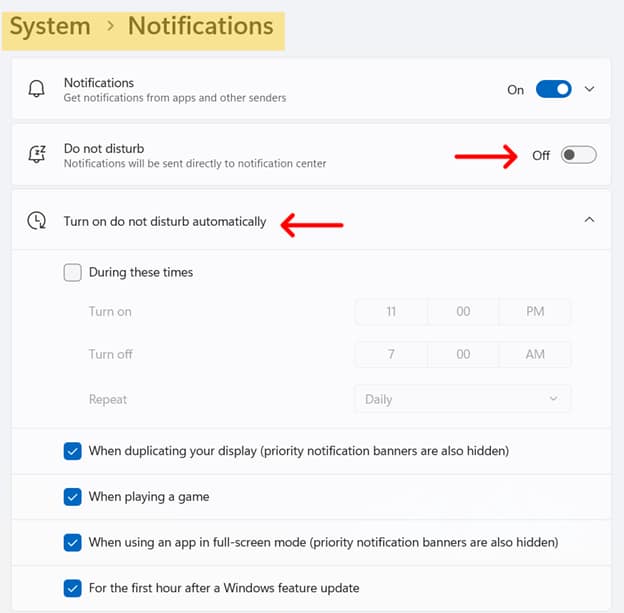
- Click on System and then Notifications.
- Switch the Do Not Disturb toggle to On to silence notifications or Off to restore normal notification behavior.
- (Optional) Click on Turn on Do Not Disturb Automatically to set up triggers, such as:
- During specific hours: Schedules quiet hours for focused work periods.
- When duplicating display: Automatically enables Do Not Disturb when presenting or using multiple displays.
- During full-screen apps or games: Suppresses notifications while using full-screen applications or when playing games.
- For the first hour after a Windows feature update: Prevents notifications for one hour after a Windows update.
Method 2: Using Quick Settings
- Open Notification Center. You can do this by clicking on the date and time area on the taskbar (lower right area of your desktop screen) or by pressing Win + N.
- Click the bell icon to toggle the Do Not Disturb mode.
- Active mode: A filled bell with a line through it indicates Do Not Disturb is active.
- Inactive mode: Clicking the icon again will deactivate Do Not Disturb.

Method 3: Using Group Policy
💡 Note: This setting affects all toast notifications. Enabling it hides all banners, similar to Do Not Disturb.
- Press Win + R, type gpedit.msc, and click Enter.
- Go to User Configuration > Administrative Templates > Start Menu and Taskbar > Notifications
- Double-click Turn off toast notifications.
- Set your preferred option:
- To show notifications (disables Do Not Disturb): Set to Disabled or Not Configured.
- To hide notifications (enables Do Not Disturb): Set to Enabled.
- Click Ok to save.
- Open an elevated Command Prompt and run
gpudate /forceto apply the changes immediately, or wait for the next policy refresh.
Additional considerations when modifying the Do Not Disturb notification
- Take note that Do Not Disturb integrates with Focus settings under Settings > System > Focus, which allows for enhanced concentration periods.
- You can add specific apps as priority senders so you are still notified by them, even when Do Not Disturb is on. You can set them under Notifications > Set Priority Notifications.
- Notifications received during Do Not Disturb are still accessible in the Notification Center for later review.
- Currently, there is no direct Group Policy Object (GPO) for Do Not Disturb. However, administrators can enforce settings via Registry modifications or provisioning scripts.
Modifying Windows’ Do Not Disturb notifications settings
Windows 11 introduced the Do Not Disturb feature to help users maintain focus during work-critical hours by suppressing notifications. You can enable this functionality by using three methods.


