

Key Points
- You can add a desktop context menu via the Registry: You can create a new key under HKEY_CLASSES_ROOT\DesktopBackground\Shell and define a command that opens the current wallpaper location.
- The command uses PowerShell to locate the active wallpaper: It reads the wallpaper path from the user registry and opens File Explorer to that file.
- Removing the option requires deleting the custom registry key: Delete the created key and restart Explorer to restore the default behavior.
- PowerShell can automate adding or removing the entry: Scripts create or delete the same registry keys, making it easier to deploy across multiple systems.
- Restarting Explorer applies the change: After adding or removing the registry entry, restarting the Explorer ensures the context menu updates properly.
This tutorial provides step-by-step instructions for quickly finding the Windows 11 background wallpaper location by adding a context menu item. With this, you’ll be able to right-click on the desktop to quickly locate the folder containing the current desktop background image file.
What you need to add an ‘Open desktop background file location’ context menu option to Windows 11
You’ll need a device running Windows 11 (any version) and a user account with administrative privileges for making changes to the Windows Registry.
Add ‘Open desktop background file location’ to the right-click context menu using the Windows Registry Editor
To add a context menu item (shown when you right-click on the desktop) that opens the folder containing the currently displayed wallpaper, follow these steps:
- Right-click the Start button and select Run
- Run the command regedit.exe to open the Windows Registry Editor
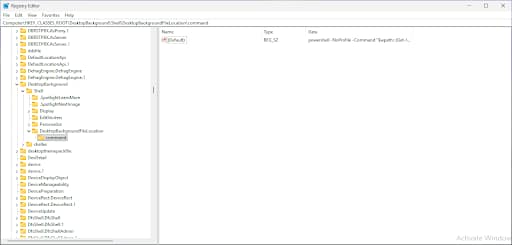
- Navigate to the registry key located at Computer\HKEY_CLASSES_ROOT\DesktopBackground\Shell (you can copy and paste this path into the navigation bar in the Registry Editor)
- Right-click on the Shell key and select New > Key and name it DesktopBackgroundFileLocation
- In the DesktopBackgroundFileLocation key, double-click the (Default) value and set it to Open desktop background file location
- Create a key under DesktopBackgroundFileLocation named command
- Double-click on (Default) value under the command key and give it the following value:
powershell -NoProfile -Command “$wallpaper_path=(Get-ItemProperty ‘HKCU:\Control Panel\Desktop’).Wallpaper; if($wallpaper_path -and (Test-Path $wallpaper_path)){explorer /select,$wallpaper_path} else{explorer /select,$env:APPDATA\Microsoft\Windows\Themes\TranscodedWallpaper}”
- Press OK to save
- Restart the Explorer process to apply the change
This PowerShell code reads the current wallpaper path from the Registry, then launches Windows Explorer and navigates to that path. If the registry value is not set, it falls back to a default.
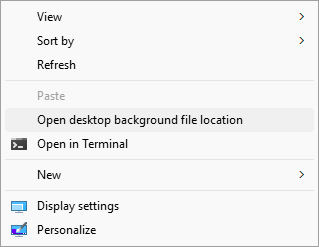
When these steps are completed, you’ll see the new context menu item when you right-click on the desktop:
Remove the added context menu entry using the Windows Registry Editor
You can reverse this change by removing the added Registry key and default value:
- Right-click on the Start button and click Run
- Enter the command regedit.exe and press OK to open the Windows Registry Editor
- Navigate back to the key located at Computer\HKEY_CLASSES_ROOT\DesktopBackground\Shell
- Right-click on the DesktopBackgroundFileLocation and click Delete
- Restart Explorer to apply the change
You can also export and import Registry keys if you want to streamline this process.
Deploy or remove context menu entries using PowerShell
PowerShell can be used to automate the creation and deletion of Windows Registry keys and values. The following commands will set the values detailed above that add/remove the ‘Open desktop file location’ context menu item:
You should back up your registry before allowing scripts to make changes, in case something goes wrong.
Add the context menu entry with:
New-Item -Path “HKCR:\DesktopBackground\Shell\OpenWallpaperLocation” -Force
Set-ItemProperty -Path “HKCR:\DesktopBackground\Shell\OpenWallpaperLocation” -Name “(default)” -Value “Open desktop background file location”
New-Item -Path “HKCR:\DesktopBackground\Shell\OpenWallpaperLocation\command” -Force
Set-ItemProperty -Path “HKCR:\DesktopBackground\Shell\OpenWallpaperLocation\command” -Name “(default)” -Value ‘powershell.exe -NoProfile -Command “$wallpaper_path=(Get-ItemProperty ”HKCU:\Control Panel\Desktop”).Wallpaper; if($wallpaper_path -and (Test-Path $wallpaper_path)){explorer /select,$wallpaper_path} else{explorer /select,$env:APPDATA\Microsoft\Windows\Themes\TranscodedWallpaper}”‘
Remove it with:
Remove-Item -Path “HKCR:\DesktopBackground\Shell\OpenWallpaperLocation” -Recurse -Force
Finally, restart Explorer to apply the change with:
Stop-Process -Name explorer -Force
Adjust the file path for theme, slideshow, or Spotlight wallpapers
If you want to add context menu items for common wallpaper locations instead of using a script to locate the current background image file, you can use the following paths:
- Static wallpapers: %AppData%\Microsoft\Windows\Themes
- Theme pack wallpapers: C:\Windows\Web\Wallpaper
- Spotlight wallpapers: %LocalAppData%\Packages\Microsoft.Windows.ContentDeliveryManager
You’ll also need to update the (Default) value for the command registry key to explorer.exe /select,””.
Additional considerations and troubleshooting
To test, right-click on the desktop and see if the context menu items you have added appear. If they do not, or other context menu or explorer issues appear, check that you have configured the registry setting correctly. Note that the methods described above will affect all users on the device.
If you are using a device owned by an organization, you may be restricted from making certain customizations.
Deploy consistent user experiences and enhance troubleshooting with NinjaOne
End-user productivity is improved when they have access to consistent environments that prioritize access to common tools and functionality. Helpdesk workflows are also streamlined when technicians know what to expect when logging in to devices, and there are no surprises caused by questionable user customizations.
NinjaOne gives IT administrators and managed service providers (MSPs) the tools to create and enforce operating system configurations and user interface tweaks (including custom context menu items). These tools help enforce configurations to ensure that users have a distraction-free environment with ready access to the apps they need to complete their work duties. NinjaOne provides oversight and control over Windows 11, macOS, Linux, and mobile devices from a unified interface that combines remote monitoring and management (RMM) and mobile device management (MDM) with scripting and automation.


