

Key Points
- Use the legacy Control Panel in Windows 11 to quickly show or hide the Lock option in the Start menu power button settings.
- Select “Choose what the power buttons do” and enable or disable the Lock checkbox under Shutdown Settings to control visibility.
- Configure the “Show lock in the user tile menu” setting in Local Group Policy Editor (Windows 11 Pro, Enterprise, Education) to enforce changes across all users.
- PowerShell enables scalable automation of Lock option configuration across multiple devices.
This tutorial demonstrates how to add or remove the Lock option in the power menu that can be accessed from the Start menu’s power button in Windows 11. Note that the methods described in this article only hide the Lock menu item and do not disable the ability to lock your PC entirely.
Why you need to hide or show the Lock option from the Start menu
Locking your PC when you are not using it is a critical security practice: it prevents unauthorized users with physical access to your devices from using them. It can also help prevent exploitation of remote access tools in some situations.
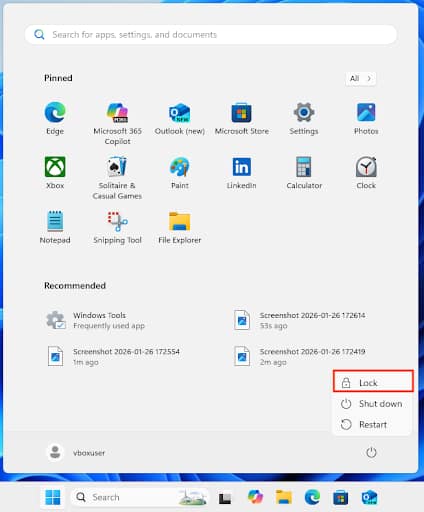
You can lock your PC by pressing the Windows key + L, or from the Start menu by pressing the power button icon to open the Shut down menu, where the Lock option is enabled by default.
While locking your PC is best practice, there are some situations in which you may want to disable the option of locking it. For example, if you’re helping a novice user with their PC, and they keep accidentally locking it, if you are managing PCs in a shared environment and need to enforce users fully logging out, or to keep kiosks unlocked.
What you need in order to manage the Lock option in the power button menu
To toggle the visibility of the Lock item in the Shutdown menu in Windows 11, you’ll need a user account with administrative privileges. If you’re using a method that requires Group Policy, you’ll need to be running Windows 11 Pro, Education, or Enterprise editions, as Group Policy is not available in Windows 11 Home.
Using the Control Panel to configure Shutdown menu options
The simplest way to configure the Lock option in the Start menu is to use the legacy Control Panel:
- Right-click on the Start button and select Run to open the Run dialog
- Run the command control to open the legacy Windows Control Panel
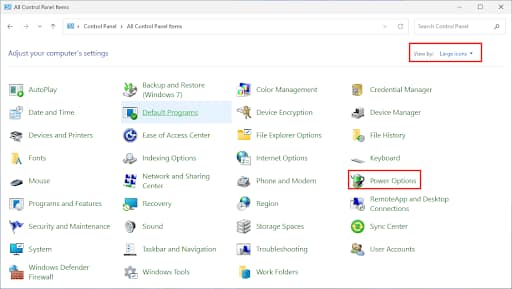
- In the top-right of the Control Panel window, change View by: to Large icons
- Click Power Options
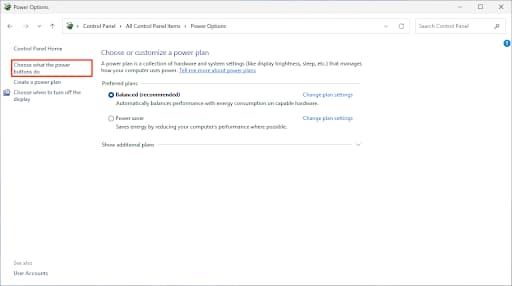
- In the Power Options sidebar, click Choose what the power buttons do
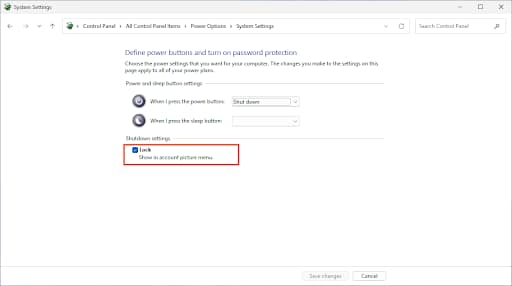
- Before making changes here, you may need to click Change settings that are currently unavailable
- Check Lock under Shutdown Settings to show the Lock option in the Start menu, or uncheck it to hide the Lock option
You can also create a shortcut to list all tasks in the old Control Panel rather than digging through menus.
Add or remove the Lock option from the Start menu using Group Policy
On devices running Windows 11 Pro, Enterprise, and Education editions, you can also configure and enforce this setting using Group Policy. To do this with Local Group Policy:
- Open the Local Group Policy Editor by executing gpedit.msc from the Run dialog
- Click through to Computer Configuration > Administrative Templates > Windows Components > File Explorer
- Locate Show lock in the user tile menu in the list of settings and double-click to edit it
- To show the Lock option, set the value to Not configured or Enabled
- To hide the Lock option, set the value to Disabled
- Run gpupdate /force in the Command Prompt or PowerShell, or reboot to apply the change
This will apply to all users on your device. Group Policy settings can also be deployed to multiple devices connected to a domain.
Configure Lock option in the Power menu using the Windows Registry Editor
You can also use the Windows Registry to remove or add the Lock option in the Start menu. This works on all versions of Windows 11.
- Open the Windows Registry Editor by running regedit.exe from the Run dialog
- Navigate to the key located at HKEY_LOCAL_MACHINE\SOFTWARE\Microsoft\Windows\CurrentVersion\Explorer\FlyoutMenuSettings
- If the FlyoutMenuSettings key doesn’t exist, right-click on the Explorer key and select New > Key to create it
- Create the DWORD value ShowLockOption if it does not already exist by selecting Edit > New > DWORD (32-bit) Value
- Double-click ShowLockOption to edit it, and set its value to 1 to show the lock option, or 0 to hide it
- If the value is not present Lock option will be shown by default
- You may need to restart the Explorer or Start menu process to apply the change
It’s recommended that you back up your registry data so that you can restore it if a mistake is made.
Manage Lock availability using PowerShell automation
You can also use PowerShell to deploy the above registry settings.
The following command will remove the Lock option from the Power menu by setting the required registry values:
Set-ItemProperty -Path “HKLM:\SOFTWARE\Microsoft\Windows\CurrentVersion\Explorer\FlyoutMenuSettings” -Name “ShowLockOption” -Value 1
The following command will remove the Lock option from the Power menu by setting the required registry values:
Set-ItemProperty -Path “HKLM:\SOFTWARE\Microsoft\Windows\CurrentVersion\Explorer\FlyoutMenuSettings” -Name “ShowLockOption” -Value 0
Remote monitoring and management (RMM) solutions can be used to deploy scripts and configure end-user devices over the internet, wherever they are located.
Standardize security and interface settings across your Windows 11 fleet
NinjaOne provides IT administrators and managed service providers (MSPs) with a unified toolchain that combines RMM with helpdesk, remote access, and automation. This enables you to tailor your user experience and enforce security rules across your entire fleet, whether they are on-premesis or remote. This includes managing Windows enterprise environments, and deploying scripts to managed devices.


