

Generative AI enhances app capabilities to boost productivity, like automated insights and data generation. This guide discusses ways to manage Windows app access to Generative AI features to match your needs. We’ll also guide you through important precautions and provide solutions to common issues when making the change.
Methods to manage Windows app access to Generative AI
Generative AI transforms traditional applications and takes them up a notch, enabling users to work efficiently. However, users may accidentally incorporate sensitive information when using Generative AI, creating privacy and regulatory risks. That said, managing this feature across an environment is important to balance convenience with compliance and security.
📌 Prerequisites:
- Windows build 26236 or later (Insider Preview build).
- Device support for Generative AI.
- Administrator rights for system-wide configurations.
- Installation of the latest Windows app versions.
📌 Recommended deployment strategies:
Method 1: Toggle Generative AI access for all users via Windows Settings
📌 Use Case: This method allows administrators to enforce their preferred Generative AI settings for all users on a local machine.
- Press Win + I to open Windows Settings
- Select Privacy & security on the left pane, then Generative AI on the right.
- Find Generative AI access and toggle the switch beside it.
- On: Allows all users to use the Generative AI feature.
- Off: Prevents all users from using the Generative AI feature.
- Exit the Windows Settings app.
💡 Note: Once toggled, the new Generative AI setting instantly applies for all users on a local machine. (See ⚠️ Things to look out for.)
Method 2: Toggle Generative AI access per user via Windows Settings
📌 Use Case: This method allows end users to customize Generative AI settings for their personal accounts without affecting other users.
- Press Win + I, then go to Privacy & security > Generative AI.
- Find Let apps use generative AI and toggle the switch beside it.
- On: Allows the current user to use Generative AI.
- Off: Prevents the current user from using Generative AI.
- Close Windows Settings.
💡 Note: Disabling Let apps use Generative AI makes the next method inaccessible.
Method 3: Pick which Windows apps get Generative AI access via Settings
📌 Use Case: Leverage this method if you want to fine-tune which Windows apps have access to the Generative AI feature.
- Press Win + I and go to Privacy & security > Generative AI.
- Click Let apps use generative AI and navigate the resulting list.
- Select which Windows apps to allow or prevent access to Generative AI.
- Close Windows Settings once you’re done.
⚠️ Important: Disabling Generative AI may reduce the functionality of supported applications. (See ⚠️ Things to look out for.)
Method 4: Manage Generative AI access per user via Registry Editor
📌 Use Cases: This method allows administrators to deploy Generative AI settings per user. Additionally, it can be deployed for non-domain accounts via logon scripts or incorporated in golden images for provisioning.
⚠️ Warning: Registry misconfigurations can negatively affect overall system functionality. (See ⚠️ Things to look out for.)
📌 Prerequisite: Windows Registry backup
- Press Win + R, type regedit, and press Enter.
- Navigate the following path:
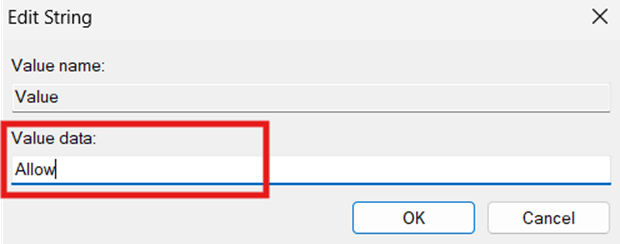
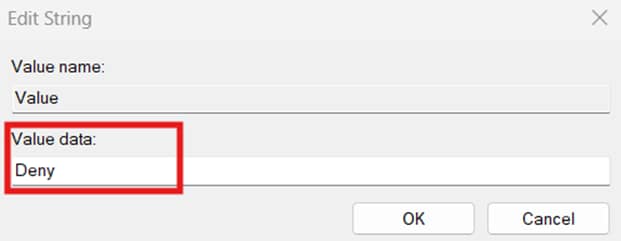
HKEY_CURRENT_USER\Software\Microsoft\Windows\CurrentVersion\CapabilityAccessManager\ConsentStore\generativeAI - Inside the generativeAI subkey, find and double-click Value.

- If these values don’t exist, verify if your device meets the minimum Windows 11 Build 26236 requirement.
- Alternatively, you can launch a generative AI-enabled app to automatically create the key and value.
- Configure Value to match your preferred per-user Generative AI setting:
- Allow: Allows users to use Generative AI with Windows apps.
- Deny: Blocks users from using Generative AI with Windows apps.
- Allow: Allows users to use Generative AI with Windows apps.
- Press OK to apply the new Value data, then restart your device to enforce the change.
💡 Note: Setting the value data of Value to Deny will prevent you from accessing Method 3.
Method 5: Manage Generative AI access for all users via Registry Editor
📌 Use Case: This method is suitable for enforcing Generative AI settings for all users on a local machine.
💡 Note: Enforcing Generative AI access configurations for Windows apps prevents users from configuring it through Settings or the Registry.
📌 Prerequisite: Windows Registry backup
- Press Win + R, type regedit, then press Ctrl + Shift + Enter.
- Navigate the following path:
HKEY_LOCAL_MACHINE\SOFTWARE\Microsoft\Windows\CurrentVersion\CapabilityAccessManager\ConsentStore\generativeAI - Find and double-click Value within the generative AI subkey.
- If the subkey doesn’t exist, check if your device meets the minimum device version for the feature.
- Alternatively, you can launch an app with Generative AI access to automatically create the subkey.
- Configure the value data inside Value to match the behavior you prefer:
- Allow: Enables Generative AI for all users, allowing them to configure the feature’s settings.
- Deny: Disables Generative AI or all users while preventing access to the feature’s settings.
- Restart your device to apply the change.
💡 Tip: You can use an elevated PowerShell to automate this process:
To enable Generative AI:
Set-ItemProperty -Path "HKLM:\SOFTWARE\Microsoft\Windows\CurrentVersion\CapabilityAccessManager\ConsentStore\generativeAI" -Name "Value" -Value "Allow" -Force
To disable Generative AI:
Set-ItemProperty -Path "HKLM:\SOFTWARE\Microsoft\Windows\CurrentVersion\CapabilityAccessManager\ConsentStore\generativeAI" -Name "Value" -Value "Deny" -Force
Method 6: Set Windows app access to Generative AI via Local Group Policy Editor
📌 Use Cases: Administrators can use this method to test Generative AI configurations before deploying them as GPOs for an Active Directory.
📌 Prerequisites: Windows 11 Pro, Enterprise, or Education editions.
- Press Win + R, type gpedit.msc, and press Ctrl + Shift + Enter.
- Go to: Computer Configuration > Administrative Templates > Windows Components > App Privacy
- Locate and double-click Let Windows apps make use of generative AI features of Windows.
- Follow the steps that best reflect the Generative AI behavior you want:
- To enable Generative AI for all users:
- Select the radio button beside Enabled.
- Set the drop-down menu beside Default for all apps to Force Allow.
- Press Apply and then OK.
- To disable Generative AI for all users:
- Select the radio button beside Enabled.
- Set the drop-down menu beside Default for all apps to Force Deny.
- Press Apply and then OK.
- Setting the policy to Not Configured allows users to manage their own Generative AI settings.
- Optionally, admins can specify a Package Family Name to force allow. Deny, or let end users manage access.
- To enable Generative AI for all users:
- Restart your device to apply the changes.
- Alternatively, you can open an elevated PowerShell prompt and enter gpupdate /force.
💡 Note: Enforcing Generative AI configurations for a local machine prevents users from making changes using other methods.
⚠️ Things to look out for
| Risks | Potential Consequences | Reversals |
| Configuring the Registry without a backup | Manual Registry modifications may lead to misconfigurations that can impact system functionality. | Back up your Registry before proceeding for an easy rollback if something goes wrong. |
| Manually configuring the Registry for multiple endpoints | Leveraging the Registry to enforce changes is possible, but can be repetitive and error-prone. | Use PowerShell or logon scripts to automate the configuration process and reduce the risk of misconfigurations. |
| Apps aren’t working as intended | Disabling Generative AI app access may reduce app functionality and support. | Enable Generative AI locally or across an environment to access AI-powered features. |
| Not testing configurations locally before deployment | Insufficient testing can allow misconfigurations to deploy unnoticed, potentially impacting an organization’s workflow. | Test locally to verify changes before deploying any configuration for multiple endpoints. |
Troubleshooting issues when managing Generative AI app access
Issue #1: Generative AI settings are missing
Verify if your device runs at least Windows 11 Insider Build 26236 or later by pressing Win + R and entering winver. If the setting is missing despite having a supported Windows version, organizational policies are likely blocking the feature.
Issue #2: Registry changes for Generative AI app access don’t work
Restart your computer to apply the configuration you’re trying to make. Also, check if your device supports Generative AI access for Windows apps and confirm you’re modifying the correct registry hive.
Modifying Value inside the HKEY_CURRENT_USER hive only works if there’s no enforced configuration for its counterpart inside the HKEY_LOCAL_MACHINE hive. Additionally, check if a Group Policy from your organization is overriding your changes, as this takes precedence over per-user configurations.
Issue #3: Local Group Policy change doesn’t reflect after applying
When applying a Local Group Policy configuration, press Apply and then OK inside the policy to save the change. You’ll also have to restart your device or refresh the policy by entering gpupdate /force using an elevated PowerShell prompt.
Issue #4: App-specific policies override Generative AI configurations
Some apps have their own Generative AI policies that can sometimes override system-level configurations to ensure compliance. These built-in controls can prevent apps from accessing Generative AI features, even if enforced via Group Policy or Registry.
Managing Windows apps’ Generative AI access for compliance
Leverage the steps in this guide to align Generative AI features with your environment’s compliance and privacy requirements. Use Windows Settings for quick configurations of Generative AI features on a local system. Administrators can use Group Policy for enterprise-wide enforcement, and the Registry Editor for deployments via PowerShell or logon scripts.
Related topics:


