

Key Points
How to Unblock a File in Windows 10 and Windows 11
- Methods for unblocking files in Windows: Files can be unblocked via File Properties, Windows SmartScreen prompts, Windows Defender settings, and PowerShell.
- Recommended method for IT teams and MSPs: Use File Properties and Windows Defender settings to configure individual devices or with RDP. Meanwhile, PowerShell is ideal for automation, batch processing, and RMM deployment.
- Risks when unblocking restricted files: Ignoring system warnings can expose endpoints to malware or data breaches. Unblocking should only be done when the file’s source is trusted. IT must also be consulted when taking action in managed environments.
Windows may sometimes prevent you from opening a file that you’ve downloaded or received via email. This usually happens because built-in security tools like the Attachment Manager and Microsoft Defender SmartScreen block potentially harmful files. But what if you’re certain that the file is safe? This guide provides several ways how to unblock a file in Windows 10 and Windows 11.
Methods for manually unblocking files in Windows
Use the table to choose and quickly navigate to your preferred activation steps.
📌 Prerequisites:
- Some methods may require system and network access.
- Some methods can only be triggered through the security prompt or warning.
Choose a Method | 💻 Best for Individual Users | 💻💻💻 Best for Enterprises |
| Method 1: File Properties | ✓ | |
| Method 2: Security Warning Prompt | ✓ | |
| Method 3: Windows Defender | ✓ | ✓ |
| Method 4: PowerShell (single file) | ✓ | |
| Method 5: PowerShell (multiple files) | ✓ |
💡 Tip: Check out the “Things to look out for” section to optimize your action plan and manage risks.
Protect critical data on your Windows devices from malicious files.
Discover the features of NinjaOne Endpoint Security for Windows.
Method 1: Unblocking a file in Windows using the File Properties dialog
To unblock a file that has been blocked by Microsoft Defender SmartScreen or the Windows Attachment Manager, you can follow the steps below.
📌 Use cases: General configuration, RDP
Right-click on the blocked file on your desktop or in Windows Explorer, and select Properties.
- Ensure the General tab is selected at the top of the dialog.
- Under the Security details in the general tab, click to check the Unblock checkbox.
- Click the OK or Apply button in the Properties dialog to complete unblocking the file.
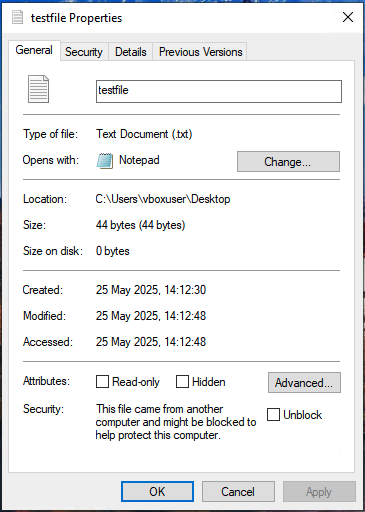
User Account Control (UAC) may prompt you to confirm or enter administrator credentials. If the option to unblock is not present, the file is not blocked, and no action is required.
Method 2: Unblocking a file using the security warning prompt
You can also unblock a file at the time you open it by confirming that you do want to open or run it by using the security warning prompt (if it is displayed).
📌 Use cases: General configuration, RDP
- Attempt to open the blocked file by double-clicking, running, or opening it.
- You will see a security warning prompt asking whether you want to open the file or run the software.
- Uncheck the checkbox for Always ask before opening this file.
- Click Open or Run to continue opening the file and unlock the file for future use.
You may also be prompted for administrator credentials if the file is in a location you do not have permissions to modify.
Method 3: Unblocking a file in Windows Defender SmartScreen settings
If a file or app has been blocked by Windows Defender SmartScreen, you can unblock it by opening the Windows Defender settings via the security prompt.
📌 Use cases: General configuration, RDP
- Attempt to open the block file or app.
- Click on More info in the Windows Smart Screen prompt that warns it prevents an unrecognized app from starting.
- Click the Run anyway button to unblock and run the file.
This action will only apply to the current file. Windows Defender will continue to block suspected threats in other instances.
Method 4: Unblocking a single file in Windows PowerShell
To unblock a single file using PowerShell on any version of Windows 10 or Windows 11, follow these instructions.
📌 Use case: Automation, RMM scripting
- Use Search 🔎 to open Terminal → PowerShell → Run as administrator.
- Run the following script to unblock the selected file:
Unblock-File -Path “PATH_TO_FILE”
👉Tip: Replace PATH_TO_FILE with the correct file path to your file.
- Close Windows Terminal after the process has been completed.
💡 Note: This script may run or fail without displaying any confirmation or prompt. To confirm if changes have been applied successfully, check the corresponding Registry keys or system settings.
Method 5: Unblocking multiple files in Windows PowerShell
You can also unblock all files in a directory using PowerShell.
📌 Use case: Automation, RMM scripting
- Use Search 🔎 to open Terminal → PowerShell → Run as administrator.
- Navigate to the directory that contains the files you want to unblock.
- Run the following script to unblock the selected file: Get-ChildItem “DIRECTORY” | Unblock-File
👉Tip: Replace DIRECTORY with the correct file path.
- Close Windows Terminal after the process has been completed.
Unblocking all files in a folder and its sub-folders using Windows PowerShell
PowerShell also allows you to recurse through directories and unblock all files in a folder and its subfolders.
- Use Search 🔎 to open Terminal → PowerShell → Run as administrator.
- Locate the directory that contains the files you want to unblock.
- Run the PowerShell command:
Get-ChildItem “PATH_TO_FOLDER” -recurse | Unblock-File
👉Tip: Replace PATH_TO_FOLDER with the full path to the folder that contains the files and subdirectories you wish to unblock.
- Close Windows Terminal after the process has been completed.
You should take caution when running PowerShell commands that will affect multiple files, as they will make changes without prompting for confirmation.
⚠️ Things to look out for when unblocking files
Missing something? Consider these scenarios and tips for handling errors, preventing system issues, and reinforcing policies.
Risks | Potential Consequences | Reversals |
| File has restricted access | Unable to unblock the file without administrator-level access | Seek authorization; try again using the required admin user account |
| File originates from an unknown source | Risk of malware or phishing schemes | Scan with updated antivirus software before unblocking; confirm source legitimacy |
| File was blocked by endpoint protection | May indicate it violated company security policy | Review endpoint logs; consult security team before overriding protection |
| File is outdated or an unsupported format | May not be readable or could cause application crashes | Convert to modern format before use; test in an isolated environment |
If you regularly deal with files sent to you from external sources, you should also perform regular anti-malware scans and back up your device regularly as a precaution.
Secure your Windows environment with full visibility and control of every device
Remotely supporting users anywhere and on any device
Downloaded files and attachments are initially categorized as high, moderate, or low risk based on their file type and source. As a result, you may be unable to open a file or receive a warning when the attachment is flagged as a threat.
On personal or home devices, you can unblock these files at your discretion by using File Properties or Windows Defender. However, you should review policies or consult with the IT and security team when attempting to open blocked files in managed environments.
If you’re an IT administrator, consider NinjaOne MDM™ (Mobile Device Management) for remotely supporting users or managing files according to protocols. You can even use it to back up devices or monitor endpoints for unauthorized access or suspicious behavior before or after a malware attack.


