Key Points
- Windows 11 enables administrators and users to hide/show empty drives in File Explorer, reducing UI clutter and streamlining the navigation experience.
- Users can configure drive visibility in a straightforward manner through the Windows Settings app or File Explorer Options.
- Modify the Windows Registry or use PowerShell to enable direct control of HideDrivesWithNoMedia, an ideal method when GUI settings are unavailable.
- Use PowerShell scripts for scalable and repeatable drive visibility management, especially across endpoints via RMM or deployment tools.
- Verify configuration changes to ensure that policies, scripts, or conflicting settings don’t override preferred drive visibility configurations in Windows 11.
Visible empty drives can make the File Explorer’s UI feel cluttered, especially on devices with numerous partitions or drives. While many users benefit from a streamlined navigation experience, others require full visibility into every storage path, empty or not.
These methods show how to hide a drive in Windows 11 for both local endpoints and enterprise deployments. Aside from that, you’ll also learn how to revert changes and troubleshoot issues to ensure reliable storage visibility.
Recommended methods to hide or show empty drives in Windows 11
Windows 11 can automatically hide empty drives, such as card readers, optical drives, and removable USB slots, when no media is present. This simplifies File Explorer navigation for end users, reducing confusion caused by unused drive letters.
In enterprise environments, technicians can enforce empty drive configurations to ensure a consistent UI across endpoints, including shared and kiosk systems. Before applying the methods described below, verify that the following prerequisites are met to ensure a smooth configuration process:
- Windows 11 system
- Administrative rights for PowerShell access and deployment
- File Explorer set to default visibility settings
- Devices with removable drives or card readers installed
📌 Recommended deployment strategies:
Click to Choose a Method | 💻 Best for Individual Users | 💻💻💻 Best for Enterprises |
| Method 1: Change empty drive visibility through Windows Settings | ✓ | |
| Method 2: Use File Explorer options to show or hide empty drives | ✓ | |
| Method 3: Show or hide empty drives by modifying the Registry | ✓ | ✓ |
| Method 4: Leverage PowerShell scripts to automate the procedure | ✓ | ✓ |
| Method 5: Verify empty drive behavior after configuration | ✓ | ✓ |
Method 1: Change empty drive visibility through Windows Settings
The Windows Settings app offers a user-friendly way to control the visibility of empty drives in File Explorer. With just a couple of clicks and lightweight menu navigation, users can instantly customize their UI experience in a scriptless, low-risk manner.
- Press Win + I to open Windows Settings and select System on the sidebar.
- Under System, scroll down and choose Advanced.
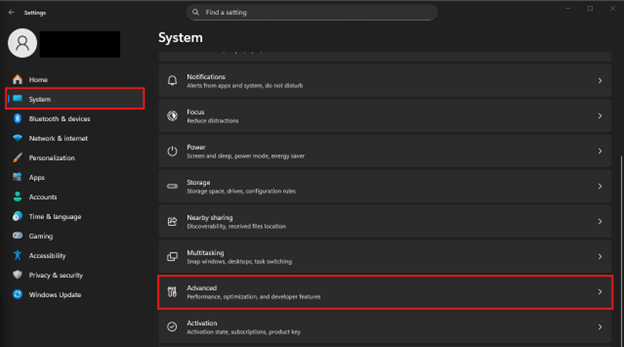
- Press File Explorer and toggle the Show empty drives setting by clicking the switch beside it. (If this option is unavailable in your Windows edition or build, you may use Method 2.)
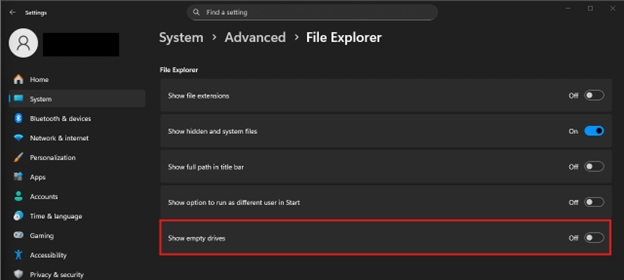
- Off: This option hides empty drives in the File Explorer UI.
- On: Show empty drives in the File Explorer UI.
Method 2: Use File Explorer options to show or hide empty drives
Sometimes the Advanced option under the System tab is hidden, which can prevent end users from toggling the visibility of empty drives. As a workaround, end users can hide or show empty drives in Windows 11 through the Folder Options menu.
📌 Prerequisite: Access to the File Explorer’s Folder Options menu
- Press Win + E to open the File Explorer app.
- Within the File Explorer ribbon, click See more (•••) then select Options.
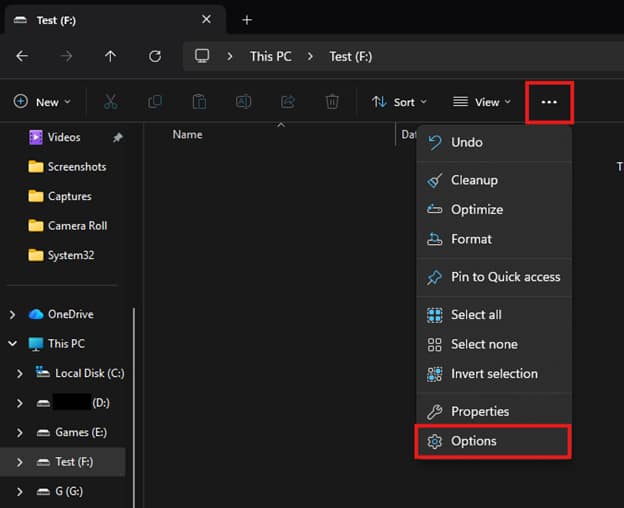
- Inside Folder Options, press the View tab and then look for the Hide empty drives option under Advanced settings.
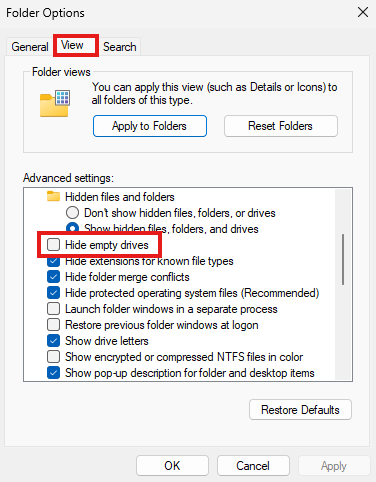
- Select the checkbox to hide empty drives in the File Explorer.
- Clear the checkbox to show empty drives in the File Explorer.
💡 Note: If you made changes using method 1, the Hide empty drives checkbox automatically reflects your preferred configuration.
Method 3: Show or hide empty drives by modifying the Registry
The Windows Registry offers end users and technicians the ability to directly configure the underlying keys that control the visibility of empty File Explorer drives. Although Registry edits are riskier than the previous methods, it’s useful for hardened environments where both GUI options are unavailable.
📌 Prerequisites:
- Windows Registry backup
- Existing HideDrivesWithNoMedia Registry DWORD
- Press Win + R, type regedit, then press Enter.
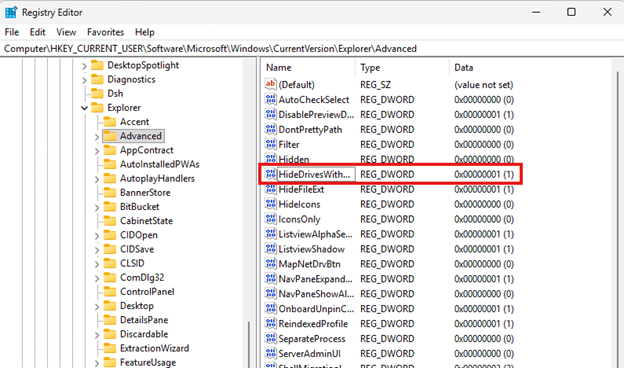
- Navigate the following path inside the Registry Editor:
| HKEY_CURRENT_USER\Software\Microsoft\Windows\CurrentVersion\Explorer\Advanced |
- Double-click the HideDrivesWithNoMedia DWORD value to edit its Value data.
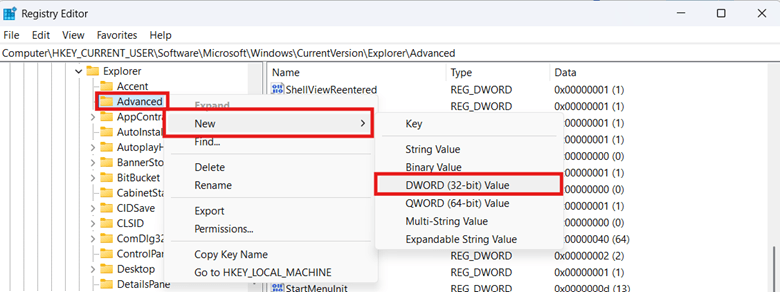
- If the DWORD doesn’t exist, right-click Advanced, select New > DWORD (32-bit), then name it HideDrivesWithNoMedia.
- Set its value data to 0: Show all drives in the File Explorer.
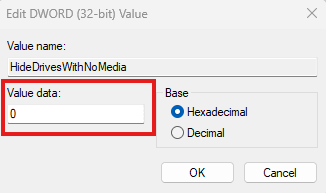
- Set its value data to 1: Hides all empty drives in the File Explorer.
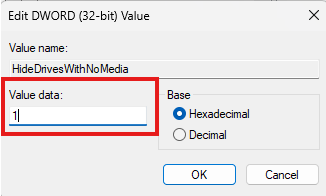
- Press OK, close the Registry Editor, and restart the File Explorer process to apply the change.
💡 Note: This method only enforces the change for the signed-in user account.
Method 4: Leverage PowerShell scripts to automate the procedure
Manually applying registry configurations across multiple endpoints is a highly risky and repetitive task. With that in mind, you can use PowerShell to automate the process, allowing you to deploy the same change consistently across endpoints.
📌 Prerequisite: Elevated privileges to run PowerShell as administrator.
- Open an elevated PowerShell prompt on your target endpoint.
- Enter the following script to hide empty drives:
Set-ItemProperty -Path "HKCU:\Software\Microsoft\Windows\CurrentVersion\Explorer\Advanced" -Name "HideDrivesWithNoMedia" -Value 1 |
- On the other hand, use the script below to show all drive paths in your system:
Set-ItemProperty -Path "HKCU:\Software\Microsoft\Windows\CurrentVersion\Explorer\Advanced" -Name "HideDrivesWithNoMedia" -Value 0 |
- Restart Windows Explorer by executing the following commands:
Stop-Process -Name explorer -ForceStart-Process explorer.exe |
💡 Tip: Deploy this script centrally across endpoints through an RMM or an alternative deployment platform.
Method 5: Verify empty drive behavior after configuration
Once you’ve applied your preferred configuration, the last step is to verify if the visibility changes you made work as intended. Verifying how empty drives behave in real-world scenarios ensures no policies or scripts are interfering with your settings.
- Press Win + E to open File Explorer and select This PC on the sidebar.
- Verify that empty optical drives, card readers, or virtual drives are all hidden.
- Connect a USB drive or disc to the endpoint and verify that the drive appears once it is occupied.
- Remove the media to ensure the drive becomes hidden once unoccupied.
⚠️ Things to look out for
| Risks | Potential Consequences | Reversals |
| Drive still appears when empty. | Users can mistakenly assume the configuration failed, leading to unnecessary reconfiguration. | Verify whether Group Policy hides disks and specific drives, and confirm that no domain or MDM policies are enforcing visibility behavior. |
| The Hide empty drives checkbox is missing in Folder Options. | Missing GUI options can cause confusion or prevent configurations from pushing through. | Check if administrative restrictions, OEM configurations, or hardening tools have removed access to the Folder Options. |
| The registry value is not applying. | Drive visibility can become unpredictable, and administrators can accidentally assume the registry setting is faulty. | Ensure that the DWORD is located under the correct path as specified in Method 3 to avoid silent failures. |
| Drives vanish from File Explorer when plugged in. | Power-saving states, such as USB selective suspend, can cause removable drives to appear as if they are empty or disconnected. | Change the device’s power management settings or try reconnecting the device to confirm if it reappears. |
| Inconsistent drive behavior across sessions or devices. | Inconsistency makes it difficult for admins to standardize behavior across an environment. | Test the configuration on a new user profile, and if the issue disappears, the original profile may be corrupted or misconfigured. |
Considerations when managing drive visibility in Windows 11
Not all endpoints are configured identically, as some can behave differently according to hardware, policies, and system environment. The following points highlight important factors that can impact how Windows handles drive visibility.
Empty drive visibility varies by hardware
Different storage controllers and media readers can influence how Windows displays connected drives. For example, multi-slot card readers often expose each slot as a separate drive letter, because the hardware presents them as available. This may cause more drive entries to appear than expected, even if the HideDrivesWithNoMedia DWORD value is configured to hide empty drives.
Group Policy overrides both registry and user interface settings
In managed environments, policies take precedence over local configurations. That said, if a Group Policy enforces drive visibility configurations, Windows will revert changes made through the GUI or the Registry. As a workaround, you’ll have to adjust the conflicting policy to effectively customize how empty drives appear in your system.
Drive visibility may differ inside virtual machines
Virtual machines, such as Hyper-V or VDI, use abstracted or synthetic storage controllers, which can cause drive states to report differently on physical hardware. This can cause inconsistent drive visibility, depending on how the VM platform presents those devices to the guest OS.
Mapped network drives are not affected by the empty-drive hiding feature
Windows don’t treat mapped network drives the same as removable media, as the former appear based on their connection state, not their media content. That said, they remain visible even when empty, ensuring users can always access the path once the network is available.
Encrypted volumes may remain visible when empty
When hiding empty drives in Windows 11, the feature does not override the security or mount logic of encrypted devices. Drives protected by BitLocker or other encryption tools may appear even when unoccupied, since the OS treats them as mounted volumes once unlocked.
NinjaOne features to support drive visibility configurations
With NinjaOne, you can automate script deployments, streamline provisioning, and gain real-time insights into any configuration drift. The following features make managing empty drive visibility simple, scalable, and reliable.
- Configuration Management: Use NinjaOne’s policy-based automation to centrally manage and monitor your configurations, including drive visibility settings, ensuring consistent empty drive visibility across endpoints.
- Remote script deployment: NinjaOne supports remote PowerShell script deployment, allowing you to deploy scripts across managed endpoints or clients from a single console.
- Real-time device visibility: NinjaOne’s device dashboard and scheduled automations can alert and track drive configuration changes through custom scripts, providing instant insights and helping maintain consistent system configurations.
- Efficient device provisioning: Build policy baselines that reflect your preferred empty drive visibility, then apply them to newly-provisioned devices automatically through NinjaOne.
Hide or remove empty drives from File Explorer at scale
Applying empty drive visibility settings across endpoints provides a cleaner File Explorer UI while offering users a consistent navigation experience across systems. With the option to configure the setting through the GUI, registry, or scripts, you can easily tailor environments according to organizational needs.
Manually applying these configurations for enterprise environments can be error-prone and repetitive, and it gets more difficult as you scale. To simplify this process, you can leverage NinjaOne’s automation, scripting, and policy tools to ensure consistent empty drive behavior across all managed endpoints.
Related topics:
- How to Add E: Drive to File Explorer Navigation Pane in Windows 11
- How to Disable USB Drives on Windows 11 and Windows 10
- How to Change the Removal Policy of External Storage Devices in Windows 11
- How to Hide Disks and Specific Drives from Windows
- How to Add or Remove Duplicate Drives in File Explorer in Windows 10