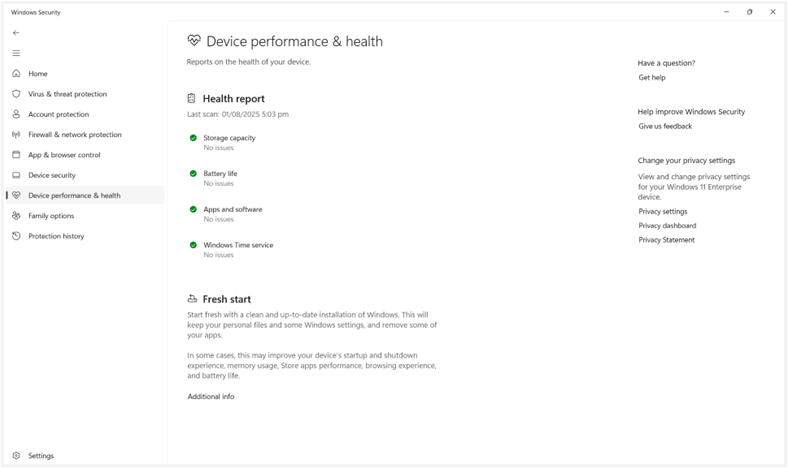
The Device Performance and Health page in Windows Security gives users a quick overview of system health. It reports on key areas such as battery status, storage capacity, drivers, and the Windows Time service. On some versions of Windows, it also includes the Fresh Start feature.
Organizations may hide this page to simplify the interface, limit end-user visibility, or support compliance standards. This guide outlines multiple ways to control the visibility of the Device Performance & Health section, using tools suited for individual machines or enterprise environments.
📌 Recommended deployment strategies:
Click to Choose a Method | 💻 Best for Individual Users | 💻💻💻 Best for Enterprises |
| Method 1: Via Group Policy (per device) | ✓ | |
| Method 2: Via Registry (per machine) | ✓ | ✓ |
| Method 3: Via Command Prompt (per machine) | ✓ | |
| Method 4: Via PowerShell (per machine) | ✓ | ✓ |
| Method 5: Via Group Policy Preferences (enterprise) | ✓ |
Methods to hide or show the Device Performance and Health page in Windows 11
Before using any method below, make sure you meet the following requirements:
📌 General prerequisites:
- Windows 10 version 1709 or later, or Windows 11
- Administrator rights to adjust registry and policy settings
- Familiarity with command-line tools, PowerShell scripting, or Group Policy Management
Method 1: Via Group Policy (per device)
This method uses the Local Group Policy Editor to hide or show the Device Performance and Health page on a per-device basis.
📌 Use Cases:
- Best for managing local machines in a professional environment.
- Use this to prevent users from accessing device health data on shared or restricted systems.
📌 Prerequisites:
- Available only on Windows 10/11 Pro, Enterprise, and Education editions.
Step-by-step:
- Press Win + R, type gpedit.msc, and click Enter to launch Local Group Policy Editor.
- Navigate to: Computer Configuration > Administrative Templates > Windows Components > Windows Security > Device performance and health
- Double-click the Hide the Device performance and health area policy.
- Set it to:
- Enabled – Hides the Device performance and health page.
- Disabled or Not Configured – Shows the page.
- Click Apply, then OK.
- Close the Local Group Policy Editor and restart Windows Security or reboot the system to apply the changes. (Read #4 in ⚠️ Things to look out for.)
Method 2: Via Registry (per machine)
For systems without Group Policy Editor (e.g., Windows Home), this method allows you to apply the setting directly in the registry.
📌 Use Cases:
- Suitable for one-off manual changes on standalone machines.
- Commonly used by advanced users or support teams.
📌 Prerequisites:
- You must be signed in with an administrator account.
⚠️ Warning: Editing the registry can cause system issues. Create a backup before proceeding. (Read #2 in ⚠️ Things to look out for.)
Step-by-step:
- Press Win + R, type regedit, and click Enter to open the Registry Editor.
- Navigate to: HKEY_LOCAL_MACHINE\SOFTWARE\Policies\Microsoft\Windows Defender Security Center\Device performance and health
- If the Device performance and health key doesn’t exist:
- Right-click Windows Defender Security Center or Windows Security
- Select New > Key
- Name it: Device performance and health
- If the Device performance and health key doesn’t exist:
- In the right pane, right-click > New > DWORD (32-bit) Value.
- Name it: UILockdown
- Set the value to:
- 1 – Hide the Device performance and health page
- 0 or delete the value – Show the page.
- Close the Registry Editor and restart Windows Security or your PC to apply the changes. (Read #4 in ⚠️ Things to look out for.)
💡 Note: If you’re using newer Windows builds, the path may be: Windows Security\Device performance and health (Read #1 in ⚠️Things to look out for.)
Method 3: Via Command Prompt (per machine)
This approach uses the Command Prompt to set or remove the required registry key. It’s a fast and repeatable way to apply the setting.
📌 Use Cases:
- Best if you’re incorporating into batch scripts or automation tools.
📌 Prerequisites:
- You must run Command Prompt as an administrator. (Read #3 in ⚠️ Things to look out for.)
Step-by-step:
- Press Win + X and select Command Prompt (Admin) or Windows Terminal (Admin).
- Run one of the following:
- Hide the page:
reg add “HKLM\SOFTWARE\Policies\Microsoft\Windows Defender Security Center\Device performance and health” /v UILockdown /t REG_DWORD /d 1 /f - Show the page:
reg delete “HKLM\SOFTWARE\Policies\Microsoft\Windows Defender Security Center\Device performance and health” /v UILockdown /f
- Hide the page:
- Once done, restart Windows Security or your PC to apply the changes. (Read #4 in ⚠️ Things to look out for.)
Method 4: Via PowerShell (per machine)
PowerShell gives you a powerful and repeatable way to apply the setting. It’s especially useful in scripted deployments or when working with remote devices.
📌 Use Cases:
- Best for provisioning scripts, system imaging, or remote configuration via Windows Management tools.
📌 Prerequisites:
- You must run PowerShell as administrator. (Read #3 in ⚠️ Things to look out for.)
Step-by-step:
- Press Win + S and search for PowerShell.
- Right-click Windows PowerShell and select Run as administrator.
- Run one of the following:
- Hide the page:
New-Item -Path “HKLM:\SOFTWARE\Policies\Microsoft\Windows Defender Security Center\Device performance and health” -Force | Out-Null
Set-ItemProperty -Path “HKLM:\SOFTWARE\Policies\Microsoft\Windows Defender Security Center\Device performance and health” -Name “UILockdown” -Value 1 -Type DWord - Show the page:
Remove-ItemProperty -Path “HKLM:\SOFTWARE\Policies\Microsoft\Windows Defender Security Center\Device performance and health” -Name “UILockdown”
- Hide the page:
- Once done, restart Windows Security or your PC to apply the changes. (Read #4 in ⚠️ Things to look out for.)
Method 5: Via Group Policy Preferences (enterprise)
This enterprise-level method pushes the required registry setting via Group Policy Preferences. It’s designed for environments with Active Directory and centralized environments.
📌 Use Cases:
- Best for organizations deploying the setting across many machines.
- Use this to standardize security configurations across organizational units.
📌 Prerequisites:
- Group Policy Management Console (GPMC) installed on the admin system
- Permission to edit GPOs and link them to Organizational Units (OUs)
Step-by-step:
- Open the Group Policy Management Console (GPMC).
- Navigate to: Computer Configuration > Preferences > Windows Settings > Registry
- Right-click Registry > New > Registry Item.
- To hide:
- Action: Update
- Hive: HKEY_LOCAL_MACHINE
- Key Path: SOFTWARE\Policies\Microsoft\Windows Defender Security Center\Device performance and health
- Value Name: UILockdown
- Value Type: REG_DWORD
- Value Data: 1
- To restore:
- Action: Delete
- Use the same key path and value name
- Link the GPO to the target OU and run gpupdate /force. (Read #5 in ⚠️ Things to look out for.)
- Once done, restart Windows Security or your PC to apply the changes. (Read #4 in ⚠️ Things to look out for.)
⚠️ Things to look out for
| Risks | Potential Consequences | Reversals |
| 1. Editing the wrong registry path or key | May affect unrelated settings or cause UI issues in Windows Security. | Delete or correct the affected registry key and reboot the system. Also, confirm the registry path based on your OS build and update the key location if needed. |
| 2. Editing the registry without a backup | Incorrect edits may cause system instability or break related features. | Back up the registry before changes; delete the UILockdown entry to undo the setting. |
| 3. Running PowerShell or CMD without admin privileges. | Commands may silently fail or return access-denied errors. | Re-run the terminal as administrator, then retry the command. |
| 4. Forgetting to restart Windows Security or reboot the system. | Changes won’t take effect. | Restart Windows Security or reboot the PC. |
| 5. Using Group Policy Preferences without linking the GPO to an OU. | The setting won’t apply to any devices. | Ensure the GPO is linked to the target OU and run gpupdate /force on client machines. |
Additional considerations
Keep these additional points in mind when managing the visibility of the Device Performance and Health page in Windows Security:
The policy applies to all users
The setting is applied at the machine level. If the Device Performance and Health page is hidden, it disappears for every user account on that device. There are no exceptions or per-user controls.
No official ADMX template for this policy
Microsoft doesn’t offer a dedicated ADMX template for this specific policy. In domain environments, IT admins must use Group Policy Preferences (GPP) to deploy the required registry setting across multiple machines.
Hiding doesn’t disable functionality
Hiding the Device Performance and Health page only removed it from view in the Windows Security interface. The underlying health monitoring features continue to run in the background as usual.
No OS reinstall needed
You don’t need to reset or reinstall Windows to apply this change. A simple restart of the device or the Windows Security app is enough for the setting to take effect.
Manage access to the Device Performance and Health in Windows Security
Controlling the visibility of the Device Performance and Health page helps you refine the Windows Security interface to suit individual user or organizational standards. Microsoft offers several ways to do this, including via Group Policy, Registry edits, Command Prompt, PowerShell, and Group Policy Preferences, each suited for different environments and deployment styles.
Related topics:
- Hide Account Protection in Windows Security in Windows 10 and Windows 11
- Configure Local Security Authority Protection in Windows 11
- How to Add Support Contact Information to Windows Security in Windows 10
- How to Create Local Windows Performance Reports
- NinjaOne Performance Monitoring Software Drives Proactive IT Health