

Working with paths using Command Prompt and PowerShell can prove challenging—a single typo can lead to failed commands. That’s why accuracy and precision matter, especially when locating the full path of a file, folder, or executable.
To help reduce mistakes, you can easily add Copy as path to the context menu in Windows, allowing you to get accurate paths with a single click. This guide contains detailed instructions for adding and removing Copy path from the Windows context menu, together with alternative methods to copy file or folder paths, solutions to common issues, and frequently asked questions about the feature.
💡If you learn better visually, watch our video on How to Add Copy Path to Context Menu in Windows 10
How to add Copy path to the Context Menu
⚠️Consider backing up your Windows Registry before proceeding. Incorrect registry changes can lead to system instability, crashes, or software malfunctions.
Add Copy as path to the context menu via Windows Registry Editor
- Open the Windows Registry Editor.
- Press Win + R, type regedit, and then click Enter.
- If prompted by User Account Control (UAC), choose Yes.
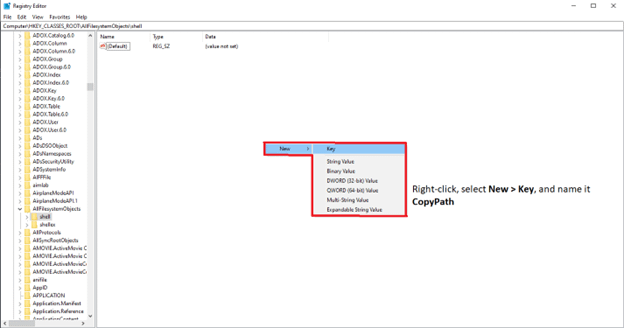
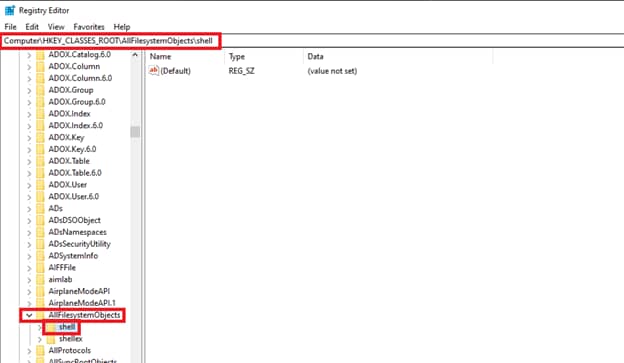
- Navigate to the Context Menu Registry Key.
- Follow the path: HKEY_CLASSES_ROOT\AllFilesystemObjects\shell, as seen in the example below.
- If the shell key doesn’t exist, right-click AllFilesystemObjects, select New > Key, and name it shell.

- Create a Copypath key.
- Right-click inside the shell, select New > Key, and name the created folder CopyPath.
- Right-click inside the shell, select New > Key, and name the created folder CopyPath.
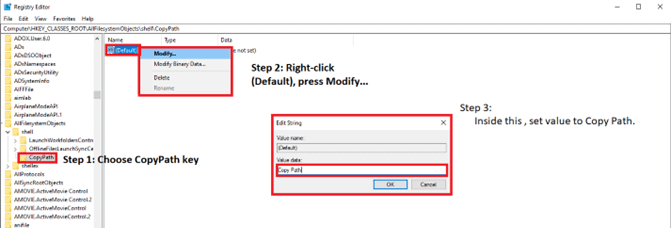
- Modify the newly created CopyPath key.
- Inside the CopyPath key, right-click (Default), then press Modify…, then set its value to Copy Path.
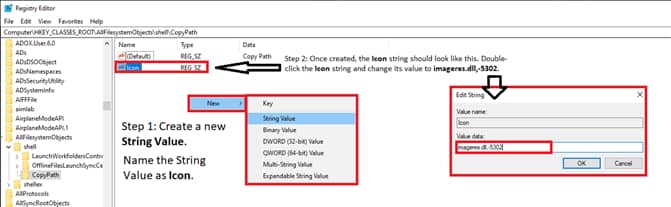
- Create a new String Value named Icon and set its value to imageres.dll,-5302.
- This value adds the correct icon to the Copy Path feature and is completely optional but recommended.
- Inside the CopyPath key, right-click (Default), then press Modify…, then set its value to Copy Path.
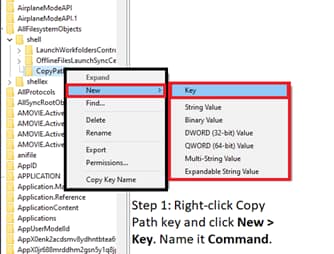
- Create Command under the CopyPath key.
- Right-click the CopyPath key, choose New > Key, then name it Command.
- Select the Command key, and inside it, modify the (Default) value to cmd.exe /c echo “%1″| clip.
- This value sends a selected file or folder’s full path to the clipboard.
- Afterward, click OK.

- Right-click the CopyPath key, choose New > Key, then name it Command.
- Save and Exit Registry Editor
- Close the Registry Editor.
- Right-click any file or folder to verify if the Copy Path option appears in the context menu.
How to remove Copy Path from the context menu
Remove Copy as path from the context menu via Registry Editor
- Open Registry Editor. (Press Win + R, type regedit, and then click Enter.)
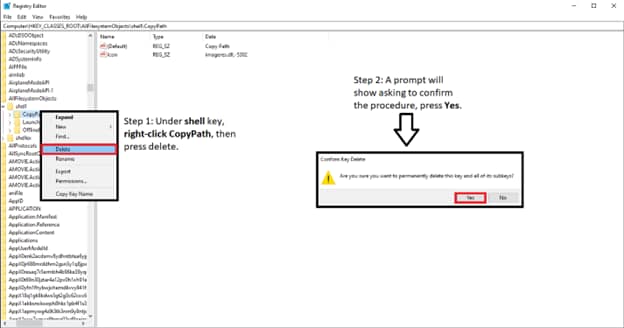
- Navigate to the following key: HKEY_CLASSES_ROOT\AllFilesystemObjects\shell
- Delete the CopyPath key.
- Under shell, right-click CopyPath, then press Delete.
- If there’s a prompt asking to confirm the procedure, press Yes.
- Close the Registry Editor.
- After confirming the deletion process, exit the Registry Editor—the system will immediately remove Copy Path from the context menu.
What is Copy Path in the Windows context menu?
The Copy path option in the Windows context menu allows users to easily copy a folder or file’s path to the clipboard. Additionally, this feature wraps the copied path in quotation marks, making it useful when working with command-line interfaces.
The benefits of using this feature are further amplified in the use cases of scripting, programming, and documentation. Providing users with a ready-to-paste path eliminates the need for manual typing, reducing errors, especially when working with complex path directories.
Why you should add Copy as path to the context menu
Here are some examples of why having the Copy path function enabled can prove beneficial for users:
- Faster process: The Copy path feature’s one-click operation is faster than retrieving a path through the File Explorer ribbon—a process that requires users to manually locate files and folders.
- Eliminates multiple inputs: Another way to access the Copy as path option is to hold the Shift key while right-clicking a selected file or folder. However, you can forego having to press Shift all the time if you add Copy as path to the context menu.
- Improves efficiency: The Copy path option streamlines tasks by providing a full path with just one click. This feature also wraps the path in quotation marks, allowing you to instantly paste the path when scripting, documenting files, or troubleshooting problems using command-line operations.
Alternative ways for copying file or folder paths in Windows 10
Not everyone wants to go through the hassle of tweaking their device settings. Fortunately, several alternative methods exist to copy file or folder paths in Windows, even if you don’t add Copy as path to the context menu.
Using the File Explorer ribbon
- Open File Explorer by pressing Win + E.
- Navigate File Explorer to find the file or folder whose path you want to copy.
- Choose the intended file or folder by left-clicking it.
- On the upper-left side of the File Explorer ribbon, press the Home button.
- Click Copy path to copy the full path of your selected file or folder.
Using Shift + right-click
- Hover your mouse over the intended file or folder.
- While pressing Shift, press right-click.
- Choose Copy as path in the context menu.
Using the File Explorer address bar
- Find the intended folder using the File Explorer.
- Once inside the target folder, click the address bar at the top of the window.
- Press Ctrl + C to copy the folder’s full path.
Note: that the copied full path in this method doesn’t have quotation marks, which can affect its usability in some use cases.
Solving common issues associated with the Copy path feature
‘Copy path’ option doesn’t appear after adding
If the Copy path option doesn’t appear after adding, press Ctrl + Shift + Esc to open the Task Manager. Under the Processes tab, find Windows Explorer, right-click it, and select Restart. However, if you’ve just enabled the feature via the Windows Registry, restarting your computer instead can effectively remediate the issue.
Registry edits not saving
If your registry edits are not saving, double-check if you have the proper clearance to modify the registry. Changes made in the registry won’t stick for those who don’t have the proper administrative privileges.
Accidentally deleted the wrong registry key
Accidentally deleting the wrong registry key can lead to a multitude of issues and potentially harm a device’s entire system. It’s crucial to back up your registry keys before making changes, so if you accidentally delete the wrong key, you’ll have a safety net to recover from.
Add Copy as path to your context menu for an efficient workflow
With just one click, the Copy path feature in Windows 10 enhances efficiency by providing quick access to file and folder paths. The addition of quotation marks on the copied path makes it easier for technicians and administrators to run scripts, document files, and operate command-line interfaces, especially when managing multiple endpoints.
With a few simple registry edits, you can easily add Copy as path to the Windows context menu—and reversing the process is just as easy. Aside from this feature, there are also multiple ways available for copying paths, which can cater to different user preferences and use cases.
Quick-Start Guide
Here are a few methods to add “Copy path” to the context menu in Windows 10:
1. Registry Method:
- Open Registry Editor (regedit)
- Navigate to
HKEY_CLASSES_ROOT\*\shell - Create a new key named “copypath”
- Add a default value with the text you want to appear in the context menu
- Create a subkey called “command” and set its default value to the command for copying the path
2. Quick Method for Existing Windows Feature:
- Hold Shift key while right-clicking a file or folder
- Select “Copy as path” from the context menu
3. Built-in File Explorer Option:
- In File Explorer, go to the Home tab
- Look for “Copy Path” in the ribbon
- You can add this to the Quick Access Toolbar for easy access
We recommend using the built-in Shift + right-click method, as it’s the simplest and doesn’t require registry modifications. If you want a permanent solution without using the Shift key, you might want to look into third-party context menu utilities or use a registry edit.


