


Key Points
- Toggle the Save resources with sleeping tabs setting in Microsoft Edge under Settings > System and performance to manage the feature for an individual profile.
- Configure the SleepingTabsEnabled policy in Group Policy to enforce sleeping tab rules across domain-joined machines.
- Modify the SleepingTabsEnabled DWORD in the Windows Registry under HKLM\SOFTWARE\Policies\Microsoft\Edge for targeted local control.
- Run administrative PowerShell commands to automate sleeping tab registry settings across multiple managed endpoints.
- Import pre-configured .reg files to rapidly deploy enable or disable registry entries without manual key navigation.
To turn Microsoft Edge sleeping tabs on or off, open Settings, select System and performance, then Performance, and switch Save resources with sleeping tabs. IT teams can apply the same setting to many devices with the SleepingTabsEnabled policy through Group Policy, the registry, PowerShell, or a .reg file. Microsoft Edge sleeping tabs pause unused background tabs to save memory and CPU.
Methods for disabling/enabling Microsoft Edge sleeping tabs
Use cases: Users manage sleeping tabs to reduce background CPU and memory usage, especially on resource-limited systems or during intensive tasks. They can disable it or prevent specific tabs from sleeping to avoid unintended interruptions.
Prerequisites: This guide covers Microsoft Edge version 88 or newer on Windows. On newer builds, sleeping tabs are on by default, so check the setting first.
Watch the video on How to Turn the Sleeping Tabs in Microsoft Edge On or Off, which shows how to add sites to the never-sleep exclusion list.
We recommend checking Things to look out for before proceeding.
Recommended deployment strategies:
📌 Recommended deployment strategies:
| Click to Choose a Method | Best for Individual Users | Best for Enterprises |
| Method 1: GUI | ✓ | |
| Method 2: Group Policy | ✓ | |
| Method 3: Registry Editor | ✓ | ✓ |
| Method 4: PowerShell Automation | ✓ | ✓ |
| Method 5: .reg file | ✓ |
Method 1: Enable or disable sleeping tabs via Microsoft Edge settings (GUI)
This method edits Edge’s user profile settings, which are stored in the preferences files.
Use cases: Use this when you’re configuring on a personal or singular device and need instant changes without system restarts. You can also do this to disable the feature during troubleshooting or enable it to prevent critical web apps from sleeping.
- Open Microsoft Edge on your device.
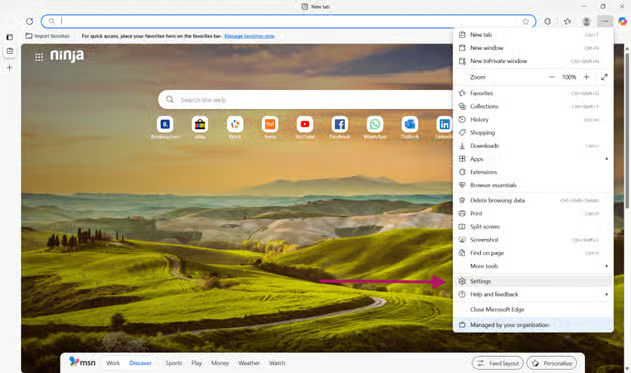
- Click the three-dot menu (⋯) in the top-right corner.
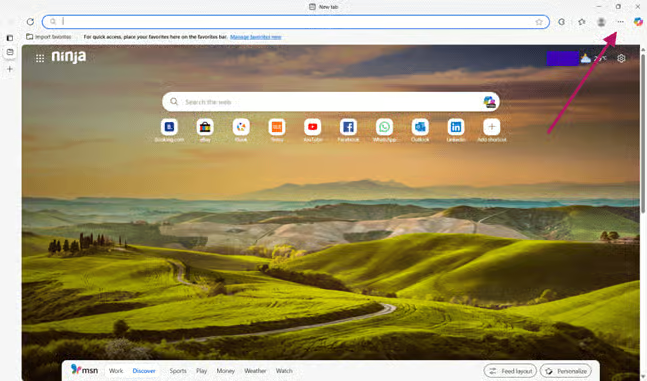
- Select Settings from the dropdown menu.
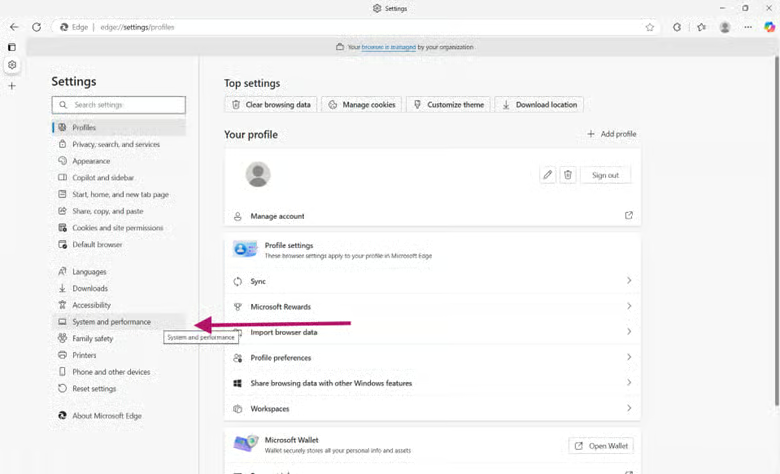
- Go to System and performance in the left sidebar.
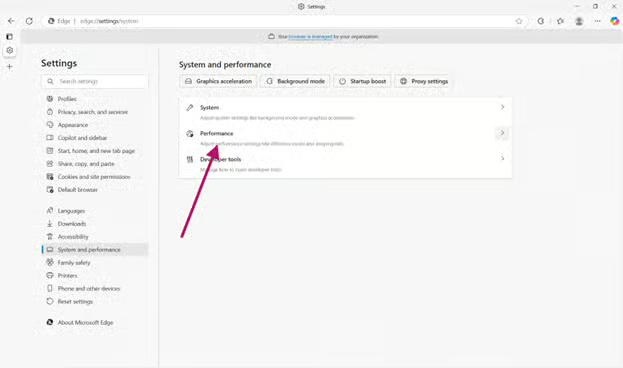
- Click Performance.
- Look for the toggle for Save resources with sleeping tabs:
- Switch ON to enable sleeping tabs (default).
- Switch it OFF to disable the feature entirely.
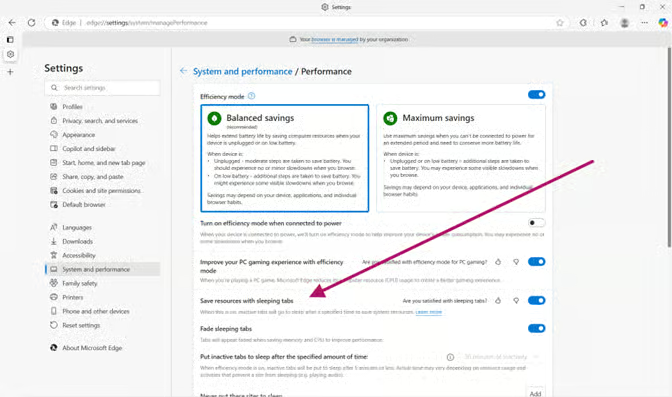
- Optional: Fine-tune the behavior:
- Adjust Put inactive tabs to sleep after, then select how long (e.g., 5 minutes, 2 hours)
- Click Add under Never put these sites to sleep to prevent specific tabs from sleeping.
Changes apply immediately because Edge dynamically reloads the configuration when you modify this menu.
Method 2: Configure via Group Policy
This method pushes registry-based settings to domain-joined Windows 11 machines via Active Directory.
Use case: This is ideal for enforcing standardized performance across multiple devices. This lets you manage the devices without per-user intervention.
- Install the latest ADMX templates, then copy them to C:\Windows\PolicyDefinitions.
- Open Group Policy:
- Press Win + R to open Run, then type gpedit.msc, hit Enter.
- Go to Computer Configuration > Administrative Templates > Microsoft Edge > Sleeping Tabs settings.
- Configure policies:
- Configure sleeping tabs: Set to Enabled to force sleeping tabs on, or Disabled to turn the feature off across the organization.
- Set the background tab inactivity timeout for sleeping tabs: Enable this to set a custom duration before inactive tabs sleep (ranges from 30 seconds to 12 hours).
- Block sleeping tabs on specific sites: Enable this to define a list of domain patterns that must never be put to sleep.
- Apply changes by restarting the device or running gpupdate /force in Command Prompt.
This deploys the sleeping tabs settings across your organization.
Method 3: Configure via Registry Editor
This method manually sets registry keys that Edge reads on startup, overriding local settings.
Warning: Making incorrect changes in the registry can lead to system instability. Back it up before making modifications. Check out Things to look out for before proceeding.
Use case: Ideal for directly editing the Windows Registry for targeted control when Group Policy is not available. Windows 11 Pro/Home users can follow this approach. IT admins can do this when making one-time configurations on devices outside the corporate domain or testing settings before Group Policy deployment.
- Press Win + R to open Run.
- Type regedit, then press Enter to open the Registry Editor.
- Confirm UAC if prompted.
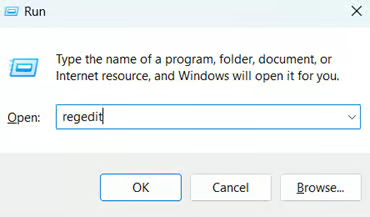
- Go to this address key: HKEY_LOCAL_MACHINE\SOFTWARE\Policies\Microsoft\Edge
- If missing, right-click Microsoft key, then New > Key, name it Edge.
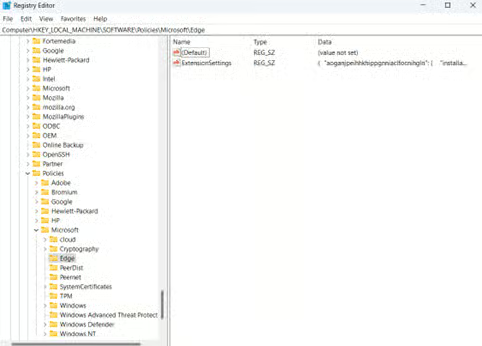
- Modify the SleepingTabsEnabled DWORD.
- If missing, right-click an empty area in the key, then New > DWORD (32-bit) Value.
- Name the new DWORD as SleepingTabsEnabled.
- Set the value to:
- 1 to enable sleeping tabs (default)
- 0 to disable it entirely
- (Optional) Add advanced settings:
- SleepingTabsTimeout DWORD: Set the inactivity time, in seconds, before Edge puts a background tab to sleep (for example, 900 for 15 minutes). Microsoft documents a fixed set of values, from 30 seconds to 12 hours.
- SleepingTabsBlockedForUrls key: Create a subkey named SleepingTabsBlockedForUrls under the Edge key, then add one String Value (REG_SZ) per site, named 1, 2, 3, and so on, with the site URL as the value data.
- Restart Microsoft Edge to apply changes.
Method 4: Automate via PowerShell
These scripts modify the same registry keys as Method 3 but allow bulk deployment via tools like Intune, SCCM, or logon scripts.
Important: You need administrative privileges to run this tool, or your scripts can fail. Check Things to look out for to learn more.
Prerequisites: Administrative privileges
Use case: Ideal for rolling out standardized settings for multiple devices in an organization-wide environment. Quick reversion of settings via script updates.
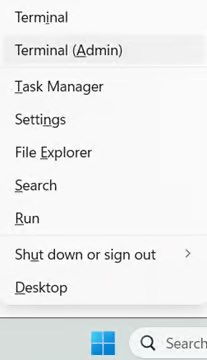
- Press Win + X, then select Terminal (Admin).
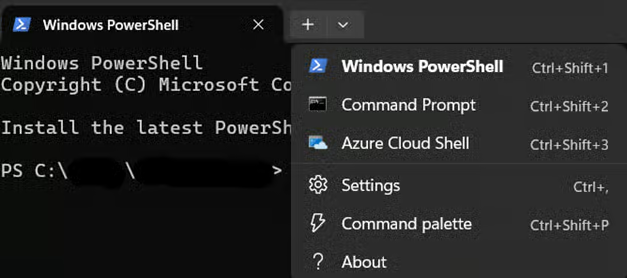
- If PowerShell is not the default command-line tool, click the ▼ dropdown arrow in the tabs above, then select Windows PowerShell.
- Run this command to enable sleeping tabs:
New-Item -Path "HKLM:\SOFTWARE\Policies\Microsoft\Edge" -Force | Out-NullSet-ItemProperty -Path "HKLM:\SOFTWARE\Policies\Microsoft\Edge" -Name "SleepingTabsEnabled" -Value 1
- Run this command to disable sleeping tabs:
Set-ItemProperty -Path "HKLM:\SOFTWARE\Policies\Microsoft\Edge" -Name "SleepingTabsEnabled" -Value 0
Method 5: Deployment via .reg file
Registry files directly inject registry values into Windows 11, achieving identical results to manual Registry/PowerShell methods.
Use cases: Ideal for one-click configurations and quick deployments. This can reset the setting to baseline and is useful in environments where scripting is restricted.
- Create the .reg file:
- Press Win + S, search for Notepad, then open the application.
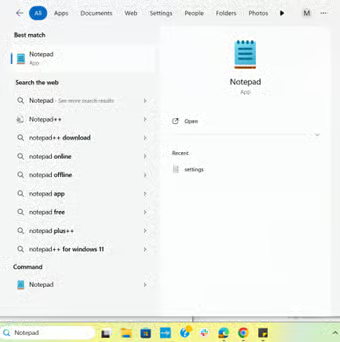
- Paste/write the relevant code:
- To enable sleeping tabs:
Windows Registry Editor Version 5.00
[HKEY_LOCAL_MACHINE\SOFTWARE\Policies\Microsoft\Edge]"SleepingTabsEnabled"=dword:00000001
- To disable sleeping tabs:
Windows Registry Editor Version 5.00
[HKEY_LOCAL_MACHINE\SOFTWARE\Policies\Microsoft\Edge]"SleepingTabsEnabled"=dword:00000000
Warning: Making mistakes with the code input can lead to potential data loss. Read Things to look out for to learn how to fix this.
- Save and execute:
- Save the file as Disable_Sleeping_Tabs.reg or Enable_Sleeping_Tabs.reg (file type: All Files).
- Right-click the .reg file, then select Run as administrator and confirm prompts.
- Reboot and verify:
- Restart your system or Microsoft Edge.
- Use the How to check status procedure to verify.
How to Verify If Policy Changes Took Effect
To check whether your Group Policy, Registry, or PowerShell settings have successfully taken effect in Edge:
- Open Microsoft Edge and type edge://policy in the address bar.
- Click Reload Policies.
- Under the Microsoft Edge policy table, look for SleepingTabsEnabled.
- If configured properly, the value will display true (Enabled) or false (Disabled), and the source will state Mandatory or Recommended.
Things to look out for
This section highlights potential challenges to keep in mind while following this guide.
| Risks | Potential Consequences | Reversals |
| 1. Excluding critical sites from sleep | Accidental exclusion of resource-heavy sites can negate the performance benefits of this feature. | Review blocked sites list (edge://settings/system) and remove non-essential domains |
| 2. Registry edits without backup | This can lead to system instability, Edge crashes, and boot failures. | Delete erroneous keys in Registry Editor, and always keep a system backup. |
| 3. Group Policy misconfiguration | This can lead to org-wide performance issues or unintended tab suspension. | Set GPO to Not Configured > run gpupdate /force in Command Prompt > then verify with edge://policy. |
| 4. Overly aggressive timeout | This can make active tabs sleep mid-task and cause data loss in forms | Reset the timeout to the default (2 hours) in Settings, Group Policy, or the Registry. |
| 5. .reg file errors | This can cause invalid entries, corrupt the registry, and ignore settings. | Edit the .reg file to fix syntax. Re-merge it. You can also delete the invalid keys/code. |
| 6. PowerShell execution without admin rights | Script fails, partial configuration applied. | Rerun as Admin: Right-click PowerShell > Run as administrator. |
Pro tips when configuring sleeping tabs in Microsoft Edge
Before configuring sleeping tabs, keep these factors in mind for optimal performance and control.
Policy settings can override user preferences
If you deploy settings via Group Policy or Registry Editor, they can lock out user-level changes in Microsoft Edge (GUI). Methods 2 to 5 in this guide are ideal for managed environments where the enterprise wants to prevent users from making changes on the device that violate company policies.
Disabling sleeping tabs increases resource consumption
When you turn off sleeping tabs, Edge keeps inactive tabs running, so memory and CPU use can rise, especially on older devices or with many tabs open. Check the effect on a pilot device before you change the setting across your organization.
Exclude real-time tools from sleeping
Always add productivity tools like Microsoft Teams, Zoom, and other live apps/sites to the exclude from sleeping list. It will help avoid meeting disruptions or data gaps.
Future Microsoft Edge updates may change behavior
Microsoft can change how sleeping tabs work in new Edge releases. Test each release with a pilot group before an organization-wide rollout to catch unexpected tab suspensions or compatibility issues with legacy web apps.
Apply Edge settings across many devices
To run the Method 4 PowerShell commands on many devices at once, use NinjaOne Endpoint Management, which can run scripts on a single device or across multiple devices simultaneously. For central control of browser extensions, settings, and blocked websites across Chrome, Edge, and Firefox, see NinjaOne Browser Management.
Improve system efficiency with Microsoft Edge sleeping tabs
Sleeping tabs free memory and CPU by putting inactive background tabs to sleep, which helps most on memory-constrained devices and during heavy multitasking. You can turn the feature on or off from Edge settings, enforce it with Group Policy or the Registry, or deploy it with PowerShell or a .reg file, and you can exclude sites that must stay awake. Test any change on a pilot device before you roll it out more widely.
Related topics:
- How to Enable or Disable Graphics Hardware Acceleration in Microsoft Edge
- How to Turn On or Off Caret Browsing in Microsoft Edge
- How to Enable or Disable Send Do Not Track Requests in Microsoft Edge in Windows 10
- How to Disable Microsoft Edge from Launching at Startup in Windows
- How to Enable or Disable Autofill in Microsoft Edge in Windows 10