

Key Points:
- Turn On or Off Notifications of USB issues via Settings: Open Settings, go to Bluetooth & devices > USB, and toggle Connection notifications on or off.
- Enable or disable USB error notifications via Registry Editor: Use Registry Editor (regedit) to navigate to the appropriate USB notification registry path, modify the DWORD value to enable or disable USB error notifications, and restart the system to apply the changes.
- Deploy via Command Line or Script: Enter the commands below in either PowerShell or Command Prompt to update the USB notification registry value and turn on or off notifications of USB issues in Windows 11 at scale.
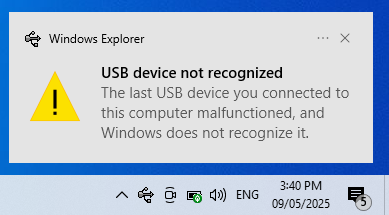
USB issue notifications are system alerts displayed by Windows 10 when it detects a problem with a connected USB device. These typically appear as toast notifications in the lower-right corner of the screen, indicating limited functionality, unrecognized devices, or compatibility warnings.
While these alerts are helpful, they may be unnecessary in controlled environments, such as kiosks, embedded systems, or thin clients, where user interaction is minimal. They can also be distracting when specific USB peripherals consistently trigger harmless notifications. This guide offers a walkthrough on how to enable or disable USB issue notifications in Windows 10.
How to Turn On or Off USB Error Notifications in Windows 11 (Using Settings)
Windows 11 includes a built-in USB settings page that allows you to enable or disable USB issues. Should you turn on notification of USB issues in Windows 11, you’ll receive alerts should there be a problem with a connected USB device. This feature can also report whether the USB issues stem from power limitations, device malfunction, or recognition failure.
Follow these steps to enable Notifications of USB Issues in Windows 11:
- Open Settings (press Windows + I).
- Select Bluetooth & devices from the left pane, then click USB.
- Toggle “Connection notifications” on to enable notifications.
To turn off notifications of USB issues in Windows 11, follow the steps above, but toggle “Connection notifications” to off.
💡 Note: The USB settings page may not appear on all Windows 11 systems, depending on your device’s hardware support and your Windows 11 version. If this option is unavailable, you can use the Registry method.
Enable or disable USB error notifications via Registry Editor
Before you begin, make sure:
- You are using Windows 10 (any edition),
- You have administrative privileges, and
- You have access to the Registry Editor.
Step 1: Open the Registry Editor
⚠️ Warning: Editing the Windows Registry can affect system stability if done incorrectly. Always double-check the key and value names before making changes. It’s strongly recommended to back up the registry or create a system restore point before proceeding.
- Press Win + R to open the Run dialog box.
- Type
regeditand click Enter to open the Registry Editor.
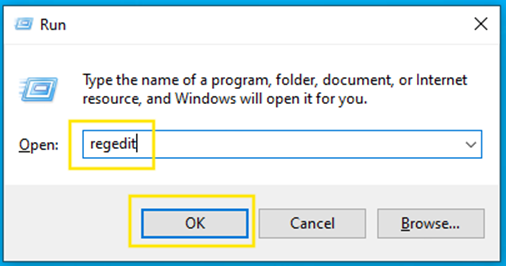
- If prompted by User Account Control (UAC), click Yes.
Step 2: Navigate to the target key
- Navigate to:
HKEY_CURRENT_USER\Software\Microsoft\Shell\USB

If the Notifications key doesn’t exist, you’ll need to create it.
Here’s how:
- Right-click on the Control key.
- Select New > Key.

- Name it: Notifications.

Step 3: Create or modify the DisableDeviceProblemNotifications DWORD
- Click the Notifications key.
- Right-click on an empty area in the right pane.
- Select New > DWORD (32-bit) Value.

- Name it: DisableDeviceProblemNotifications
![]()
- Double-click the new DWORD value and set the Value data to:
- 1 = Disable USB error notifications
- 0 = Enable USB notifications (default)

Step 4: Restart the system
- Close the Registry Editor.
- Click Start > Power > Restart to apply changes.
Deploy via Command Line or Script (optional)
You can also automate the change through the following methods:
Option 1: Using PowerShell
- Press Win + S to open the search bar.
- Type PowerShell.
- Right-click on Windows PowerShell from the search results.
- Select Run as administrator.
- If prompted by UAC, click Yes.
- Run this command.
$regPath = "HKLM:\SYSTEM\CurrentControlSet\Control\Notifications"
if (-not (Test-Path $regPath)) {
New-Item -Path $regPath
}
Set-ItemProperty -Path $regPath -Name "DisableDeviceProblemNotifications" -Value 1
- Press Enter.
Option 2: Using Command Prompt
- Press Win + S to open the search bar.
- Type cmd.
- Right-click on Command Prompt from the search results.
- Select Run as administrator.
- If prompted by UAC, click Yes.
- Run this command:
reg query "HKLM\SYSTEM\CurrentControlSet\Control\Notifications" >nul 2>&1 || reg add "HKLM\SYSTEM\CurrentControlSet\Control\Notifications"
reg add "HKLM\SYSTEM\CurrentControlSet\Control\Notifications" /v DisableDeviceProblemNotifications /t REG_DWORD /d 1 /f
- Press Enter.
Undoing the changes
If you want to re-enable USB error notifications, follow the same steps but change the DWORD value to 0.
Undo command using PowerShell
Set-ItemProperty -Path "HKLM:\SYSTEM\CurrentControlSet\Control\Notifications" -Name "DisableDeviceProblemNotifications" -Value 0
Undo command using Command Prompt
reg add "HKLM\SYSTEM\CurrentControlSet\Control\Notifications" /v DisableDeviceProblemNotifications /t REG_DWORD /d 0 /f
Troubleshooting common issues
Issue: Notifications still appear
If USB error notifications continue to show, it’s possible the registry change didn’t take effect. Here’s what to check:
- Ensure the DisableDeviceProblemNotifications DWORD value is set to 1.
- Confirm that the DWORD is set under the correct key:
HKEY_LOCAL_MACHINE\SYSTEM\CurrentControlSet\Control\Notifications
- Restart the computer after making changes.
Issue: Registry key doesn’t exist
If the registry key doesn’t exist, you’ll need to create it manually. Refer to the above steps for full instructions on creating the Notifications key.
Issue: Devices not working after setting the change
Remember that this registry setting only affects notification behavior, and it doesn’t alter USB device functionality. If a device stops working afterward, the issue is likely unrelated. Try checking the drivers or hardware for actual issues:
- Press Win + X > Device Manager.
- Right-click on the device > Update driver.
Via Group Policy Preferences (GPP)
- Press Win + R to open the Run dialog box.
- Type gpmc.msc and click Enter to open the Group Policy Management Console.
- Navigate to: Forest > Domains > [Your Domain] > Group Policy Objects
- Right-click Group Policy Objects, then select New.
- Name the GPO (e.g., Disable USB Notifications) and click OK.
- Right-click the newly created GPO and select Edit.
- Navigate to: Computer Configuration > Preferences > Windows Settings > Registry
- Right-click Registry, then select New > Registry Item.
- Fill the settings as follows:
- Action: Update
- Hive: HKEY_LOCAL_MACHINE
- Key Path: SYSTEM\CurrentControlSet\Control\Notifications
- Value Name: DisableDeviceProblemNotifications
- Value Type: REG_DWORD
- Value Data: 1 (to disable notifications)
- Base: Decimal
- Click Apply > OK.
Via PowerShell
- Open Notepad and paste the following script:
$regPath = "HKLM:\SYSTEM\CurrentControlSet\Control\Notifications"
# Create the key only if it doesn't already exist
if (-not (Test-Path $regPath)) {
New-Item -Path $regPath
}
# Set the registry value
Set-ItemProperty -Path $regPath -Name "DisableDeviceProblemNotifications" -Value 1
- Save the file as DisableUSBNotifications.ps1
- Press Win + R to open the Run dialog box.
- Type gpmc.msc and click Enter to open the Group Policy Management Console.
- Navigate to: Computer Configuration > Policies > Windows Settings > Scripts (Startup/Shutdown)
- Double-click Startup, then click Add.
- Browse to your .ps1 script, then click OK.
- Press Win + S to open the search bar.
- Type cmd.
- Right-click on Command Prompt from the search results.
- Select Run as administrator.
- If prompted by UAC, click Yes.
- Execute: gpupdate /force
- Press Enter, then restart the target machine to apply changes.
Managing USB issue notifications in Windows 10
Turning off USB issue notifications can help streamline user experience by reducing non-critical alerts, especially in controlled environments. You can suppress these notifications through the Registry Editor, PowerShell, or Group Policy Preferences. Importantly, this setting doesn’t affect the actual functionality or availability of USB devices. It’s an ideal configuration for labs, kiosks, thin clients, and production systems where alerts are unnecessary or distracting.
Quick-Start Guide
There’s a “USB Drive Alert” script that can help you manage USB issue notifications in Windows 10.
Here are the key details:
– The script is called “USB Drive Alert”
– It can alert when a USB drive is detected
– Optionally saves the results to a custom field
To use this feature:
1. Go to NinjaOne’s Automation Library
2. Search for and select the “USB Drive Alert” script
3. Configure it to send notifications or save detection information as needed
If you want more specific control over USB issue notifications, you might want to:
– Consult with your NinjaOne administrator
– Create a custom script tailored to your specific USB monitoring requirements
– Use the existing USB Drive Alert script as a starting point


