


The auto-hide taskbar feature hides the Start bar when not in use. Enabling this feature helps declutter your screen, but some users may prefer a static display that supports accessibility policies.
Whether you’re maximizing space on small devices or keeping desktop behavior consistent, custom features are a step towards controlled system management. Here’s how to configure the “Automatically hide the taskbar” feature in Windows 11.
For a visual breakdown of this topic, watch How to Enable or Disable “Automatically Hide the Taskbar” in Windows 11.
How to auto-hide the taskbar in Windows 11
The taskbar is a major part of the Windows interface that displays the time, date, background programs, and more. Exercise caution and select the method that best fits your organization’s needs.
📌 Prerequisites:
- Any edition of Windows 11
- Administrator privileges (for Registry Editor or PowerShell)
- No policies restricting taskbar changes.
📌 Recommended deployment strategies:
| Click to Choose a Method | 💻 Best for Individual Users | 💻💻💻 Best for Enterprises |
| Method 1: GUI | ✓ | |
| Method 2: CMD | ✓ | |
| Method 3: Registry | ✓ | |
| Method 4: PowerShell | ✓ | ✓ |
Method 1: Enable or disable via Settings app (GUI)
Windows 11 comes with a built-in, user-friendly option for hiding/unhiding the current user’s taskbar.
📌 Use Case: Support-led setting changes
- Press Win + I to open Settings.
- Go to Personalization > Taskbar.
- Expand Taskbar behaviors.
- To auto-hide the taskbar, select Automatically hide the taskbar.
- To stop the taskbar from auto-hiding, clear Automatically hide the taskbar.
Method 2: Enable or disable via Command Prompt
Use Command Prompt’s lightweight shell to quickly deploy system commands on legacy systems.
📌 Use Case: Deploy batch scripts on any Windows operating system.
- Press Win + R, type cmd, and press Enter.
- To auto-hide the taskbar, run this command:
powershell -command "&{$p='HKCU:SOFTWARE\Microsoft\Windows\CurrentVersion\Explorer\StuckRects3';$v=(Get-ItemProperty -Path $p).Settings;$v[8]=3;&Set-ItemProperty -Path $p -Name Settings -Value $v;&Stop-Process -f -ProcessName explorer}"
- To keep the taskbar unhidden, run this command:
powershell -command "&{$p= 'HKCU:SOFTWARE\Microsoft\Windows\CurrentVersion\Explorer\StuckRects3' ;$v=(Get-ItemProperty -Path $p).Settings;$v[8]=2;&Set-ItemProperty -Path $p -Name Settings -Value $v;&Stop-Process -f -ProcessName explorer}"
Method 3: Enable or disable via Registry Editor
⚠️ This method requires administrator rights and modifies important system settings. Before you proceed, prepare a backup.
Edit Registry values to establish your desired taskbar settings while restricting user changes.
📌 Use Case: System-wide changes
- Press Win + R, type Regedit, and tap Enter.
- Navigate to:
HKEY_CURRENT_USER\Software\Microsoft\Windows\CurrentVersion\Explorer\StuckRects3
- Double-click the Settings binary value.
- Find the 8th byte in the second row (offset 00000008).
- Modifying the correct binary value is essential to maintaining feature functionality. See risks here.
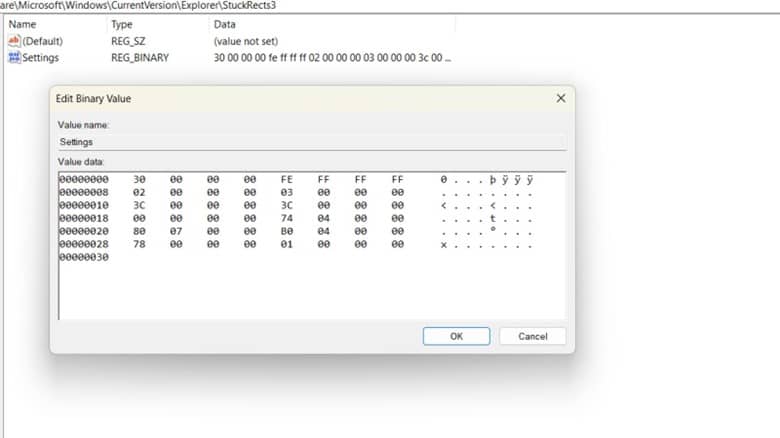
- Modify the value:
- To enable auto-hide, type 22 (hex).
- To disable auto-hide, type 02 (hex).
- Click OK.
- Restart Explorer to apply your changes.
- Press Win + R, type cmd, and hit Enter.
- Run the following commands:
taskkill /f /im explorer.exe
start explorer.exe
Method 4: PowerShell script to toggle auto-hide
📌 Use Cases: Deploy scripts that automatically configure the taskbar on a workstation/multiple devices.
📌 Prerequisite: Administrator privileges
PowerShell’s seamless integration with Windows computers lets you modify Registry values from one place, streamlining repetitive tasks.
- Press Win + R, type PowerShell, and tap Enter.
- To enable auto-hide, run this script:
$bytes = (Get-ItemProperty -Path "HKCU:\Software\Microsoft\Windows\CurrentVersion\Explorer\StuckRects3" -Name Settings).Settings
$bytes[8] = 0x22
Set-ItemProperty -Path "HKCU:\Software\Microsoft\Windows\CurrentVersion\Explorer\StuckRects3" -Name Settings -Value $bytes
Stop-Process -Name explorer -Force
- To disable auto-hide, run this script:
$bytes = (Get-ItemProperty -Path "HKCU:\Software\Microsoft\Windows\CurrentVersion\Explorer\StuckRects3" -Name Settings).Settings
$bytes[8] = 0x02
Set-ItemProperty -Path "HKCU:\Software\Microsoft\Windows\CurrentVersion\Explorer\StuckRects3" -Name Settings -Value $bytes
Stop-Process -Name explorer -Force
- Restart Explorer to apply your changes.
- Press Win + R, type cmd, and press Enter.
- Run the following commands:
taskkill /f /im explorer.exe
start explorer.exe
💡 After configuring the auto-hide taskbar feature, export a .REG file of your registry settings to serve as your backup.
⚠️ Things to look out for
| Risks | Consequences | Reversals |
| A user’s misclick in the taskbar settings | The taskbar may hide/unhide unexpectedly. | Simply toggle the feature in Settings > Personalization > Taskbar. |
| Registry value typo | The taskbar may not behave as expected. It may affect other UI elements. | Manually revert changes by going into your Registry or executing a .REG backup file. Use System Restore. |
| Incorrect script syntax | Silent changes to taskbar behaviour may confuse end-users. Potential stability issues. | Use a restore point. |
Additional considerations on how to auto-hide the taskbar
Keep these factors in mind while configuring the auto-hide taskbar setting.
Multi-monitor behavior
When using multiple monitors, your taskbar can be configured to appear either on every screen or on your main display. As such, you’ll need to be more specific with your settings to fully hide/unhide your taskbar across all monitors.
If your auto-hide taskbar feature is not working as expected, easily customize its behavior by going to Settings > Personalize > Taskbar > Taskbar behaviors.
Touch input
Hiding the taskbar on touchscreen devices improves screen real estate but reduces usability. This can make accessing important apps and files more difficult, potentially reducing accessibility. To fix this, Windows introduced separate auto-hide taskbar toggles for desktop mode and tablet mode, so keep these in mind.
User experience
A disappearing taskbar can confuse some users, especially those who are used to default display settings. Consider your organization’s needs and prioritize user-friendly display settings to keep your workplace productive.
Script testing
Thoroughly test your scripts on low-impact profiles/virtual machines before rolling them out. This helps identify any policy conflicts. These commands also modify your system settings and require admin permissions, so stay on the safe side and validate your code.
Manage the auto-hide taskbar feature for smooth workflows
Adding the auto-hide taskbar Windows 11 feature to your IT admin’s toolkit empowers you to optimize your digital work environment. While removing on-screen features gives you more room to work, other environments value accessibility over personalization, so choose carefully.
Your taskbar acts as a system dock for all your active apps. Streamline your processes as your enterprise evolves with scalable solutions that make endpoint management a breeze.
Related topics:


